Starting a new online business is both exciting and stressful. You have high hopes for your products and want to make a huge impact, but there are also so many things you don’t know about eCommerce. Because of these frustrating roadblocks, many have chosen Shopify as their starting point since the platform offers more than one tier, some of which are relatively basic.
However, we believe help is still needed, therefore, we’re going to help you start a Shopify store without all the confusing technical terms. We’ll take you step-by-step through the process of how to build a successful Shopify store so you can get started quickly and easily. By the end of this guide, you’ll have your store up and running in no time!
Table of Contents
How to Start a Shopify Store: Before You Start
Shopify is a popular eCommerce platform that provides merchants with everything they need to set up and run a successful online store. Being easy to use, scalable, and having a wide range of features and integrations are the reasons why businesses are adopting Shopify for their eCommerce solutions.

There are many eCommerce platforms out there, however, many entrepreneurs would still consider Shopify to be the best choice for their businesses. Some key reasons for utilizing Shopify include:
- User-Friendly Interface: Shopify stands out for its user-friendly design, catering to entrepreneurs and businesses with limited coding experience. Its intuitive interface empowers users to easily set up and customize their online stores without grappling with complex technicalities. This accessibility fosters a more inclusive environment for individuals from various backgrounds to embark on their eCommerce journey.
- Comprehensive Feature Set: One of the cornerstones of Shopify’s appeal is its all-encompassing suite of features that are pivotal for managing a thriving online store. From seamless product management, efficient inventory tracking, streamlined order processing, and secure payment gateways, to reliable shipping solutions, Shopify offers a cohesive ecosystem that simplifies the complexities of eCommerce operations. This holistic approach saves businesses from the hassle of cobbling together disparate tools and systems, enabling them to focus on creating a successful online store through enhancing their products, and customer experience.
- Seamless Integrations: Shopify’s extensive array of integrations is a pivotal factor in its widespread adoption. These integrations empower businesses to seamlessly connect their online stores with a multitude of external tools and services. Whether it’s integrating with accounting software to streamline financial processes, leveraging marketing tools to amplify brand presence, or collaborating with various shipping carriers for efficient logistics, Shopify’s interoperability fosters a dynamic eCommerce ecosystem tailored to individual business needs.
- Scalability for Growth: The flexibility inherent in Shopify’s architecture positions it as a platform primed for business expansion. As companies experience growth and increased traffic, Shopify can adeptly accommodate the surge in demand. This scalability ensures that businesses can confidently pursue their growth trajectory without encountering technical bottlenecks or performance hiccups. From modest beginnings to burgeoning enterprises, Shopify’s adaptable infrastructure grows alongside its users’ aspirations.
- Round-the-Clock Support: Recognizing the significance of ongoing assistance, Shopify offers comprehensive 24/7 support services. Through live chat, phone, and email channels, entrepreneurs are assured of continuous guidance as they navigate the intricacies of launching their websites or migrating from alternative platforms. This commitment to customer support not only expedites the onboarding process but also provides a safety net for addressing challenges and ensuring the smooth operation of online stores.
Starting a Shopify store just takes 30 minutes. This includes adding products, setting up payment methods and shipping rates, and configuring the store’s settings. Once the store is up and running, it can take some time to add more products and optimize the site for search engines. Overall, building a Shopify store is quick and easy, and businesses can be up and running in no time.
Decide on a Target Audience
The target audience is the specific group of people that a business’s marketing efforts focus on. It’s critical that you understand who your target audience is. It helps your company figure out how to reach people at the right time with the right message, offer, or product, increase conversion rates, and drive more sales.
There are a few key ways to go about deciding on your target audience. The first is to identify your ideal customer. There are numerous ways to do this, including market research, surveys, and interviews. Once you have an idea of who your ideal customer is, you can then start to segment them into different groups based on factors like age, gender, location, interests, and income level.

Another way to decide on your target audience is to look at your current customer base. This information can help you improve your marketing and make sure that you’re targeting the right audience.
To sell online, you need to know that every touchpoint a potential customer has with your business should be tailored to their needs and interests. By doing this, you’ll be able to build a strong relationship with your target audience and turn them into loyal customers.
Make a Business Plan
One of the most important steps you need to know before you start setting up your online store is choosing the products you want to sell. But when you complete step one: deciding your target audience, you’re already halfway there.
There are numerous ways to find profitable products or services:
- Market Research Through Competitor Analysis: Investigating successful stores within your niche offers valuable insights into consumer preferences and trending products. Analyze these competitors to identify their top-selling items, pricing strategies, and unique value propositions. This enables you to understand the demand landscape and potential gaps that your products or services could fill, positioning you for competitive advantage.
- Engagement in Relevant Online Communities: Joining online communities that cater to your chosen niche can be a goldmine of ideas. Engage in discussions, gather feedback, and observe conversations about products or services that resonate with the community’s members. These interactions provide firsthand insights into the needs and preferences of your target audience, guiding you toward offerings that are likely to gain traction.
- Monitoring Trending Products or Services: Staying attuned to emerging trends in the market is crucial. Follow industry news, social media, and popular online platforms to spot new and innovative products or services that are gaining momentum. By capitalizing on these trends early, you can tap into the heightened demand and excitement surrounding novel offerings, potentially leading to rapid growth and profitability.
- Identifying Gaps in the Market: Thoroughly researching the competition allows you to identify underserved areas within your chosen industry. Look for pain points, unmet needs, or segments that are overlooked by existing players. By catering to these gaps, you position yourself as a solution provider, attracting customers who are seeking alternatives or enhancements to existing products or services.
- Pursuing Your Passion: Selling products or services that align with your own interests and passions can yield multiple benefits. When you’re genuinely enthusiastic about what you offer, your dedication shines through in your marketing efforts and customer interactions. This authenticity resonates with customers and builds trust, potentially leading to brand loyalty and word-of-mouth referrals. Moreover, your personal investment in the offerings can drive continuous improvement and innovation.
Once you have an idea of what products you want to sell, it’s time to choose a business name. This is an important decision as it will be the first impression that potential customers have of your business but you shouldn’t spend too much time on it.
Your business name should be reflective of the products you sell. For example, if you’re selling pet supplies, you could choose a name like Best Pets or Pet Supplies Plus. Alternatively, you could choose a name that is more general such as The Pet Store. We recommend the last name because adding store or shop in the name will help you find a domain name easily.
Can You Start Your Shopify Store Without a Tax ID?
The requirements for creating a Shopify store depend on how you want to run your business. If you plan to register or have already registered a business, you will need to provide a tax ID. However, you do not need a Tax ID to set up a Shopify store.
To create an account, you will need to provide your personal information (name, address, email, etc.), as well as have a valid credit or debit card. Once your store is set up, you can choose to add your Tax ID if you wish to do so. This is not required but may be beneficial depending on your business’s needs.
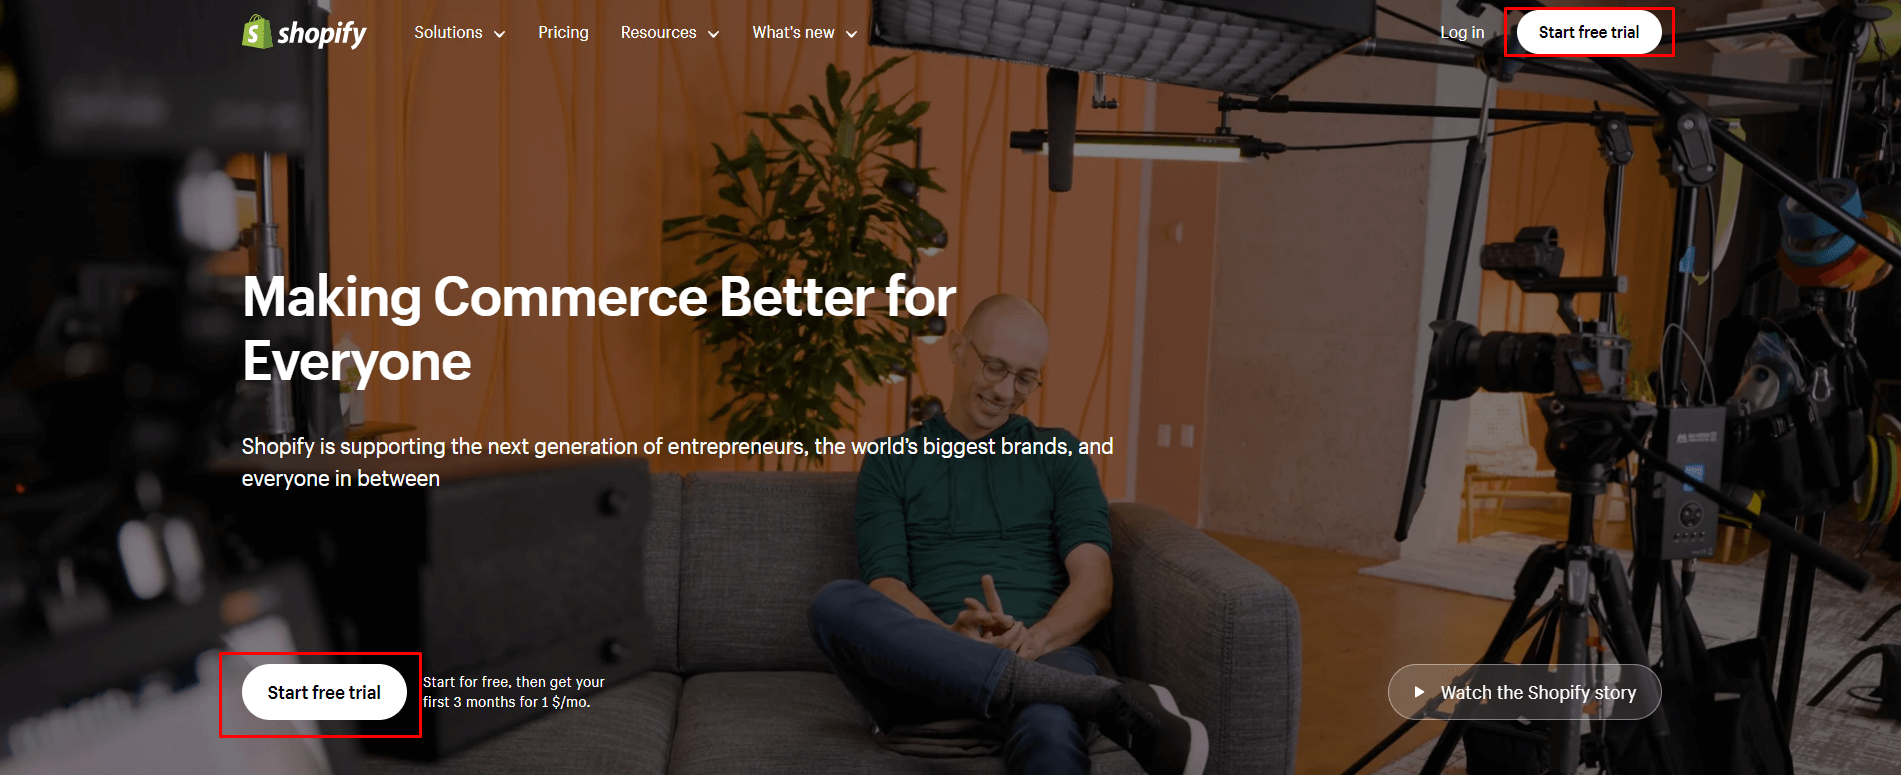
Start a Free Trial
The next step you need to do before you create a Shopify store is to start a Shopify free trial. You should start it because you need to test whether Shopify is the right eCommerce platform for you and it’s free so you have nothing to lose.
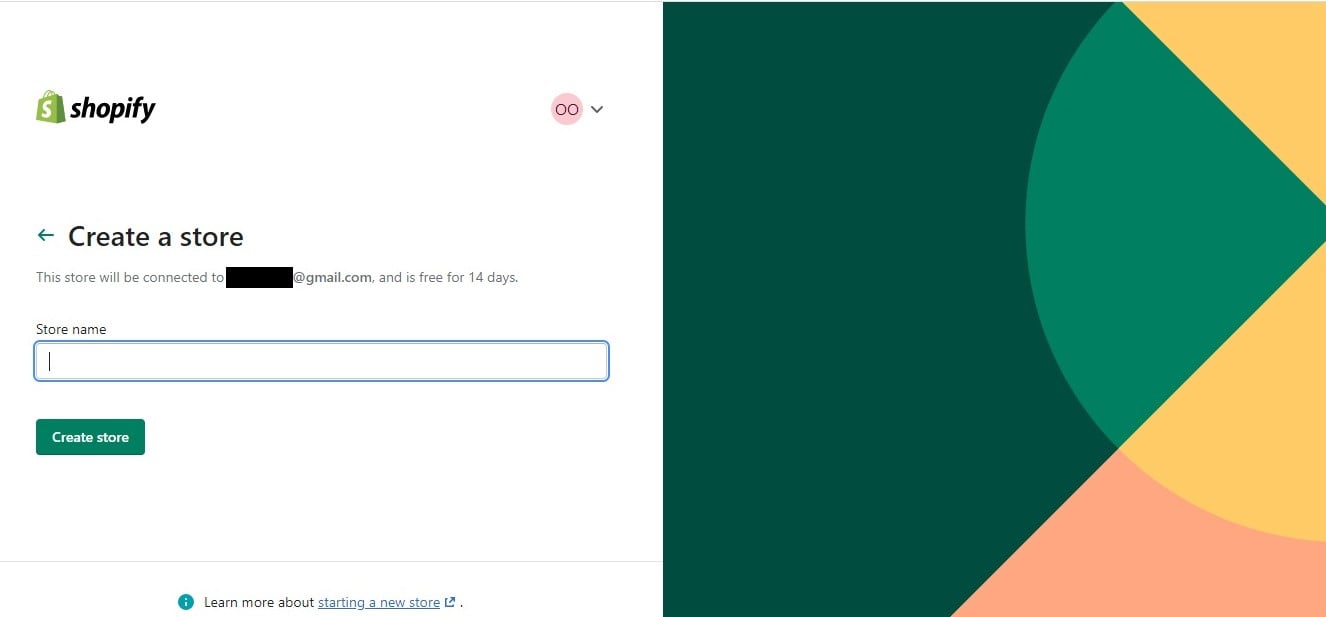
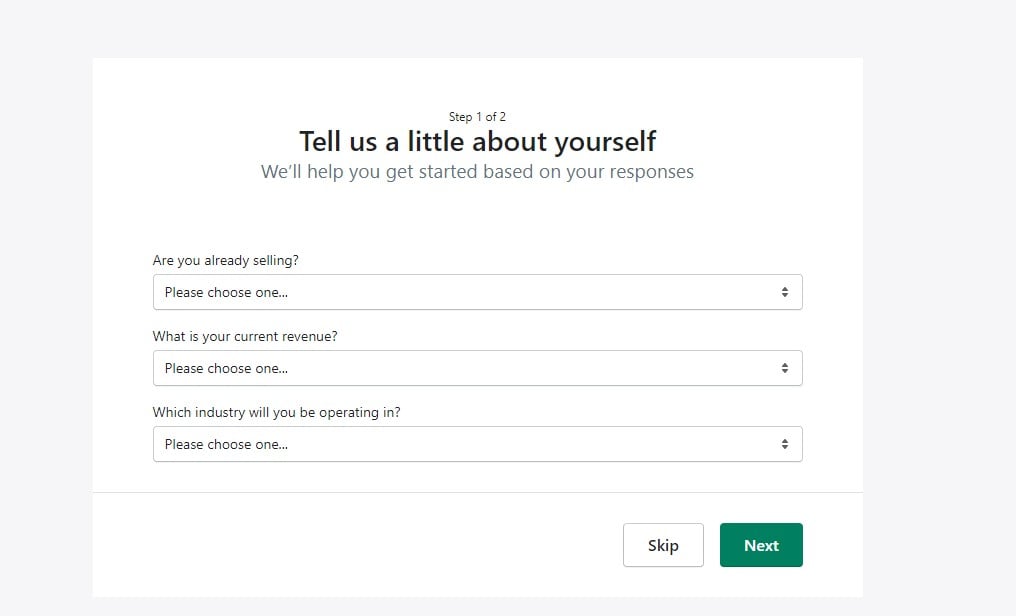
After you sign up for your free trial, you can begin working on building your store immediately. You don’t need to enter any credit card information upfront, but Shopify will ask a few questions. The most important detail it needs from you is what you would like your store name to be because it will form part of your default Shopify URL.
As we said before, don’t spend too much time on this. If you can’t come up with a great store name or URL, Shopify will automatically generate one for you. You can change this automatic URL at a later stage, but remember, you can just change it only once. Of course, you can buy a custom domain for your store whenever you and this will be the web address that your customers see, rather than the myshopify one.
Something prominent about Shopify’s free trial is that you won’t lose progress on your store if you decide to upgrade to a paid plan. Moreover, if you opt for a paid subscription during your trial period, then you don’t get charged until after the free trial expires.
The free trial for all the Shopify pricing plans (Shopify Starter, Basic Shopify, Shopify, and Advanced Shopify) gives you access to many features needed to create and run an online business. It is also a great opportunity to learn how these features can help with marketing your products and building your business.
Before you embark on your Shopify store journey, it’s crucial to lay the right foundation. Our informative video below guides you through the essential steps of preparation, ensuring you start your online store venture on the right foot.
Step-by-step Shopify Store setup
Create Your Shopify Account
Before you begin, create your Shopify account if you haven’t already. You’ll only need an email address and password; no confirmation is required just yet. Then, fill in a name for your store, it has to be unique or you’re able to purchase a domain on Shopify.
From there, continue by filling in a few more personal details about what you plan to sell. This allows Shopify to configure things like taxes and currencies based on the information provided.
Below is a streamlined checklist of the prerequisites and our experience in preparations for creating a Shopify store.
- Business Concept: Identify your niche, target audience, and what makes your products or services unique. Think about the problems your products solve or the value they add to your customers’ lives. All of these items need to be completed before you start and create your own Shopify store. Having a clear business concept will guide your marketing efforts, product selection, and overall brand messaging.
- Store Name: As we mentioned in the previous section, you can change your name anytime you want. However, your name has a huge influence on your domain name and you can only modify your domain name once. Thus, choosing a catchy and memorable store name is crucial as it’s one of the first things customers will notice about your brand and it can last with your business forever. Ensure your store name reflects your business concept and appeals to your target audience.
- Brand Logo: Your brand logo is a visual representation of your store and plays a significant role in building brand recognition. Work with a designer or use online tools to create a logo that’s both unique and reflective of your brand’s personality.
- Imagery: High-quality imagery is crucial for showcasing your products and creating a visually appealing online store. Use clear, well-lit product photos to highlight the details of your products. If possible, include lifestyle images that show your products in use, helping customers visualize them in their own lives.
Add Your Products
You need to choose your product range before you spend time customizing a store theme because the products you sell will have an enormous impact on the appearance of your store. You don’t want to customize your store theme first and then realize that your product photos or categories don’t work well with it.
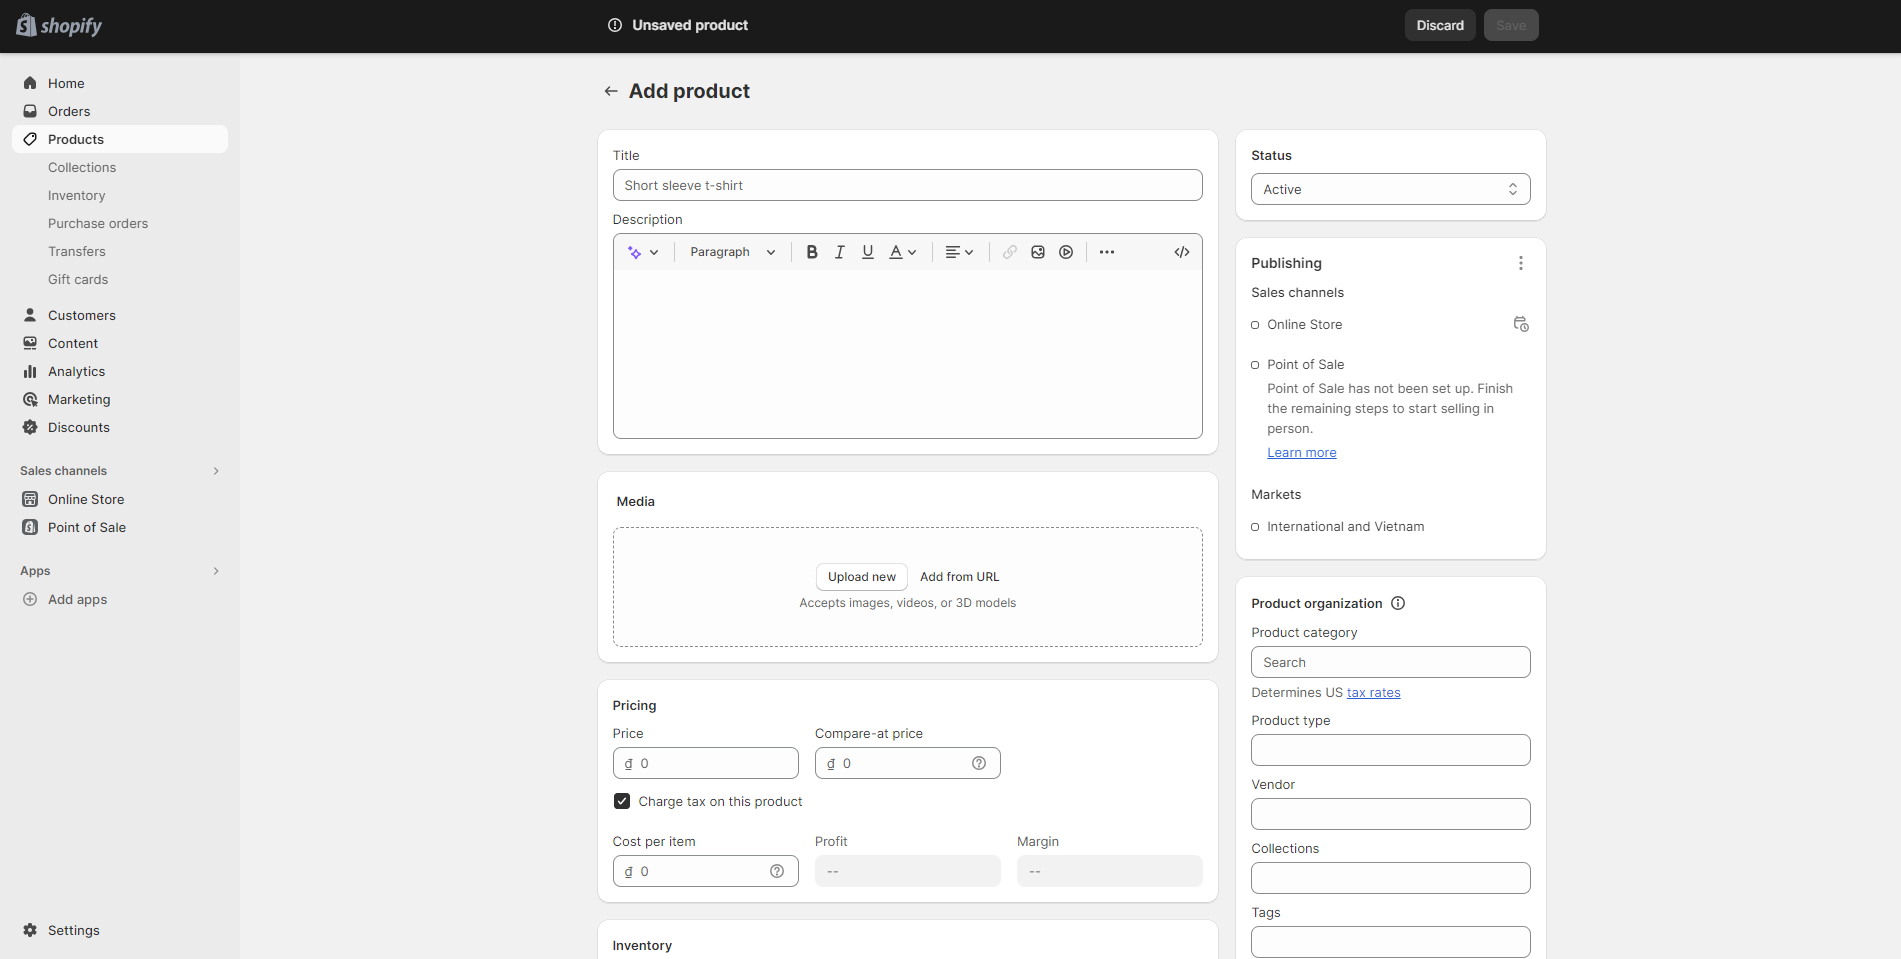
To add new products to your store, go to Products -> Add your products in your Shopify dashboard. Then, you need to add some details about your products.
Product content: Title And Description, Media
Your product title and description are some of the first things your customers will encounter when they come across your store website. Because of this, these elements must be well-displayed and informative.
Details like sizing, pricing, images, videos, and text can all make a huge difference in whether or not a customer decides to buy from you. If you’re feeling stuck, try looking at what other businesses in your market are doing for inspiration.
The title of your product is one of the first things customers will notice when they browse through your store or come across it on a search engine. Keep the title short, clear, and to the point so that people know what they’re looking at and can easily find what they want in your catalog.
Additionally, make sure the product title is engaging enough to capture the customer’s attention – you want it to be reflective of the great content within!
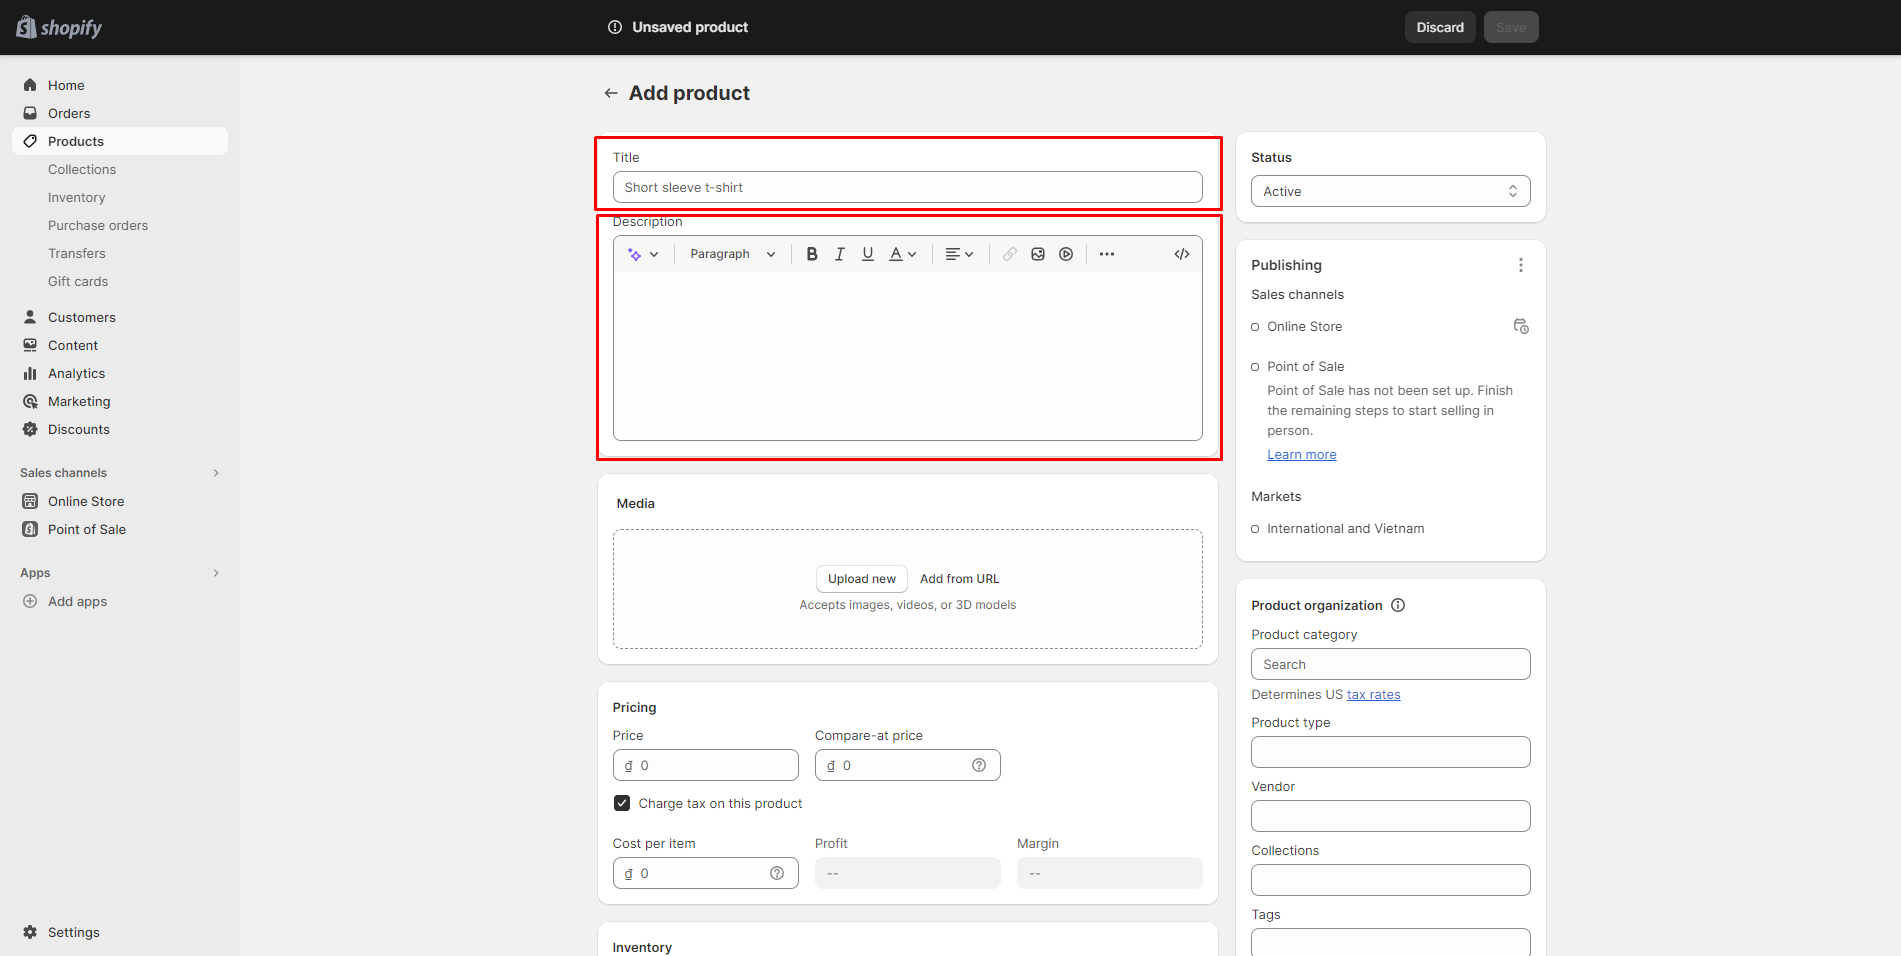
The next thing you should consider is the product description. This gives you the opportunity to describe and sell your product effectively. You don’t need to be a professional writer to write an interesting description, you just need a strategy:
- Knowing your customers: This means you know who you are talking to. Use the information in the step Decide on a target audience to draw your customer personas and customize your descriptions so that it can make your customers feel confident buying your product.
- Display what sets you apart: Does your store have a great return policy or free shipping? Are your products environmentally friendly? Think about which features, benefits, and offers are most important and get the most out of them. A lot of retailers use a combination of text and icons to show these key selling points on their product pages.
- Anticipate customer intentions and questions: Try to find out what makes your customer nervous when buying. Do they feel unsafe about not paying with cash? Are they curious about where your product comes from?…
- Make your descriptions easy to read: Help your customers easily understand your products by writing descriptions in short, easy-to-read paragraphs with subheadings, bullet points, and bolded text.
- Help customers see the solutions in your products: It can be difficult for customers to imagine using your product if they can’t taste, feel, touch, or try it on. Utilize high-quality photos that show off your product. You can also list the materials used in production or share the story of how the item was made – this all depends on what type of product you have.
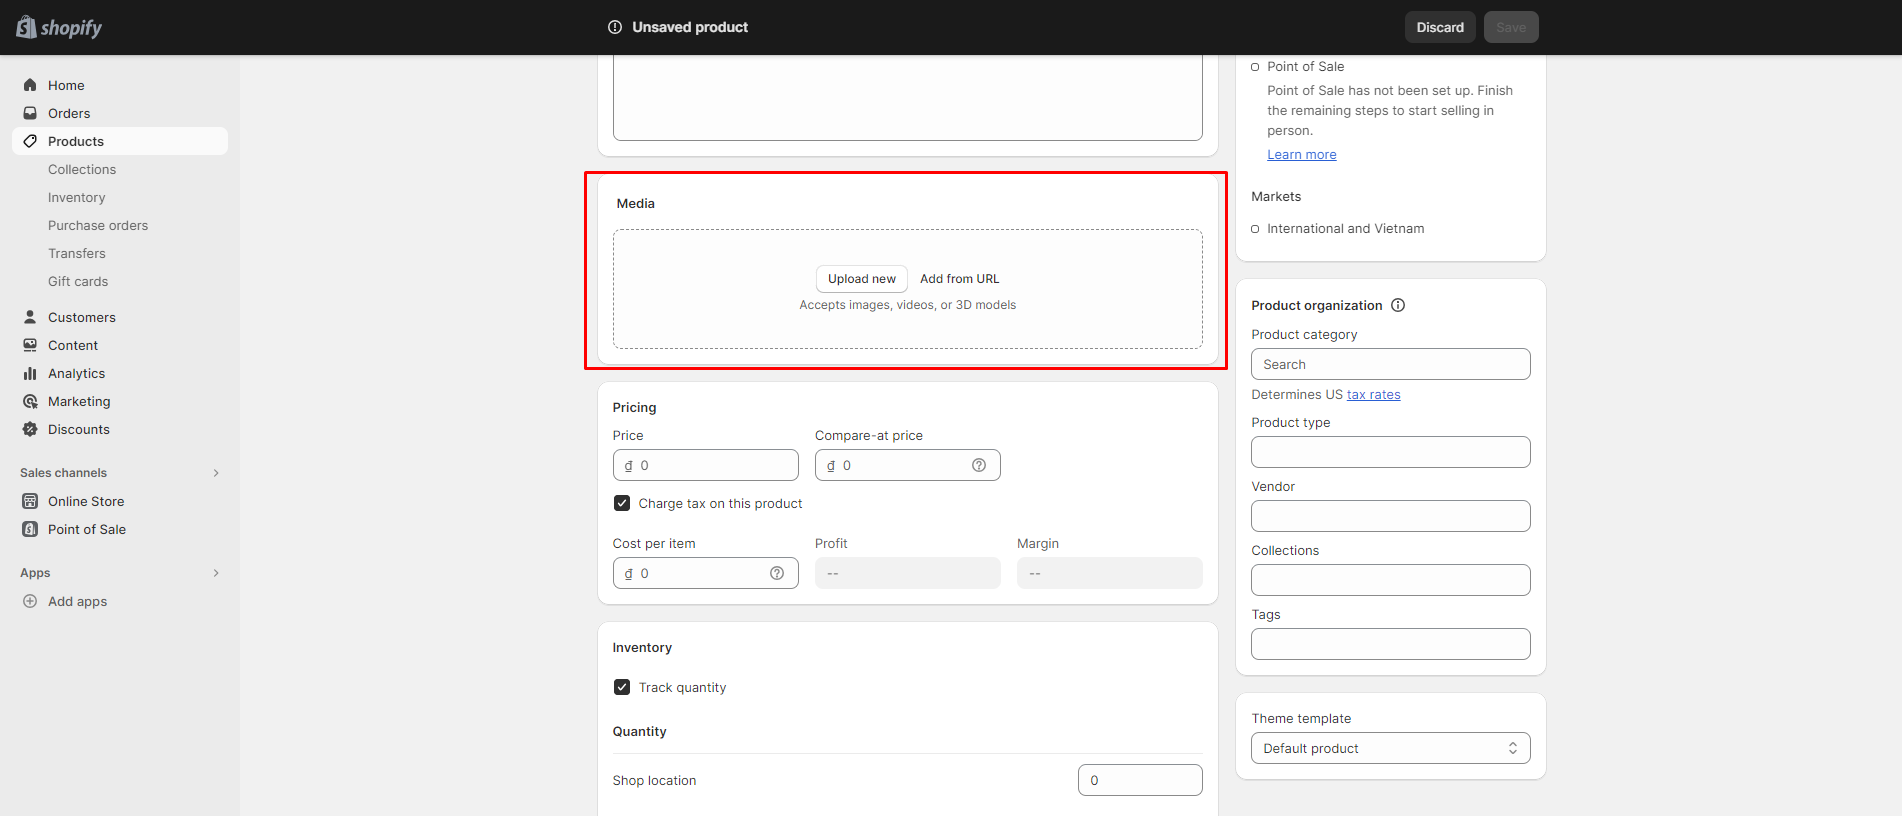
In the media section of the product page, you can upload any visual media like photos, videos, or 3D models to display your product’s richer details. These are a few keynotes when uploading media:
- High-Quality Product Photos: It’s essential to use high-quality images that effectively showcase your products. Images that are blurry or low-resolution can diminish the perceived value of your offerings. Crisp and clear photos that capture the product’s details, texture, and color accurately are more likely to entice customers and give them confidence in their purchase decisions.
- Maintain Consistent Aspect Ratio: For a polished and professional look, make sure all your product photos share the same aspect ratio. This means maintaining a consistent proportion between the width and height of the images. Consistency in aspect ratio creates a visually cohesive display on your website, which enhances the overall user experience and conveys a sense of attention to detail.
- Utilize Modern Smartphone Cameras: You don’t necessarily need an expensive camera setup to capture stunning product photos. Most modern smartphones come equipped with high-quality cameras that are more than capable of producing impressive images. Additionally, you can leverage free photo editing tools to enhance the visuals further. Adjusting lighting, contrast, and sharpness can elevate your product photos to a professional level.
- Basic Image Edits: Once you’ve uploaded an image, you’ll often have the option to perform basic edits. For instance, you can crop or resize the image to focus on specific details or maintain a consistent presentation. These editing features empower you to fine-tune the visual content to match your desired aesthetic and better highlight the product’s key features.
- Alt Text for Accessibility: Accessibility is crucial for ensuring a positive user experience for all visitors to your website, including those with visual impairments. When uploading images, be sure to include alternative text (Alt Text) that describes the content of the image. This allows individuals who use screen readers or other assistive technologies to understand what the image represents, providing them with a comprehensive browsing experience.
Pricing: How to Set an Optimal Price
Now it’s time for setting up your product price. Setting up a product price may seem easy, but there are several factors you must consider first. Things such as shipping costs, raw materials, and even the quality of your goods can play a role in how much you charge. You also have to account for things like rent or employee salaries, as well as the cost of your time spent making the product itself.
Your product price needs to be placed at a happy medium – not too high where you can’t generate sales, but not too low where people question the quality. Price is often seen as a way to measure quality by customers, so remember to stay mindful of competitor prices.
Thus, pricing your product can be tricky. We recommend you test the market with one price and change it later based on the results you’re getting. Generally, competitor prices should be used as a reference point, and from there you can lower your prices if needed to gain a competitive advantage.
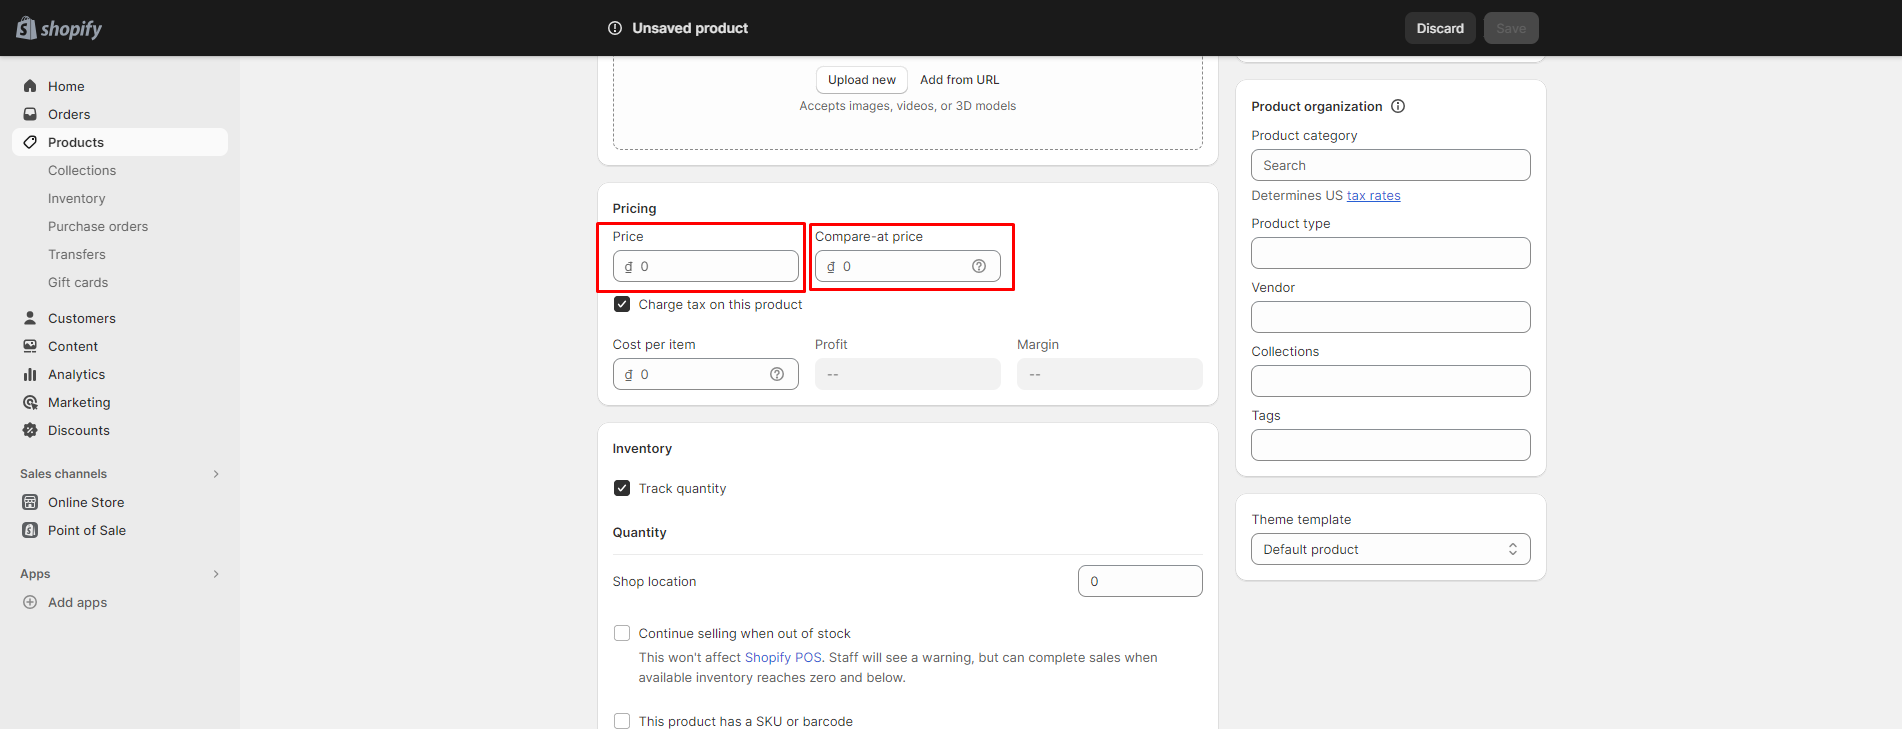
Once you have decided on your product’s price, enter it into the Price field on your product page. You can also use the Compare at price section to contrast what the product would typically cost against its current list value; this is especially useful during a sale.
For example, if you want to show discounts when buying a Blank Black T-shirt, you could enter the original price in the Compare at price section and the discount Price in the Price section.
The Cost per item field is optional. If desired, you can use it to track your profit margin for a single product. This can be helpful when creating reports.
The charge tax on this product option will only need to be ticked if it applies to your product type, location, and tax status. If you are unsure whether or not you need to tick the box, just go ahead and do so now — you can always change your settings later.
Inventory Management – Product Variants
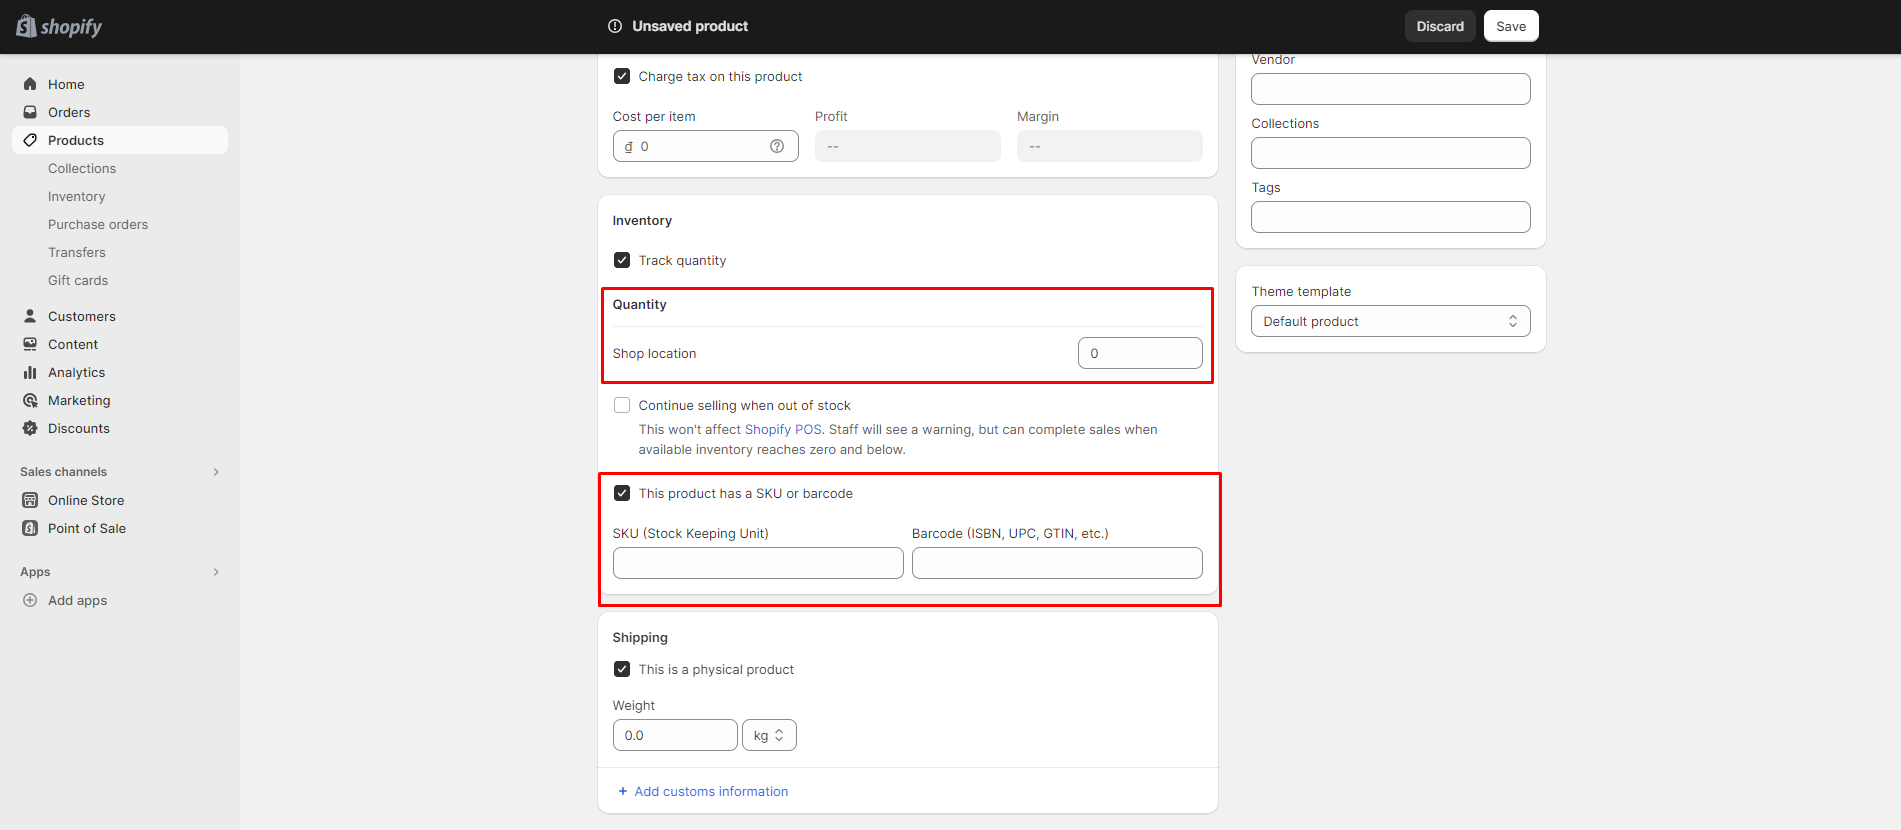
If you’re not using a dropshipping or print-on-demand service, then this section is for you to manage your inventory and let Shopify know what actions to take if you run out of stock. You need to select the option This product has a SKU or barcode to configure your product SKU and barcode.
The information you enter here will depend on the type of product you are selling (physical or digital) and your preferences. The provided fields can be used to include:
- Track Quantity: Enable this for personal inventory management, preventing overselling and prompting timely restocking.
- SKU: A stock-keeping unit is a way to keep track of all your inventory for specific products and their variants. Creating a consistent system using numbers or letters will help you quickly identify what the exact item is.
- Barcode: If you plan to resell products or want inventory management to be easier in the future, then bar codes (UPC, GTIN…) are necessary. However, if you’re making and selling your own products now, you can leave this blank for now.
- Quantity -> Edit Location: Define and manage your inventory locations, ranging from retail spaces to warehouses. The available number of locations depends on your Shopify plan. Third-party apps will automatically appear as locations.
If you have a limited inventory or it takes a long time to restock your product, you can choose to mark the item as Sold out. However, if you’re able to quickly restock your product, then simply turn on the Continue selling when out of stock option.
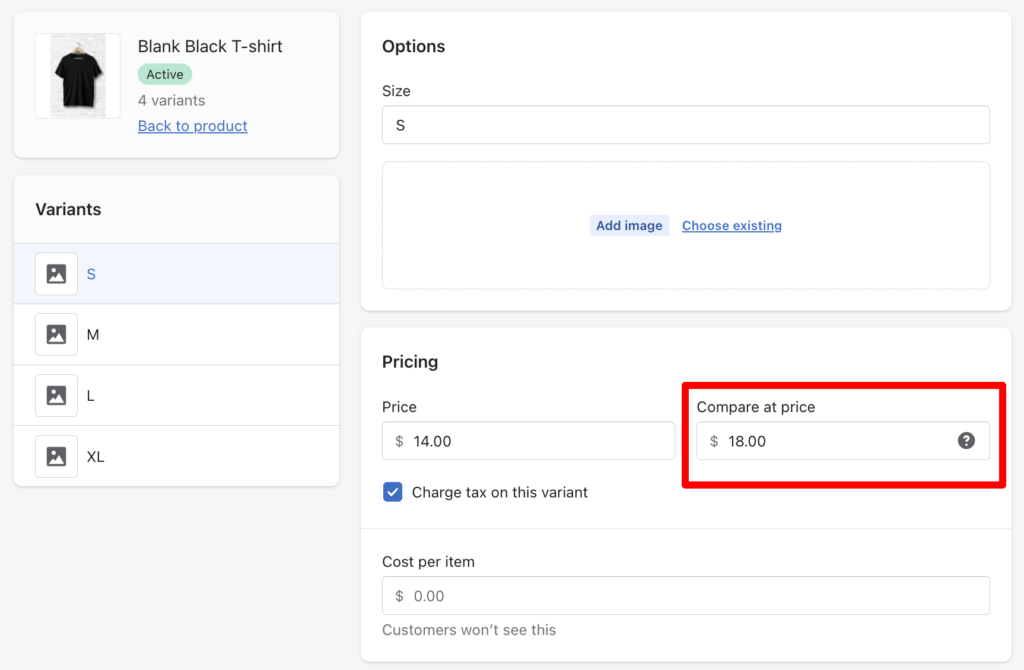
By utilizing product variants, you can offer variants of a product without having to create separate listings. This is extremely beneficial because each option has the ability to have its own image, price, tracked inventory, and settings that are unique to it.
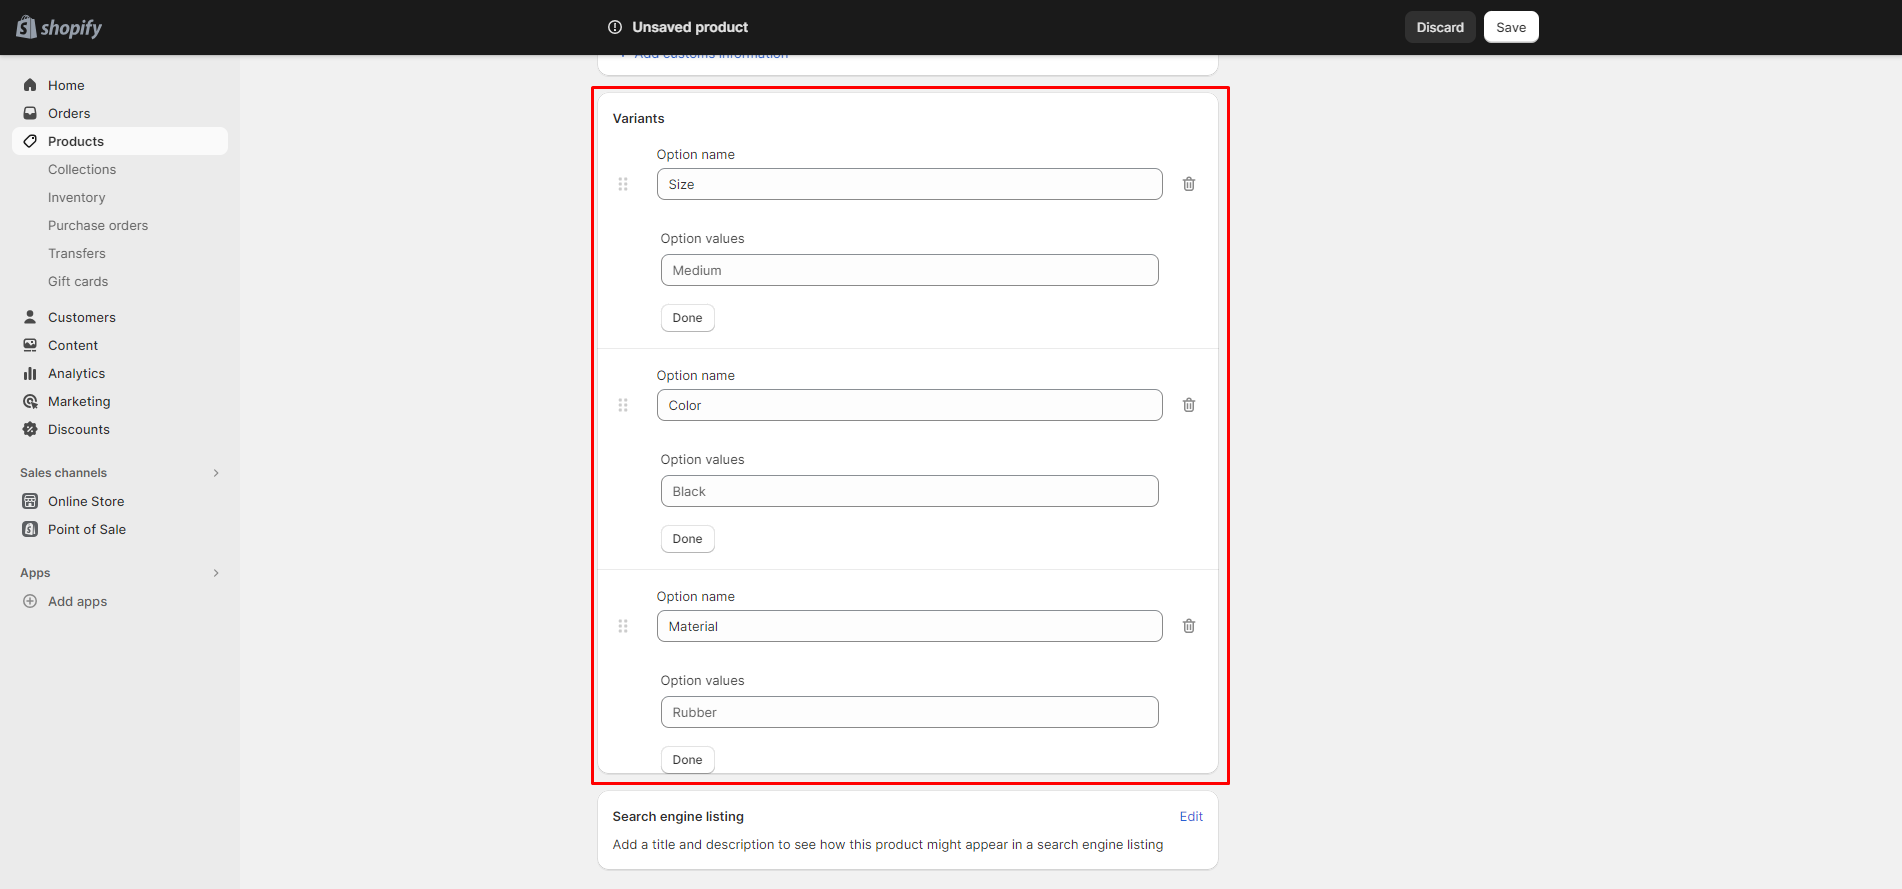
After adding variants to your product and saving the changes, you will need to update the Media, Pricing, Inventory, and Shipping sections for each variant. Shopify supports multiple product options up to a maximum of 3 options per product. Each option can have up to 100 variants.
Product Shipping
This section is only for physical products. You need to check This is a physical product and enter the following information:
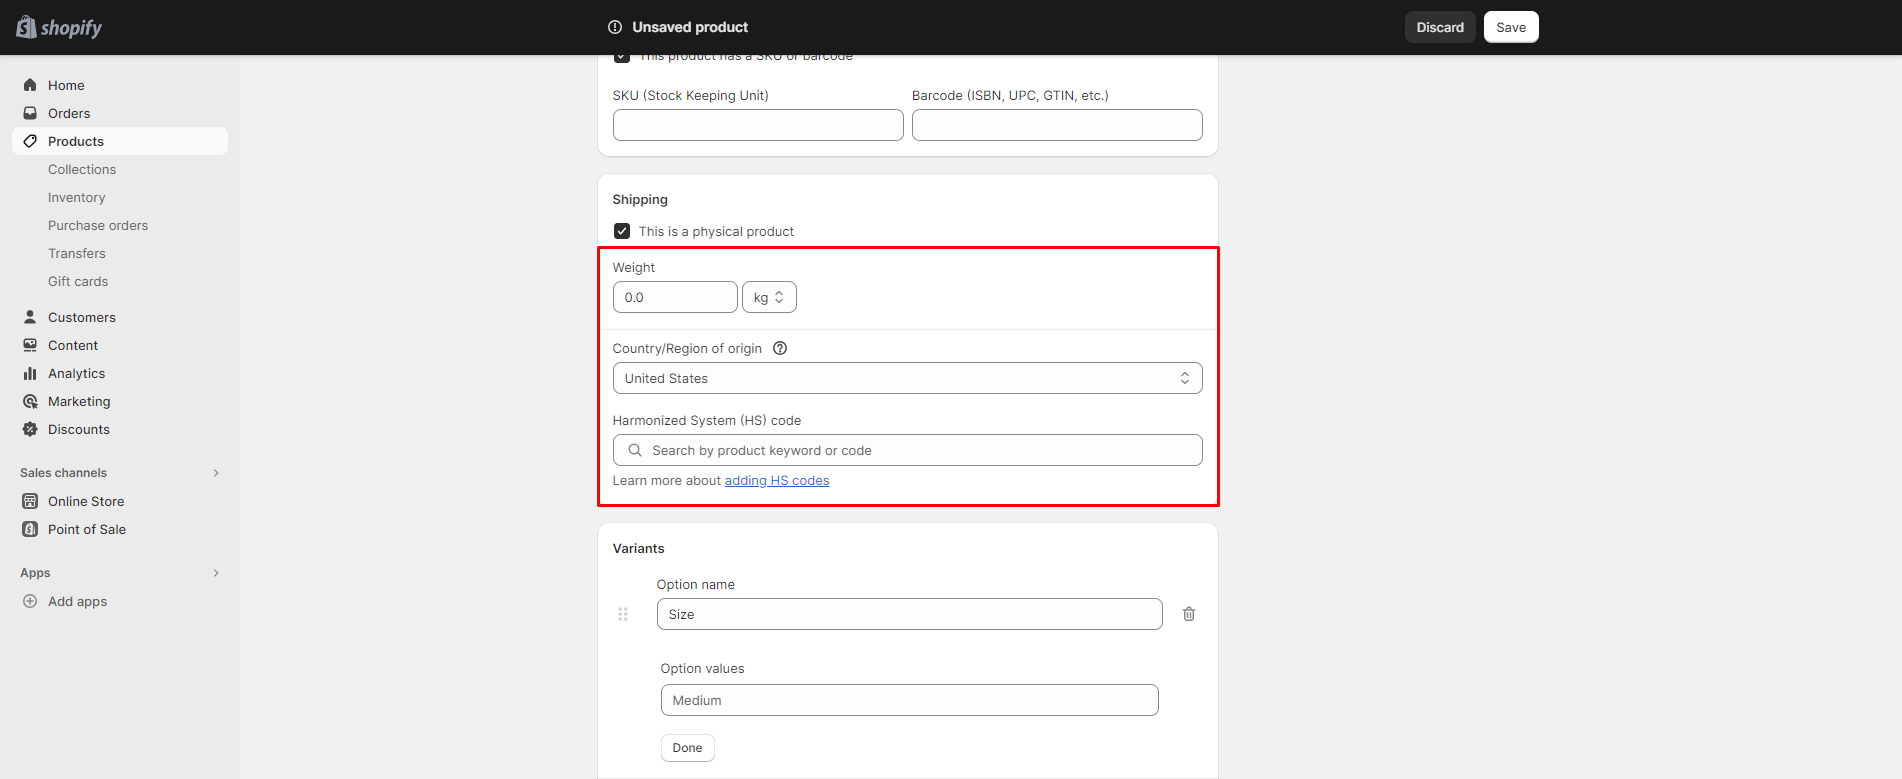
- Weight: The product’s actual weight. Select the most appropriate unit of measurement for your product, pounds, ounces, kilograms, or grams. Keep in mind, that omitting a weight value results in Shopify automatically assigning a default weight of 0.1 lb to the product.
- Country/Region of origin: The location where the product was manufactured or assembled.
- HS code: If you’re looking to ship your product outside of the country, please provide the HS tariff code. This code is vital for customs, assisting in the determination of applicable tariffs. You can find your product’s HS code by conducting a keyword search within the HS code field.
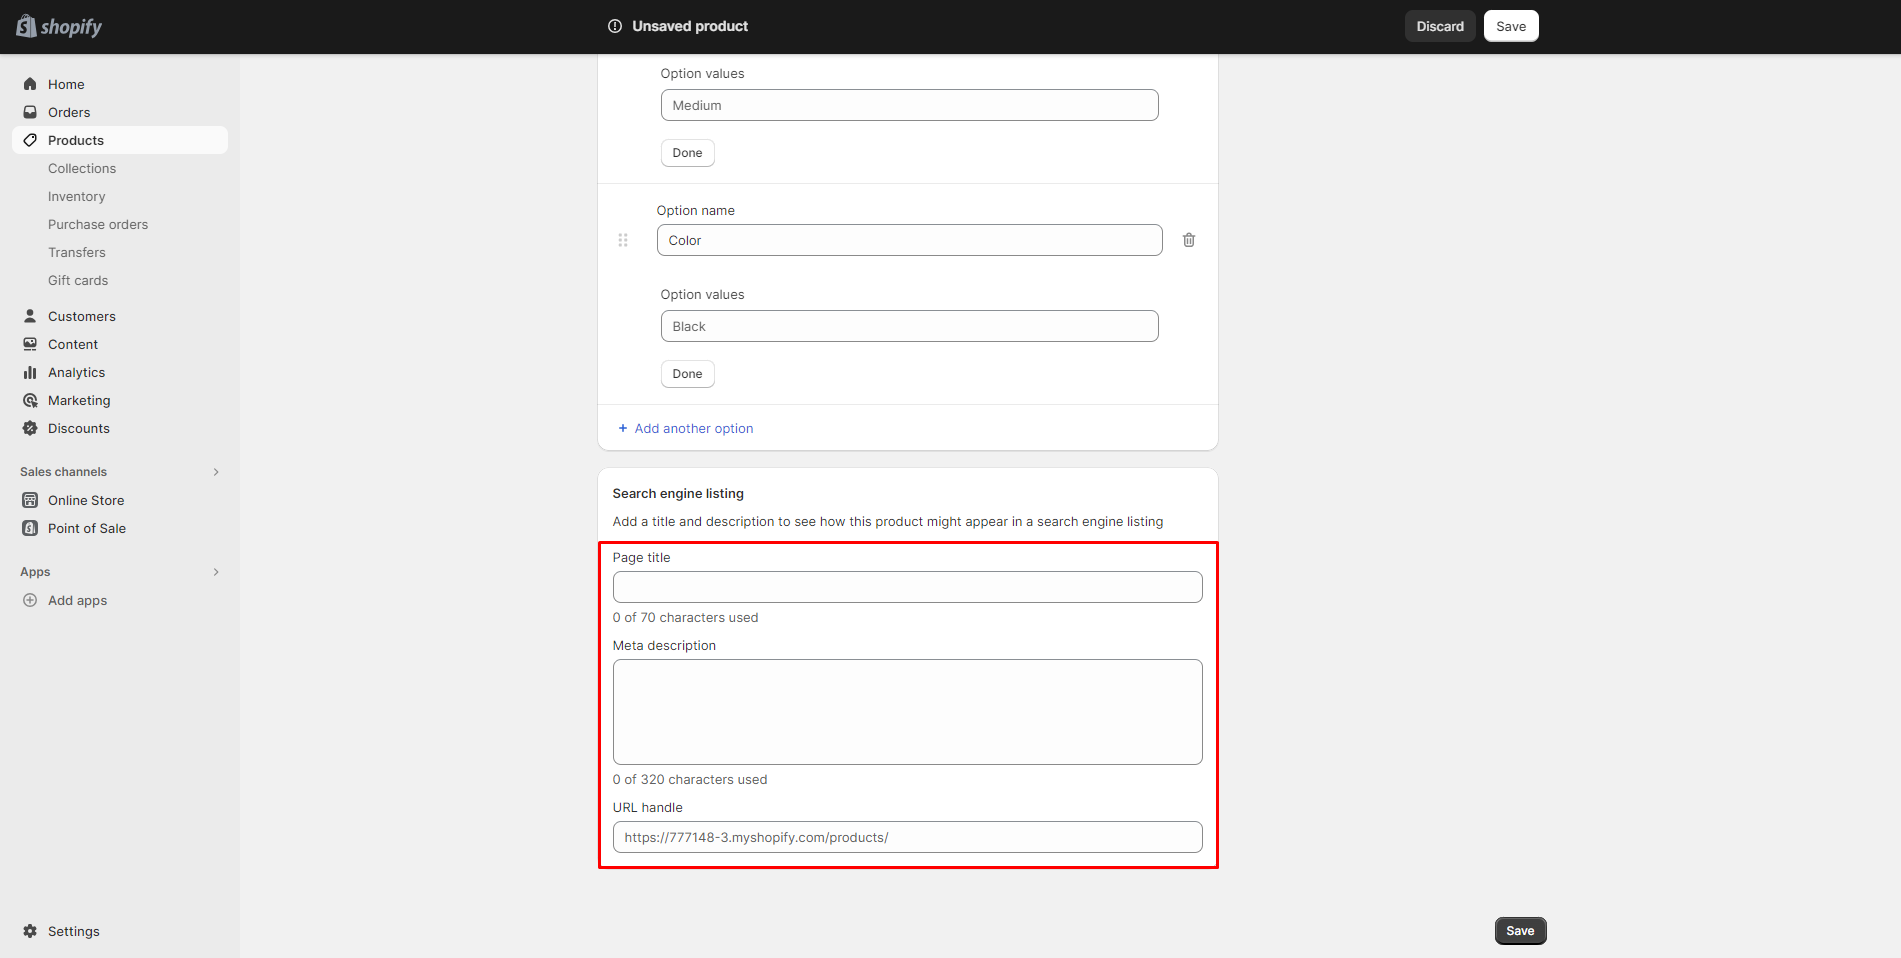
Search Engine Listing Preview
The Search Engine Listing Preview allows you to control how your pages appear on SERPs. By making use of this tool, you can make it easier for customers to find your products through Google or Bing.
To understand which keywords your target consumers are using when looking for similar items to yours, you need to do keyword research. We advocate using tools like Ahrefs and SEMrush so you can accurately find out what phrases people search, how many searches there are in a month utilizing these phrases, and how easy or difficult it would be for your product to rank for them.
Here are some quick tips for optimizing your search engine with Shopify:
- Page Title: Your page title should be impressive and include your target keywords to encourage users to click through to your page, ensuring it stays within 55 to 65 characters for ideal display on Google search results.
- Description: Include any interesting information here that will make searchers want to click on your product when they see it in search results. Keep your language concise and appealing, while expanding on what’s presented in your page title. Aim for a meta description length between 150 and 160 characters, although up to 320 characters are permissible for thorough optimization.
- URL and handle: For Google to properly index your page, be sure to include your target keyword in the URL. Keep it unique, straightforward, and meaningful for those who utilize search engines when looking for products.
- Keywords: You need to research your niche’s keywords to know your target audience better. Fill those keywords into your Page Title and Description, and use them as your URLs so that your customers can easily find your store on the search queries and search engines can crawl and index your site effectively.
After you’ve done this part, you can save our product page and preview it to see what it looks like. We can change the smaller details, such as colors and fonts, later when we begin customizing our store.
Product Organization
Additionally, on the right side of the product page, there is a section called Product Organization. Here, you can add information about your products that will make it easier to create collections and discounts.
Defining the product type enhances store organization and aids customers in refining their search based on specific categories, such as clothing, furniture, kitchen appliances, electronics, or beauty products. Effective categorization streamlines the shopping experience, making navigation effortless for customers and potentially boosting your sales.

Here’s what each field means:
- Product Category: The main category that the product belongs to.
- Product type: A category that you can use to classify certain products.
- Vendor: The vendor is the manufacturer, wholesaler, or third-party provider of the product. By filtering your product list by vendor, ordering inventory will take less time.
- Tags: Tags are keywords related to your product. You can use tags to help customers find your products through the search bar, or you can automate actions by adding products with specific tags to collections.
- Collections: Collections allow you to categorize your products for different occasions and customers.
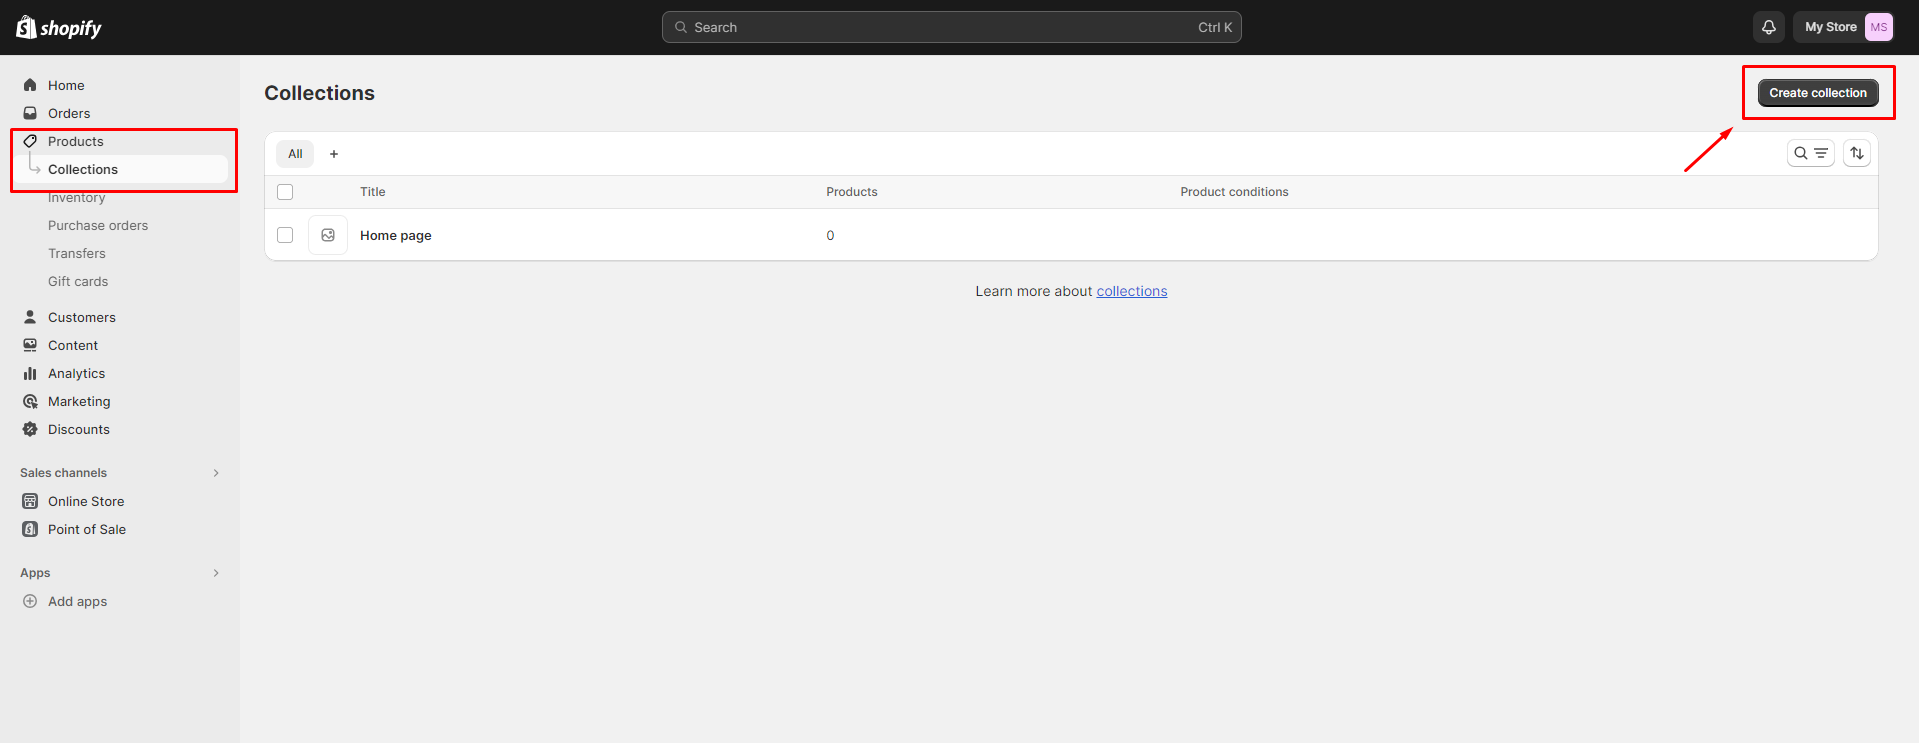
Organizing Your Products Into Collections
Shopify makes it easy to organize your products into collections. Simply go to Product -> Collections and add the products you want in each collection.
Organizing products into collections can help target a specific audience, keep to a theme, or showcase similar product categories. There are three primary benefits to creating collections:
- Curated Homepage Display: By grouping products into collections, you gain the ability to select specific products that will be prominently featured on your homepage. This curated approach enables you to highlight products that align with current promotions, bestsellers, or any strategic focus you have. As a result, you can effectively capture visitors’ attention as soon as they land on your website, increasing the likelihood of conversion and sales.
- Enhanced Navigation and Audience Targeting: Collections serve as navigational signposts within your catalog, making it easier for different segments of your audience to find products that resonate with their preferences. By linking to collections from your navigation menu or homepage, you create a seamless browsing experience. For instance, you can direct customers to specific categories based on their interests or needs, leading to improved engagement and satisfaction.
- Efficient Sale Promotion: Collections offer a practical solution for managing sales and discounts. You can conveniently organize items that you intend to put on sale within specific collections. This approach allows you to apply discounts to groups of related products, making it straightforward to implement promotional campaigns. Whether it’s seasonal sales, holiday discounts, or clearance events, collections streamline the process of offering deals to your customers.
- Themed and Cohesive Presentation: Creating collections empowers you to maintain thematic coherence across your store. This is particularly useful when you want to convey a consistent brand image or emphasize a specific product range. By grouping products that share similar characteristics or belong to a certain theme, you present a visually appealing and organized storefront that resonates with customers’ expectations and preferences.
- Personalized Shopping Experience: Collections facilitate a personalized shopping experience by tailoring product recommendations to different user segments. As customers explore collections aligned with their interests, preferences, or needs, they’re more likely to discover products that appeal to them. This personalized approach can lead to higher customer satisfaction, increased engagement, and ultimately, greater sales.
The Shopify collection editor allows you to title, describe, image, and manage SEO information for your collections in a similar way that you would do with products. The main thing to pay attention to here is the Collection type box. This gives you the option to either create a collection manually or automatically.
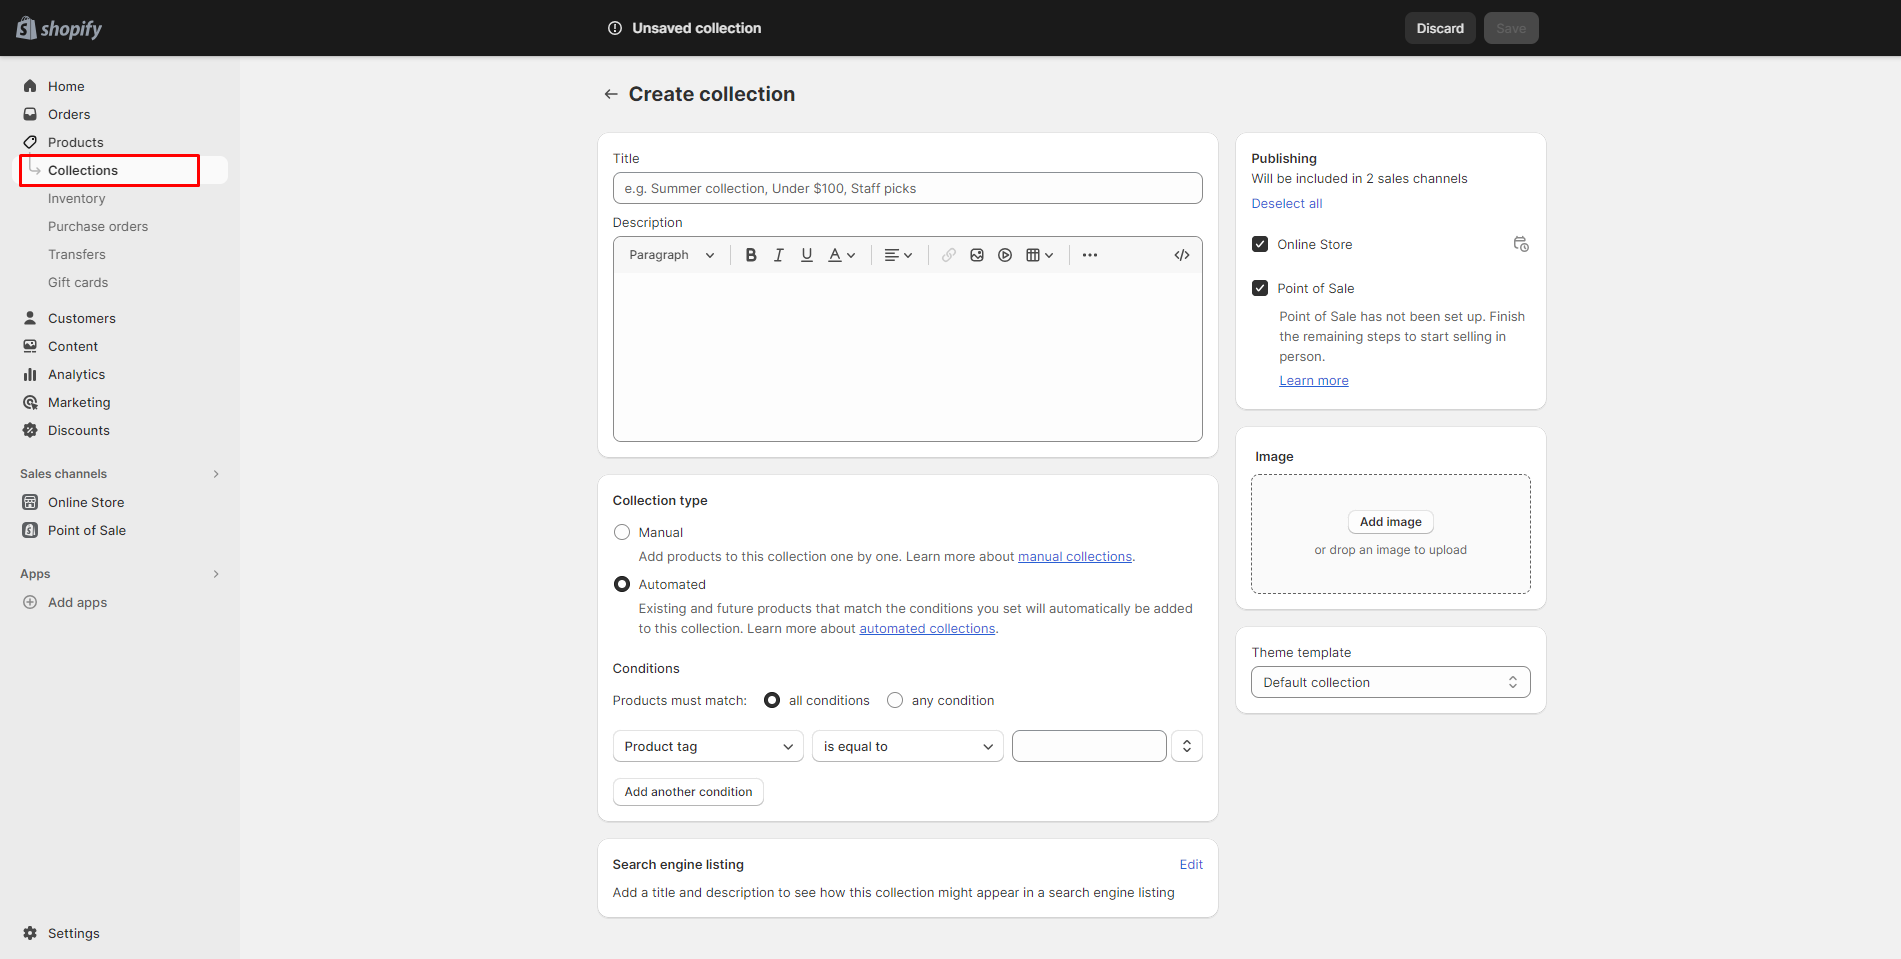
If you go with the manual option, you’ll then be able to look for products and add them to the collection individually. If you select the automated option, though, you’ll just need to set up some easy rules that populate your collection depending on price, tags, or other conditions.
Create Other Necessary Pages on Your eCommerce Sites
Products are essential for your online store, but they aren’t the only thing you need. Your eCommerce website will also require additional pages that provide customers with more information about your business, build trust, and make other details easily accessible. These types of pages are just as important as product or category pages.
Before you decide on a theme for your store, have key site content in place. This way, you’ll be able to tell which templates would work best for your needs. You don’t need all pages completed before launching, but some of the most useful ones to create include:
- Contact page: This page provides customers with easy methods of contacting you if they have questions, or it navigates them to a place where they can find answers. Most Shopify themes come with an easy-to-use contact page template. All you need to do is create a new page, go to the Template section on the right side, and choose the Contact template. This will add a form to your page. You can then write some instructions explaining how shoppers can get in touch or even link out pages like an FAQ so that shoppers can troubleshoot their own problems first before reaching out.
- About page: Having an About page on your website is a great way to connect with customers, explain your business model, and/or share the story of why you started your business. A well-written About page can go a long way in building trust for new brands. Some brands even choose to have their founders introduce the businesses in a short video on this page. Including awards and press mentions you’ve received, and images that explain your company’s supply chain or business model is a classic, yet working way to demonstrate your About page.
- FAQ page: An FAQ page is designed to answer some of the more common questions that customers have. This can help reduce the amount of time spent on customer support, shorten the users’ consideration time, as well as boost your brand’s loyalty level as customers can see how you truly understand them via how accurate your FAQs are.
- Policy pages: Having these types of pages not only benefits customers but also protects you in case of disputes. Under the Legal tab in your Shopify settings, you can generate customizable templates for policies that are required by law for businesses: Return Policy, Privacy Policy, Terms of Service, and Shipping Policy.
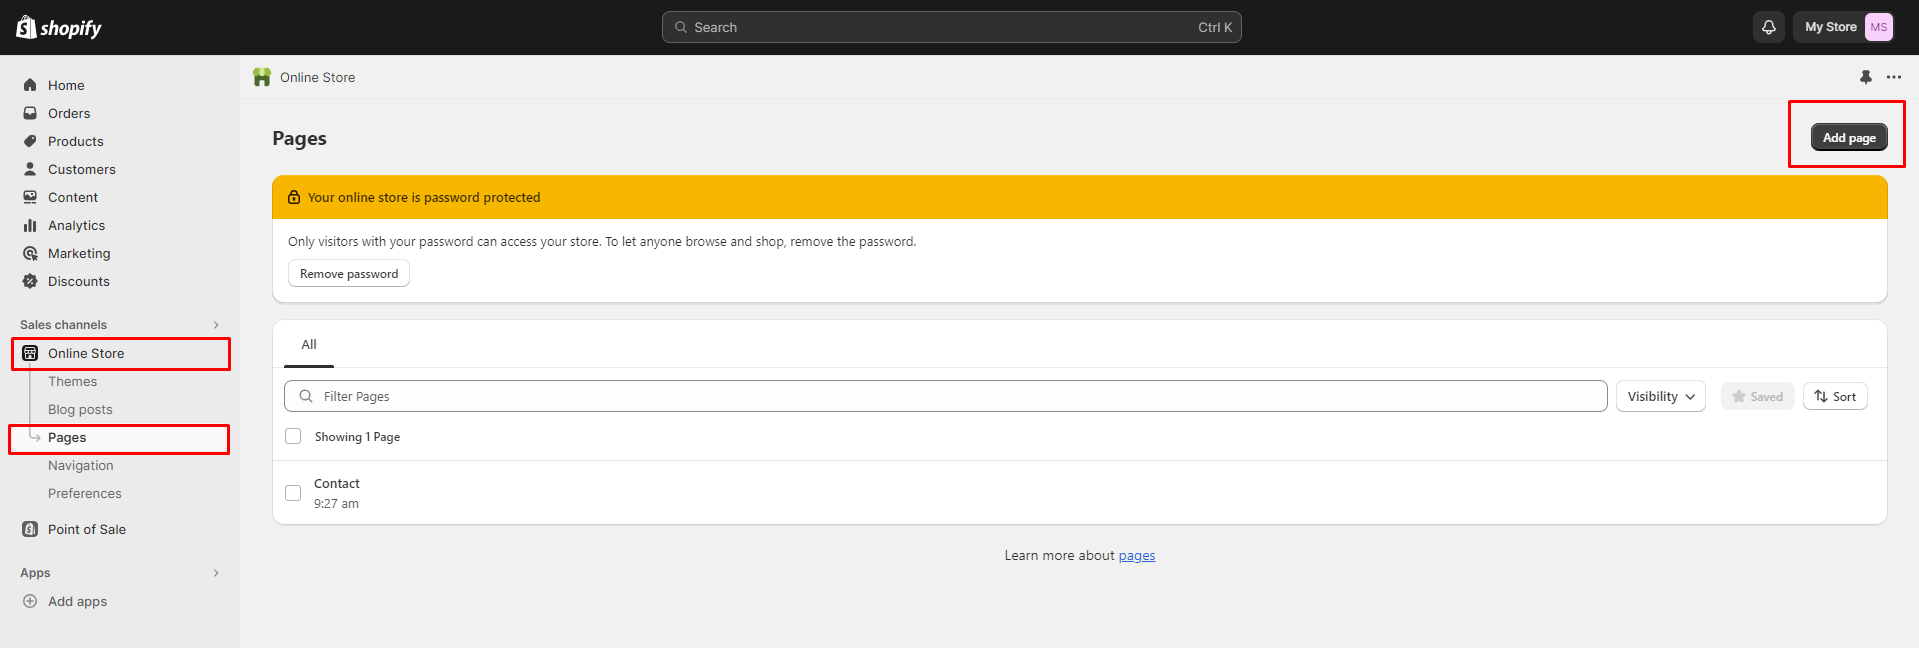
You can generate these sorts of pages by going to Online Store -> Pages and pressing Add page. Also, similar to what you did for your products, you should personalize the Search engine listing preview section of your web pages depending on how you want the URL to look and how you want the page itself to appear in SERPs.
Begin creating and adding pages to your Shopify store by entering a relevant and descriptive title, followed by the content of the page in the provided areas.
At this point, if you’re unsure of the page type, Shopify offers useful suggestions like Contact Us, Sizing Chart, or FAQs right in the title field.
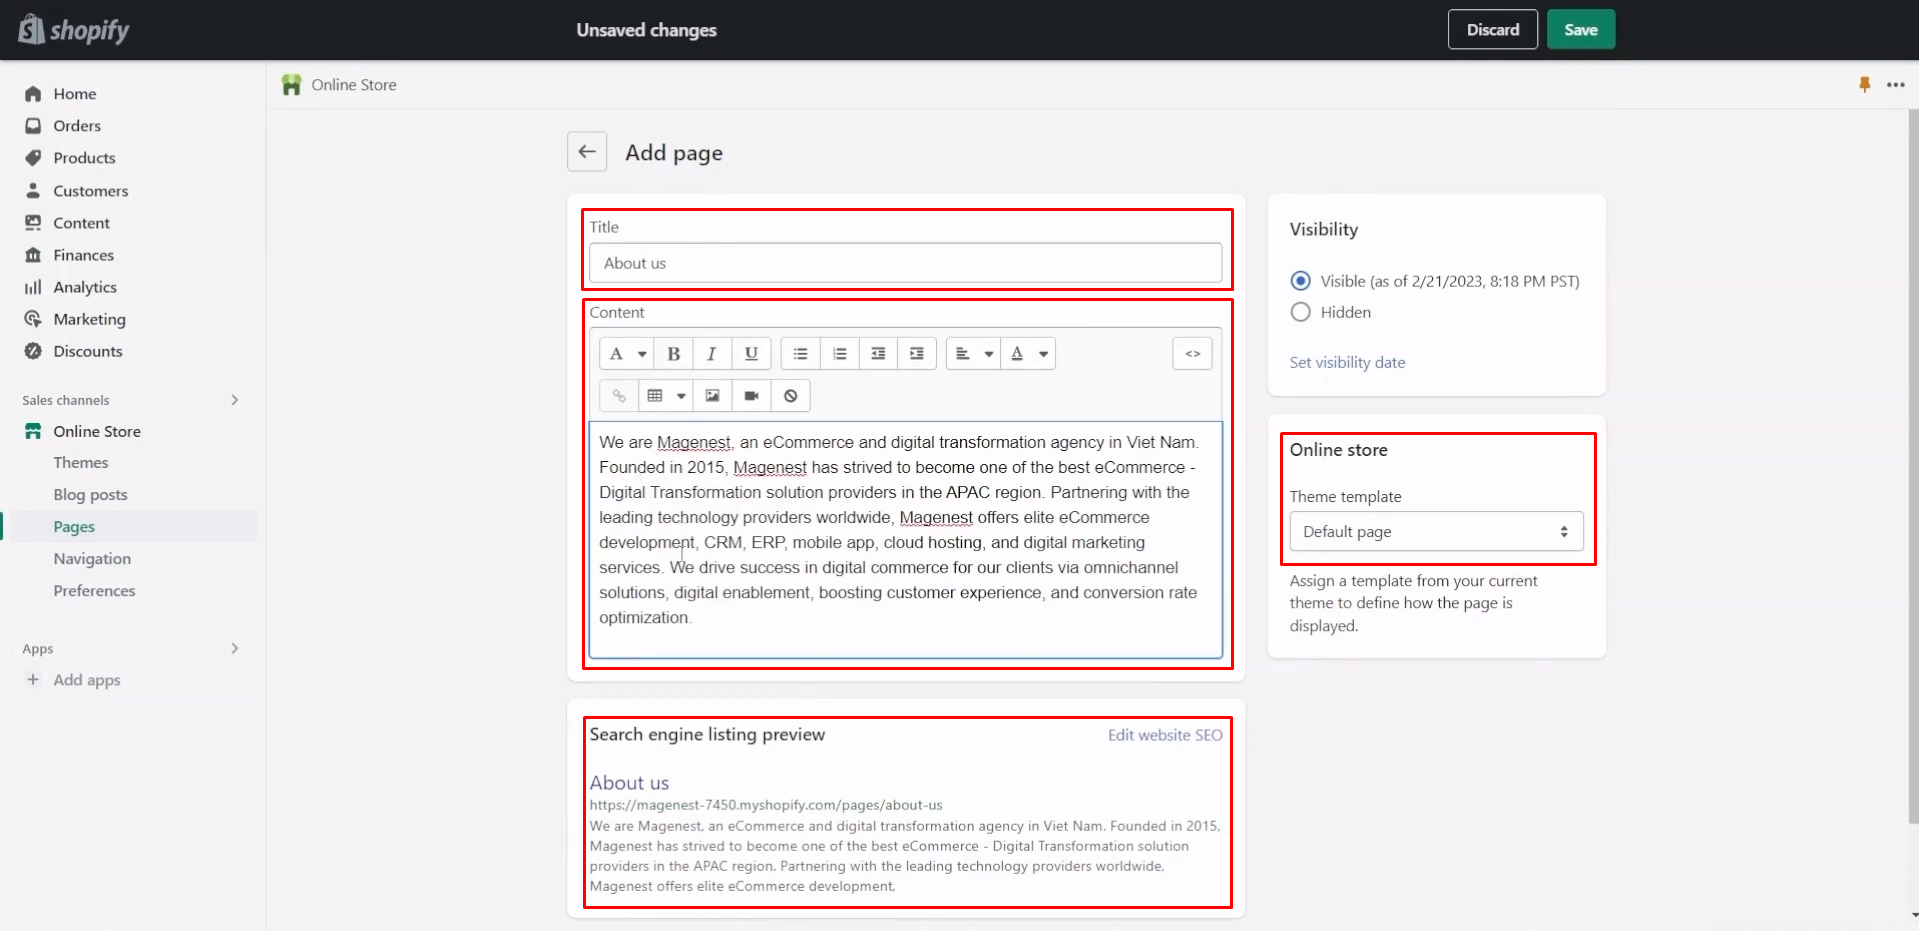
Choose a theme template that matches your Shopify theme and select any templates generated by associated apps to align with your store’s design.
Utilize the content editor to enrich your page with text, images, videos, and other necessary elements, ensuring a comprehensive and engaging user experience.
Optimize your page for search engines such as Google by customizing the meta title, meta description, and URL handle in the SEO settings. This gives you greater control and enhances your page’s visibility, although Shopify does automatically generate a URL based on your page title. Ensure your URL is succinct and includes relevant keywords. If you find setting up your eCommerce site a daunting task, you can ask some trustworthy agencies like Magenest for help. Our Shopify store development service will help your business deploy and customize your site successfully in the shortest time.
Customizing Your Online Store
It’s time to go to Shopify and begin considering what our website will look like.
Choose A Theme
Choosing a theme is an important step in creating a Shopify store. The Shopify Theme Store contains free and paid themes, each with its accompanying styles and features. Some themes are designed for companies with large catalogs while others fit better single-product businesses. Others still are crafted specifically for certain types of businesses or industries.
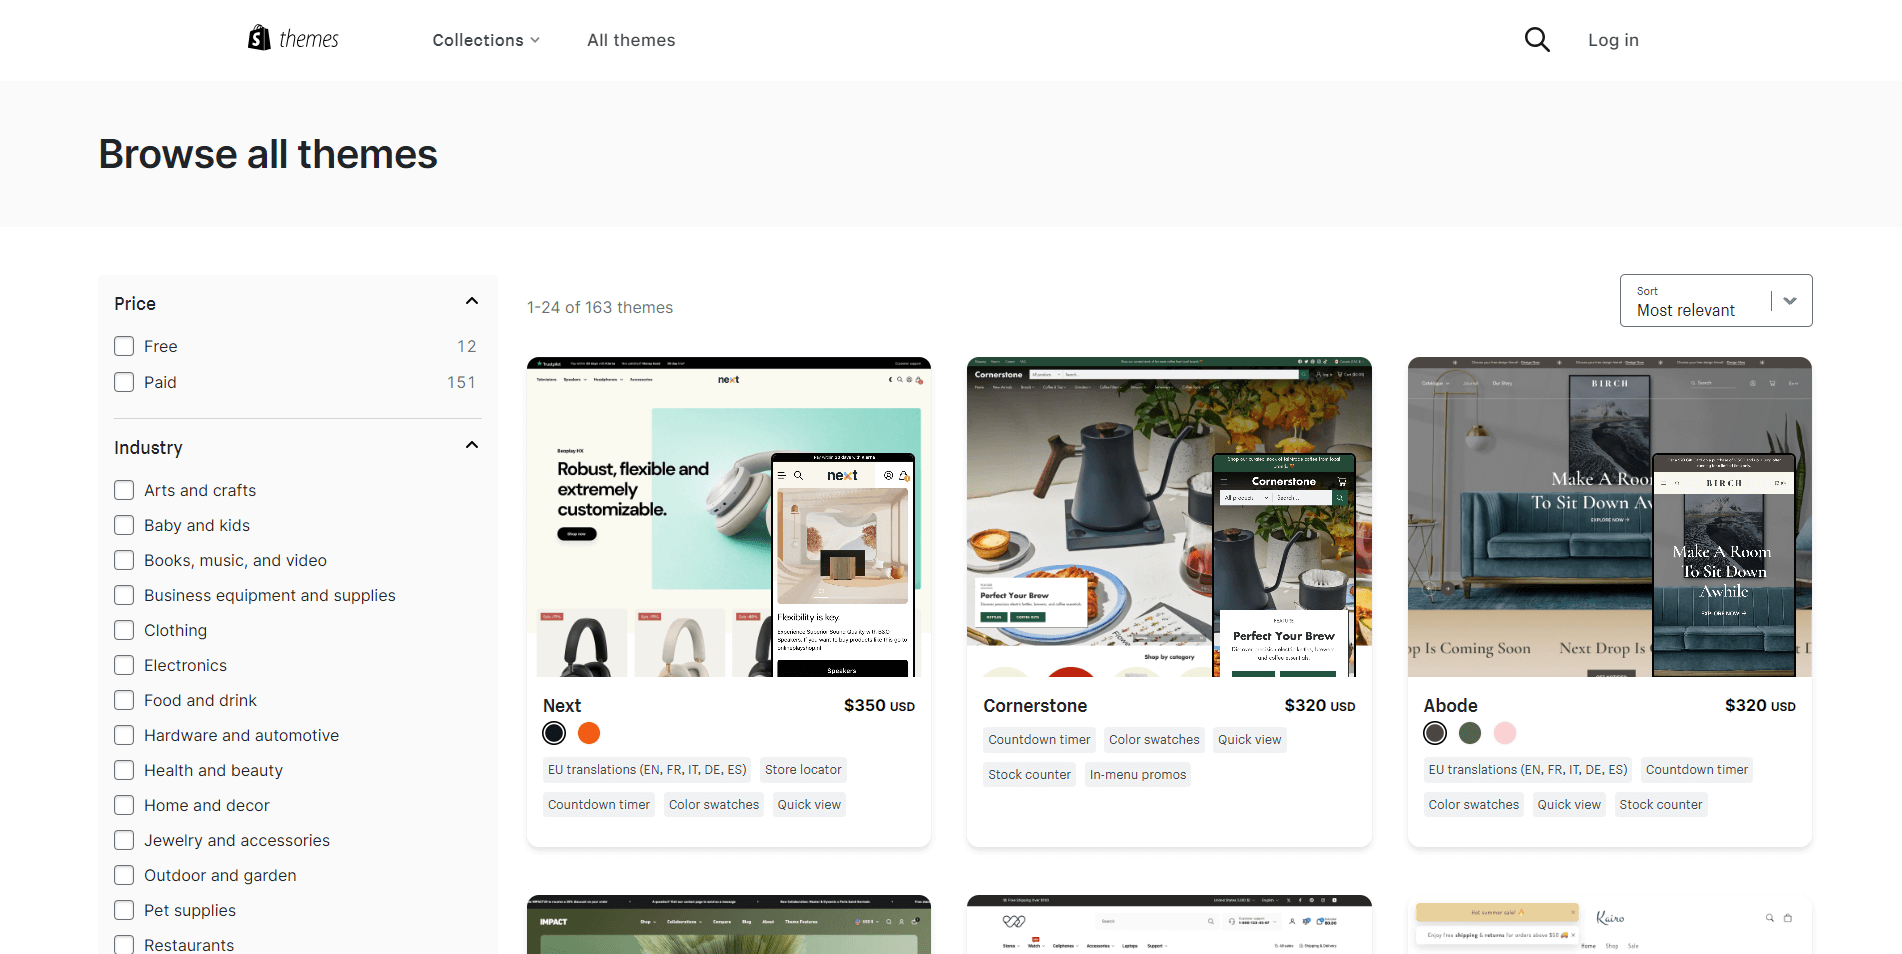
You can use a variety of filters to narrow your searches, such as price, industry, catalog size, and features to choose the best one for your needs. There are a few things you should keep in mind when choosing a Shopify theme:
- Tailored to Your Product Needs and Aesthetic: With an array of themes and styles available, you have the opportunity to construct an online store that aligns perfectly with your product offerings and desired visual aesthetics. The right theme should complement your brand identity, showcasing your products in a manner that resonates with your target audience and captures their attention.
- Built-In Features and Functionality: It’s essential to assess whether the theme you’re considering offers built-in features that cater to your specific needs. These features can range from advanced product filtering and navigation menus to integrated social media integration and customizable page layouts. Selecting a theme with these built-in functionalities can save you time and effort, as you won’t need to rely heavily on external apps or tools to achieve the desired functionality.
- Leveraging Additional Apps: If a chosen theme doesn’t include all the features you require, don’t be concerned. The Shopify ecosystem offers a plethora of both free and paid apps that can extend your store’s capabilities. These apps can seamlessly integrate with your chosen theme, adding functionality such as advanced analytics, customer engagement tools, live chat, and more. This flexibility empowers you to customize your store according to your evolving needs.
- Easy to Switch and Customize: If you find yourself reconsidering your chosen theme at a later stage, rest assured that Shopify’s platform makes the process straightforward. There’s a diverse selection of themes available, and you can preview them before making a final decision. Changing your theme won’t disrupt any progress you’ve made in building your product pages, ensuring a seamless transition that maintains the continuity of your work.
Create an Attractive Homepage
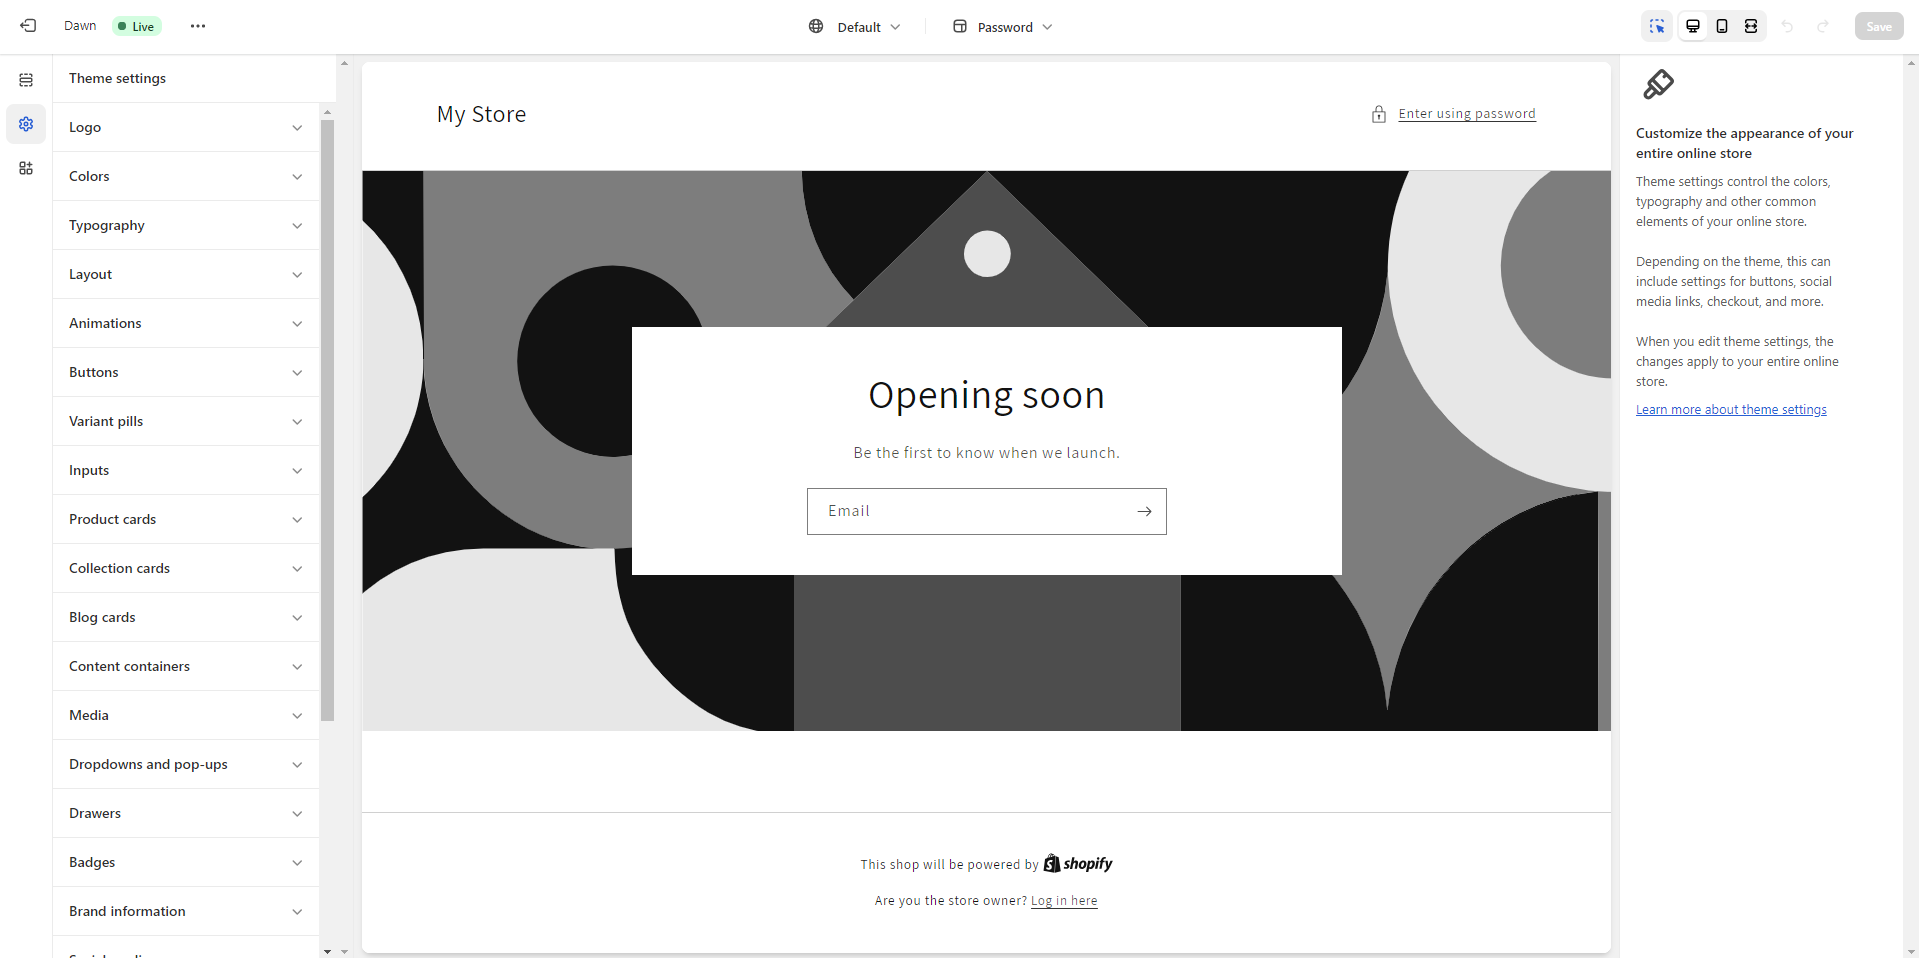
Now that you’ve selected a theme for your website, it’s time to make an appealing homepage. To do this, go to Online Store -> Themes and press the Customize button. This will direct you to a homepage editor that uses drag-and-drop capabilities.
All Shopify themes contain customizable sections like slideshows, featured collections, images with text, newsletter sign-up forms, and featured products. This helps you determine the appearance of your homepage and lets you play around with different layouts before publishing anything.
A homepage needs to achieve specific goals and how these relate to your business should be considered when designing your homepage:
- Clear Introduction and Offering: The homepage serves as a digital storefront for your business. For first-time visitors, it’s essential that they can quickly grasp the essence of your company and the products or services you provide. Through concise and impactful messaging, use your homepage to communicate your brand’s value proposition and showcase key offerings. This initial impression lays the foundation for visitors’ understanding of your business.
- Catering to Returning Visitors: Returning visitors represent a valuable segment of your audience. Ensure that your homepage facilitates their journey by providing intuitive navigation to help them easily locate the products, categories, or pages they’ve previously engaged with. Implement features such as search bars, featured products, and personalized recommendations to enhance their experience and drive them toward conversions.
- Continuous Engagement and Trust Building: A well-designed homepage should foster ongoing engagement. Utilize compelling visuals, product displays, and customer testimonials to not only pique visitors’ interest but also reinforce their trust in your brand. As users scroll down your homepage, strategically present information that resonates with their needs and addresses potential concerns, nurturing their confidence in your offerings.
- Efficient Information Retrieval: A key consideration in homepage design is facilitating efficient information retrieval. Streamline navigation by organizing your product categories, services, and other relevant sections in a user-friendly manner. Clear menus, prominent call-to-action buttons, and intuitive layouts empower visitors to easily locate the information or products they’re seeking, reducing bounce rates and increasing engagement.
- Mobile-Friendly Design: With the increasing prevalence of mobile browsing, ensuring a seamless experience for mobile users is imperative. Maintain a simple, responsive design that translates well across various devices and screen sizes. Prioritize clear layouts, easy-to-tap buttons, and concise content to ensure that mobile users can swiftly access information and products without any hindrance.
You will have to revisit and rework your homepage over time. However, don’t let the pursuit of perfection prevent you from moving forward with your launch. We recommend you try a bit of user testing to get feedback on how attractive and user-friendly your homepage is.
Create Logical Navigation Menus
You can add your navigation to a Shopify store by going to Online Store -> Navigation. It is crucial to create a logical navigation menu since it is how people will find their way through your website. There are three types of navigation you can set up in the header section:
- Main navigation: This top menu is where you can decide which main navigation paths are most important to offer customers.
- Footer navigation: The footer navigation is where you put links to pages that aren’t essential for new visitors but still need to be accessible to those who are looking for them. The majority of online shoppers will search here for things like your return policy or contact page.
- Search: If you want to help your website visitors find what they’re looking for more easily, add the search bar in the header. Search bars are especially helpful if you have a lot of products or pages on your site.
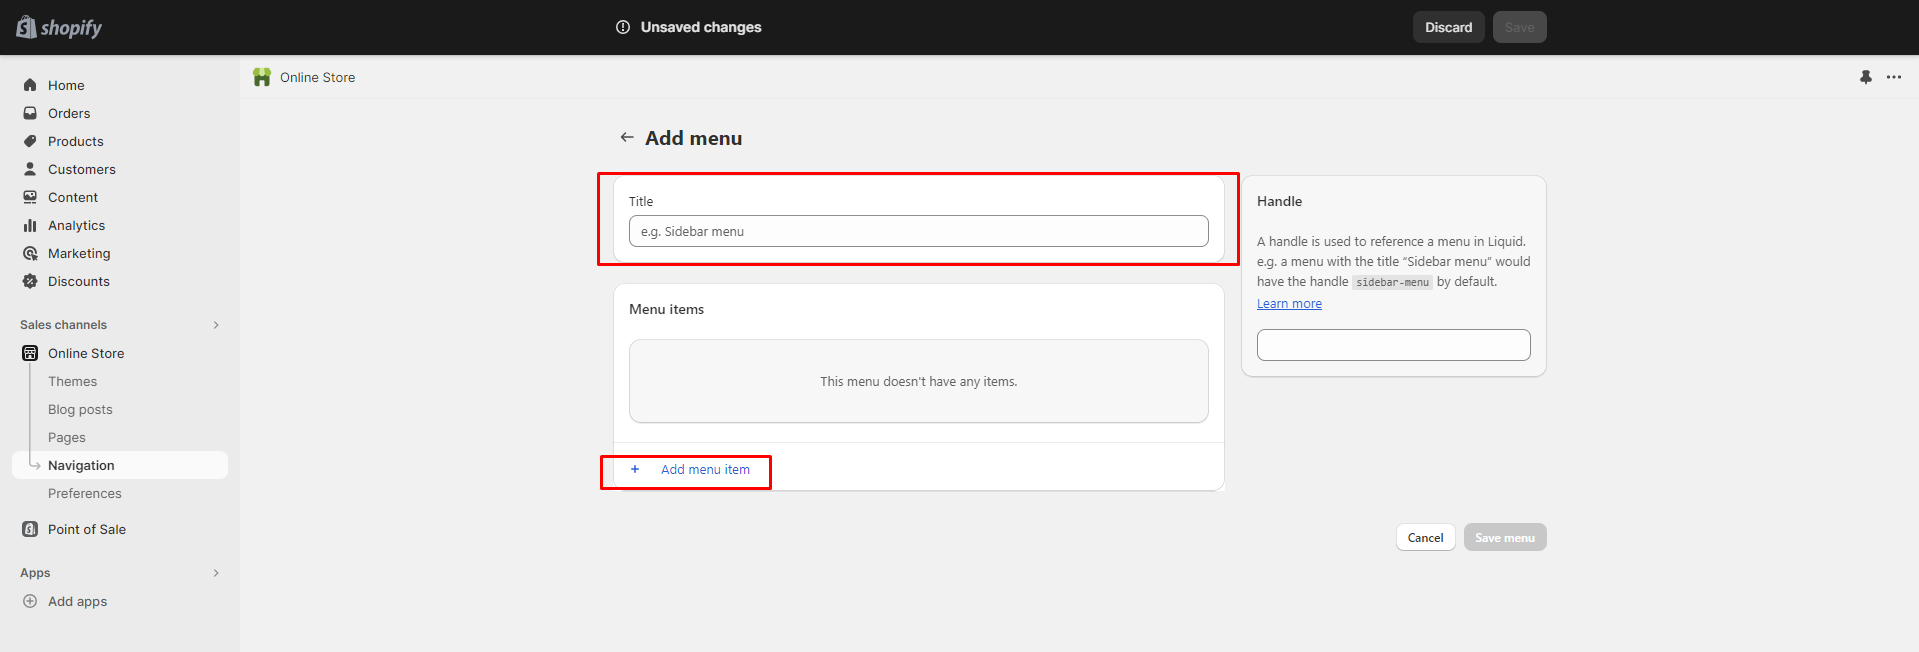
You don’t want to give people too many options right from the start. Instead, you can organize your navigation to focus on the actions you want visitors to take.
Apply Your Brand
Now it’s time to customize your store by setting your colors, typography, and other details that reflect your business’ brand.
The colors and typography you choose matter a lot for your brand’s image and identity. You can alter the look of your online store, including colors and typography, by clicking on the Theme Settings tab in the online store editor.
By following the tips below, you can build a Shopify store without any design experience and still create font and color pairings that you love:
For color:
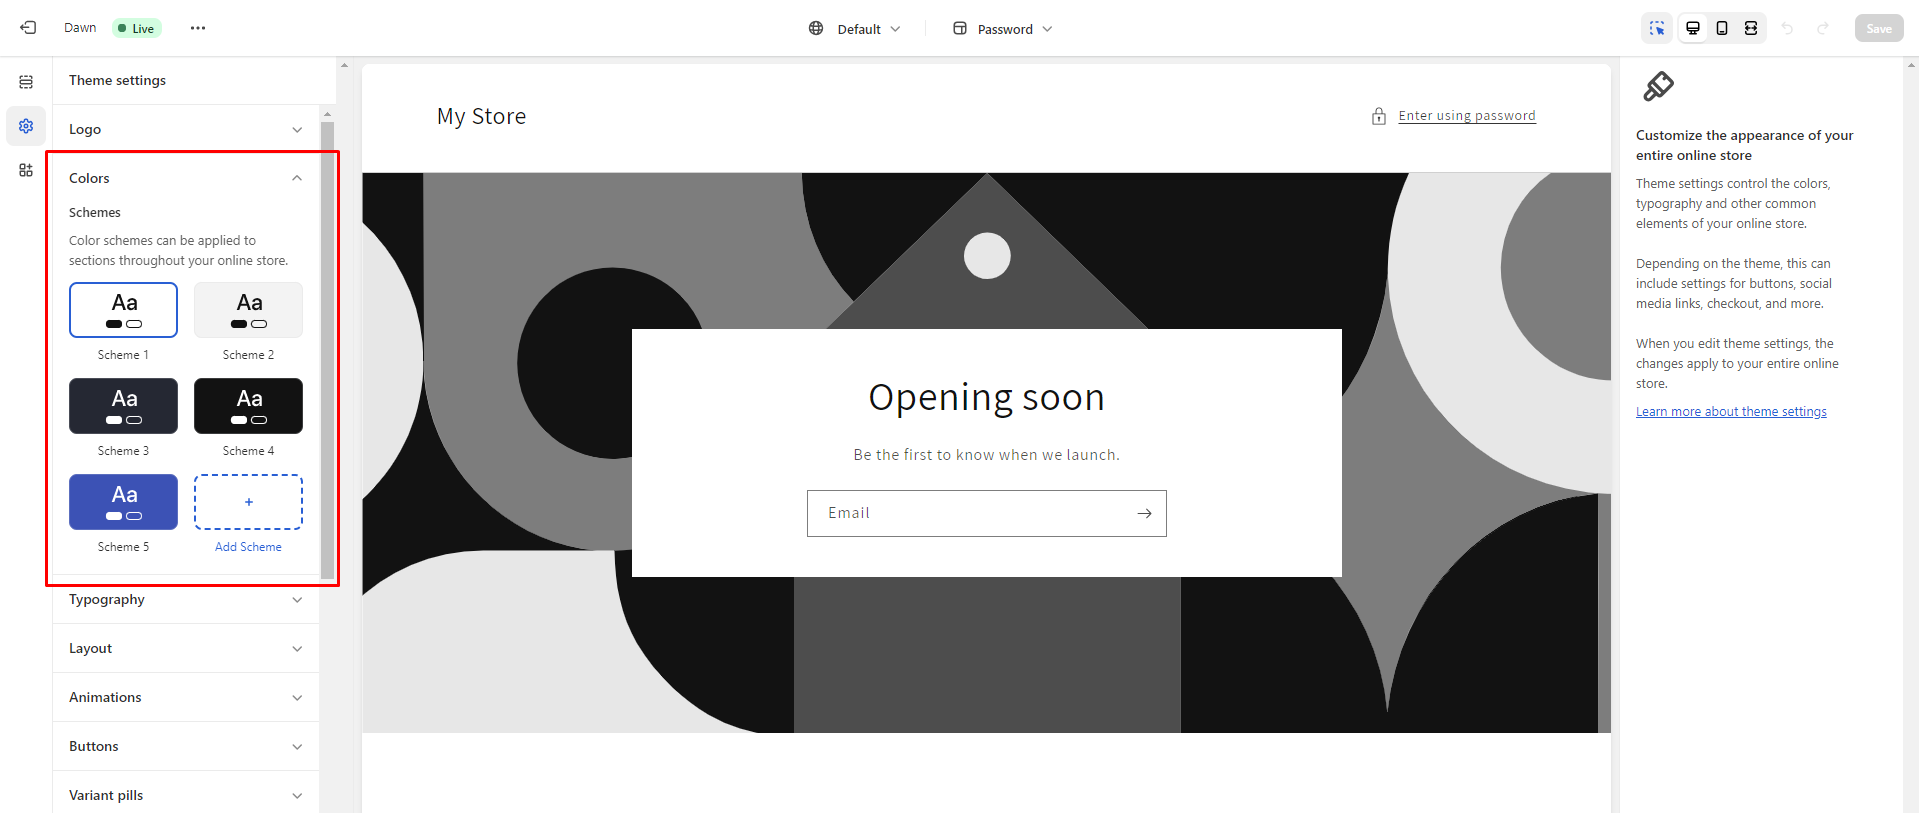
- Understanding Emotional Impact: Colors play a significant role in evoking emotions and perceptions. Familiarize yourself with the psychological associations that colors can have. For instance, red might stimulate hunger and urgency, yellow can suggest warmth and safety, and purple can convey a sense of luxury or royalty. Choosing colors that align with your brand’s personality and message can help establish a cohesive and resonant visual identity.
- Employing Contrast for Emphasis: Contrast is a powerful tool for drawing attention to specific elements on your website. For crucial features like buttons, leverage color contrast to make them stand out prominently against the surrounding content. High contrast not only improves readability and usability but also guides users’ focus to the most vital calls to action.
- Utilizing Color Palette Generators: If you’re unsure about color combinations, using online tools like Coolors can be immensely helpful. These platforms provide color palette generators that suggest harmonious color combinations. They often provide the hex codes for each color, making it easy to apply your chosen palette consistently across your website.
- Trusting Your Instincts: Sometimes, your initial gut feeling about a color combination is the right one. If a particular color pairing resonates with you and aligns with your brand’s essence, it’s likely to resonate with your audience as well. Trusting your creative intuition can lead to authentic and visually appealing results.
- Opting for Simplicity with Black and White: If you’re unsure about using a complex color palette, consider the elegance and simplicity of black and white. This classic combination can offer a clean and timeless aesthetic, enabling your content and products to shine without distraction. Black and white pairings also provide a strong foundation for introducing accent colors if needed.
For fonts and typography:
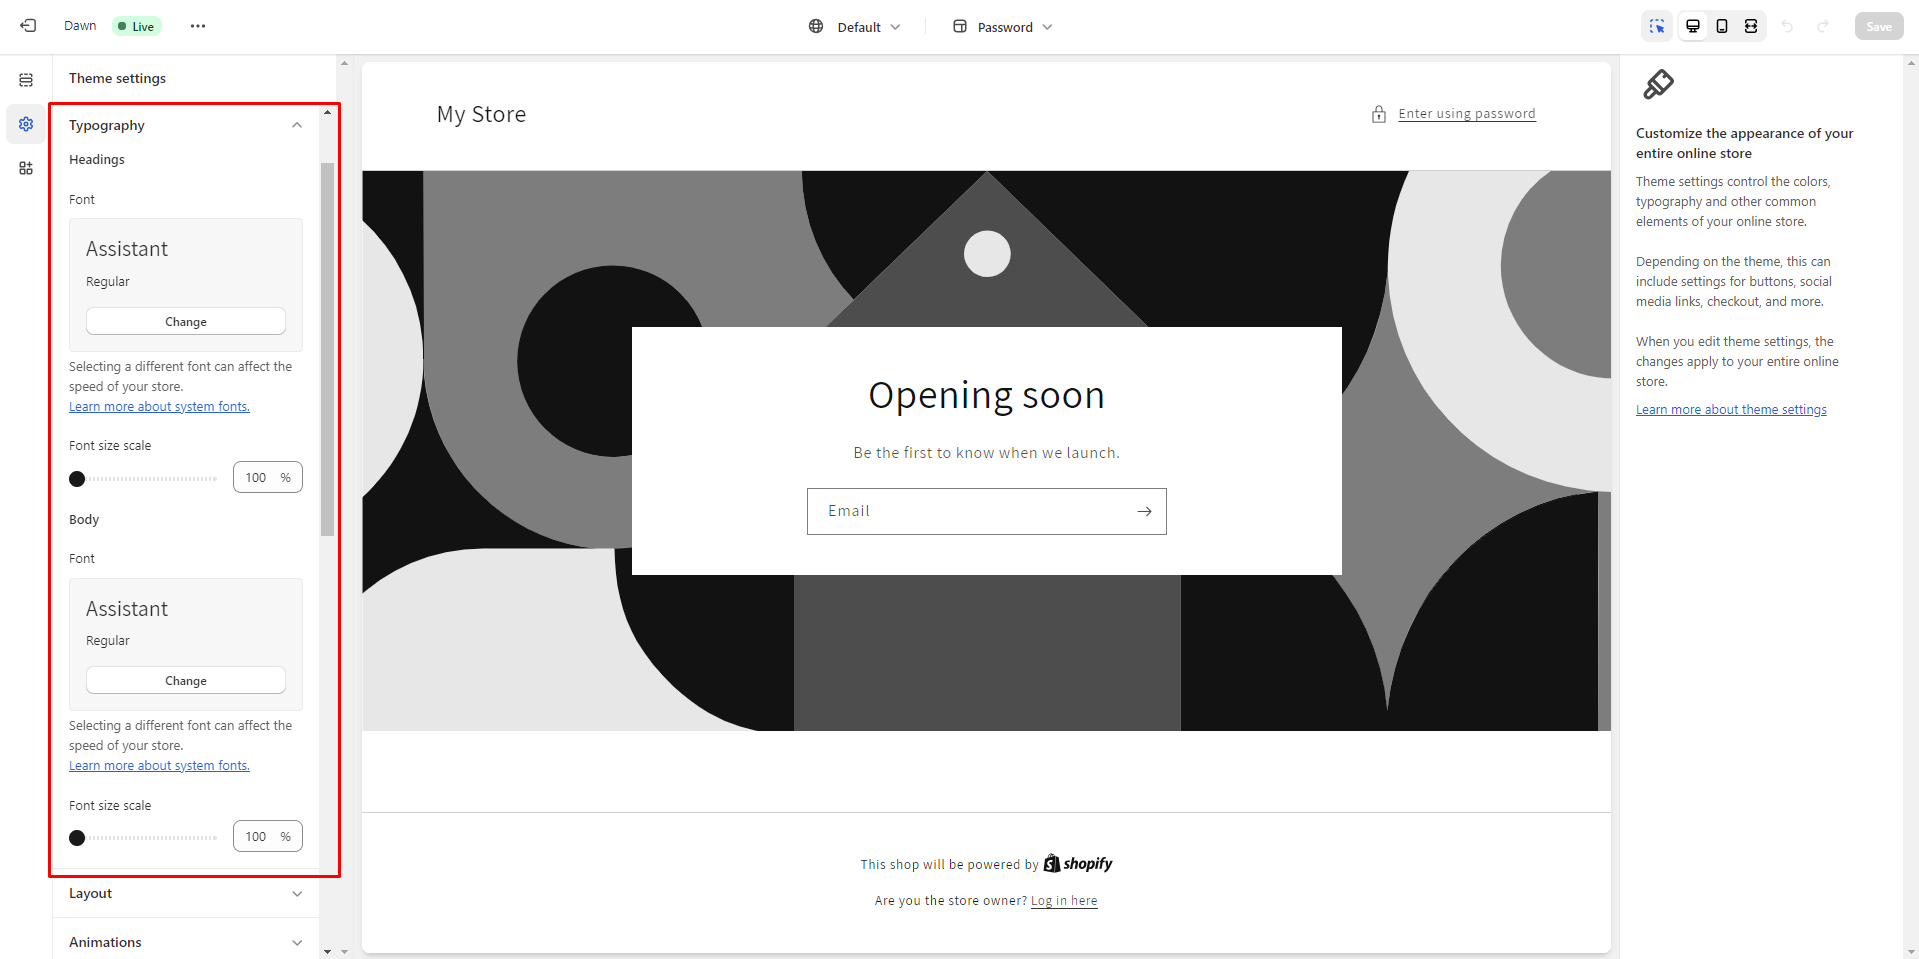
- Prioritizing Readability: When selecting the right fonts, readability should be a top priority. Opt for fonts that are clear, easy to read, and maintain legibility across different screen sizes. Ensure that your chosen fonts don’t strain users’ eyes or create confusion when consuming your content.
- Pairing Contrasting Fonts: Mixing fonts can create visual interest and help distinguish different content sections. However, it’s important to pick fonts that contrast harmoniously. Pair a bold or decorative font with a more straightforward and clean font for balance. This contrast helps guide users’ attention to headings, subheadings, and body text.
- Limiting Font Varieties: While it’s tempting to experiment with a variety of fonts, using too many can result in a cluttered and inconsistent look. Stick to a maximum of two to three fonts—each serving a specific purpose (heading, subheading, body text)—to maintain a cohesive and organized appearance.
- Testing Legibility: Before finalizing font choices, ensure that they are legible across different devices and screen sizes. Test your selected fonts on desktops, laptops, tablets, and smartphones to guarantee that your content remains easily readable and visually appealing across the board.
Customize Your Checkout
You can customize the look of your new Shopify store by going to Theme Settings and playing around with the different checkout options. You can click through to your checkout settings (or go to Settings -> Checkout) if you need to customize how your checkout works.
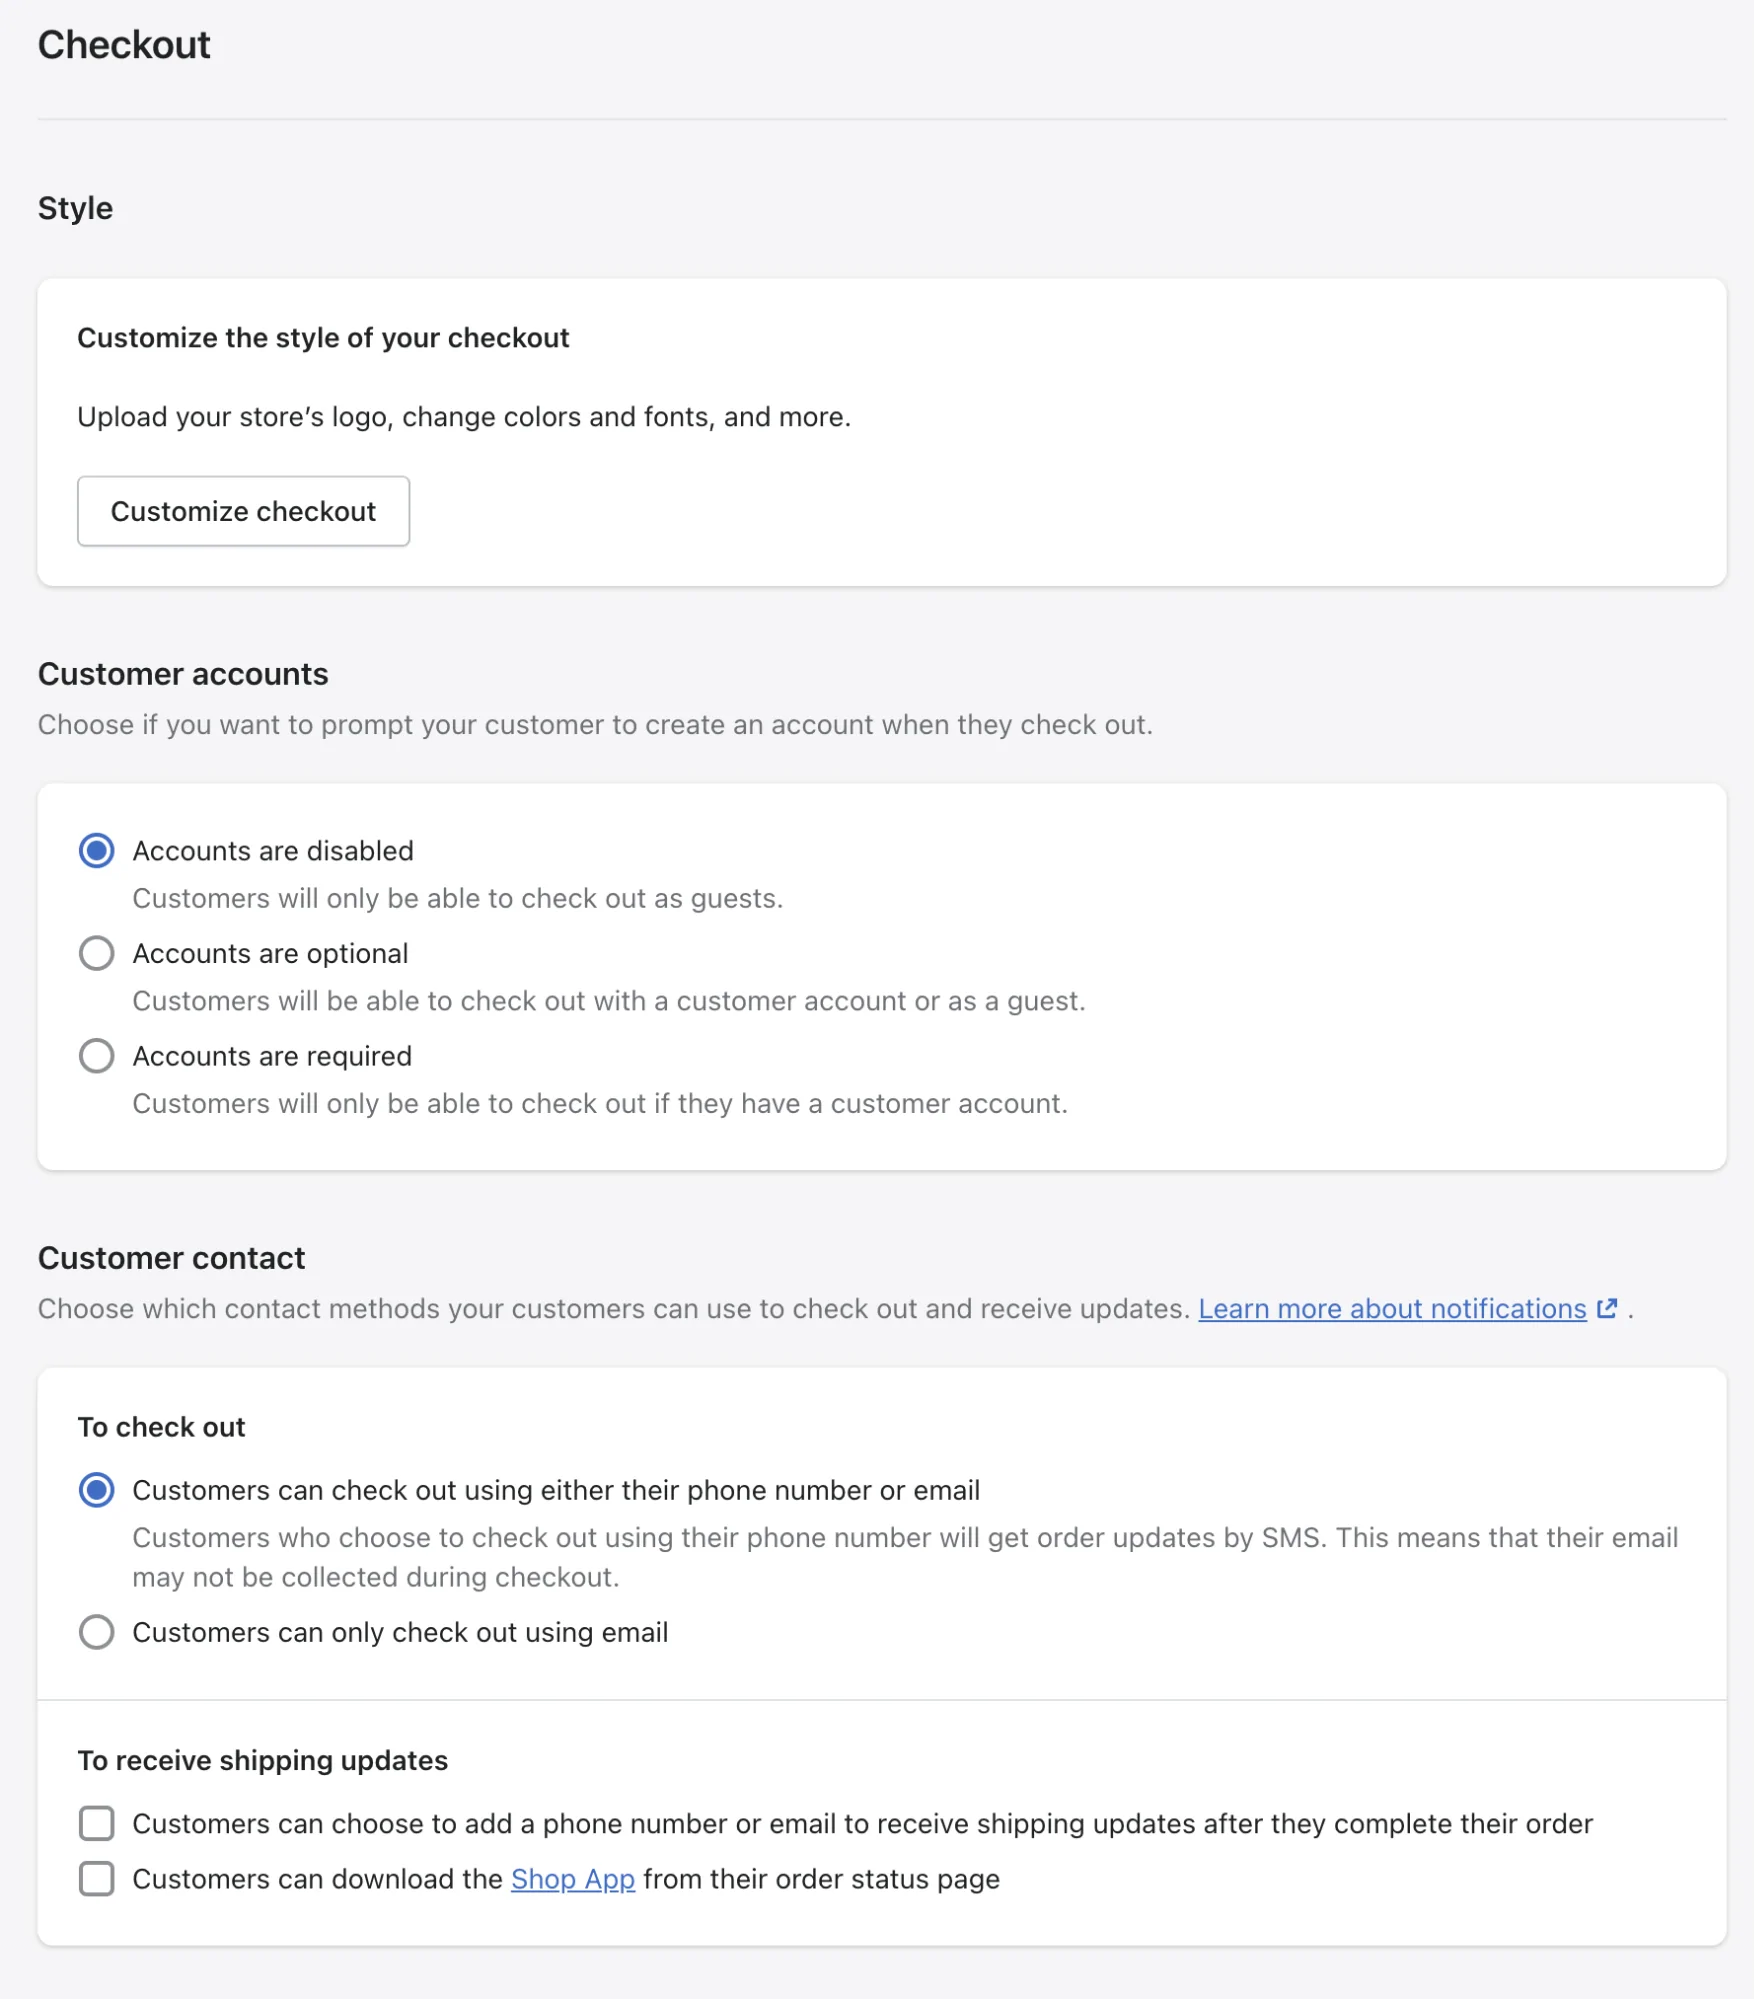
Below are the options you can select for your checkout:
- Customer accounts: Depending on your store’s focus, you can decide if customers need to make an account to finish their purchase. If you run a wholesale or members-only business, this would be beneficial.
- Customer contact: After placing an order, customers can choose whether they want to be contacted by email or SMS text message.
- Form options: You can select to keep extra information like a first name or company name hidden, optional, or required during checkout.
- Order processing: There are options available to make ordering simpler and easier, or you can add an extra confirmation step.
- Marketing consent: By subscribing to your marketing emails and SMS, customers can stay updated on your latest products and offerings.
- Tipping: Customers can add a tip to their online purchases to show support for your business.
- Abandoned checkouts: Customers who don’t finish their purchase at checkout (this can happen due to many reasons) can receive an automated reminder email.
Set Up Shipping
Set Up Your Shipping Rates
After you add products and content, and design your own website, it’s time to think about how you’re going to get your goods to customers without any issues, as well as the tax implications of selling items. Let’s start with shipping.
To change your shipping settings, navigate to Settings -> Shipping and Delivery in your Shopify account.
There are a lot of factors to consider when shipping products for your eCommerce business, such as product weight, packaging costs, shipping destination, carrier rates, and profit per order.

We simplify it down to a few key methods. You can even use a combination of methods, depending on what will serve your business best. In this way, you’re sure to find a shipping strategy that’s perfect for you:
- Free shipping: You can offer free shipping as a way to encourage customers to shop. This might apply to certain products, order amounts, or types of customers. But you’ll need to raise your product prices so that the cost of shipping will be covered by the store and not the customer.
- Flat shipping rates: Flat-rate shipping is a rate not based on the product price or weight. So it works best if your products have similar sizes and weights.
- Real-time carrier rates: Rates that vary in real-time according to the postal company chosen by the customer at checkout, based on the weight/size of the order. Customers can select the service and price combination most convenient for them.
- Local pickup/delivery: This option allows customers to pick up their orders directly from your physical location or opt for local delivery if you provide that service.
Set up Your Tax Rates
Depending on the country, many merchants will be required to charge sales tax or VAT (value-added tax) on their products. To avoid any penalties, it would be best to ask a professional how you should configure these taxes for your store.
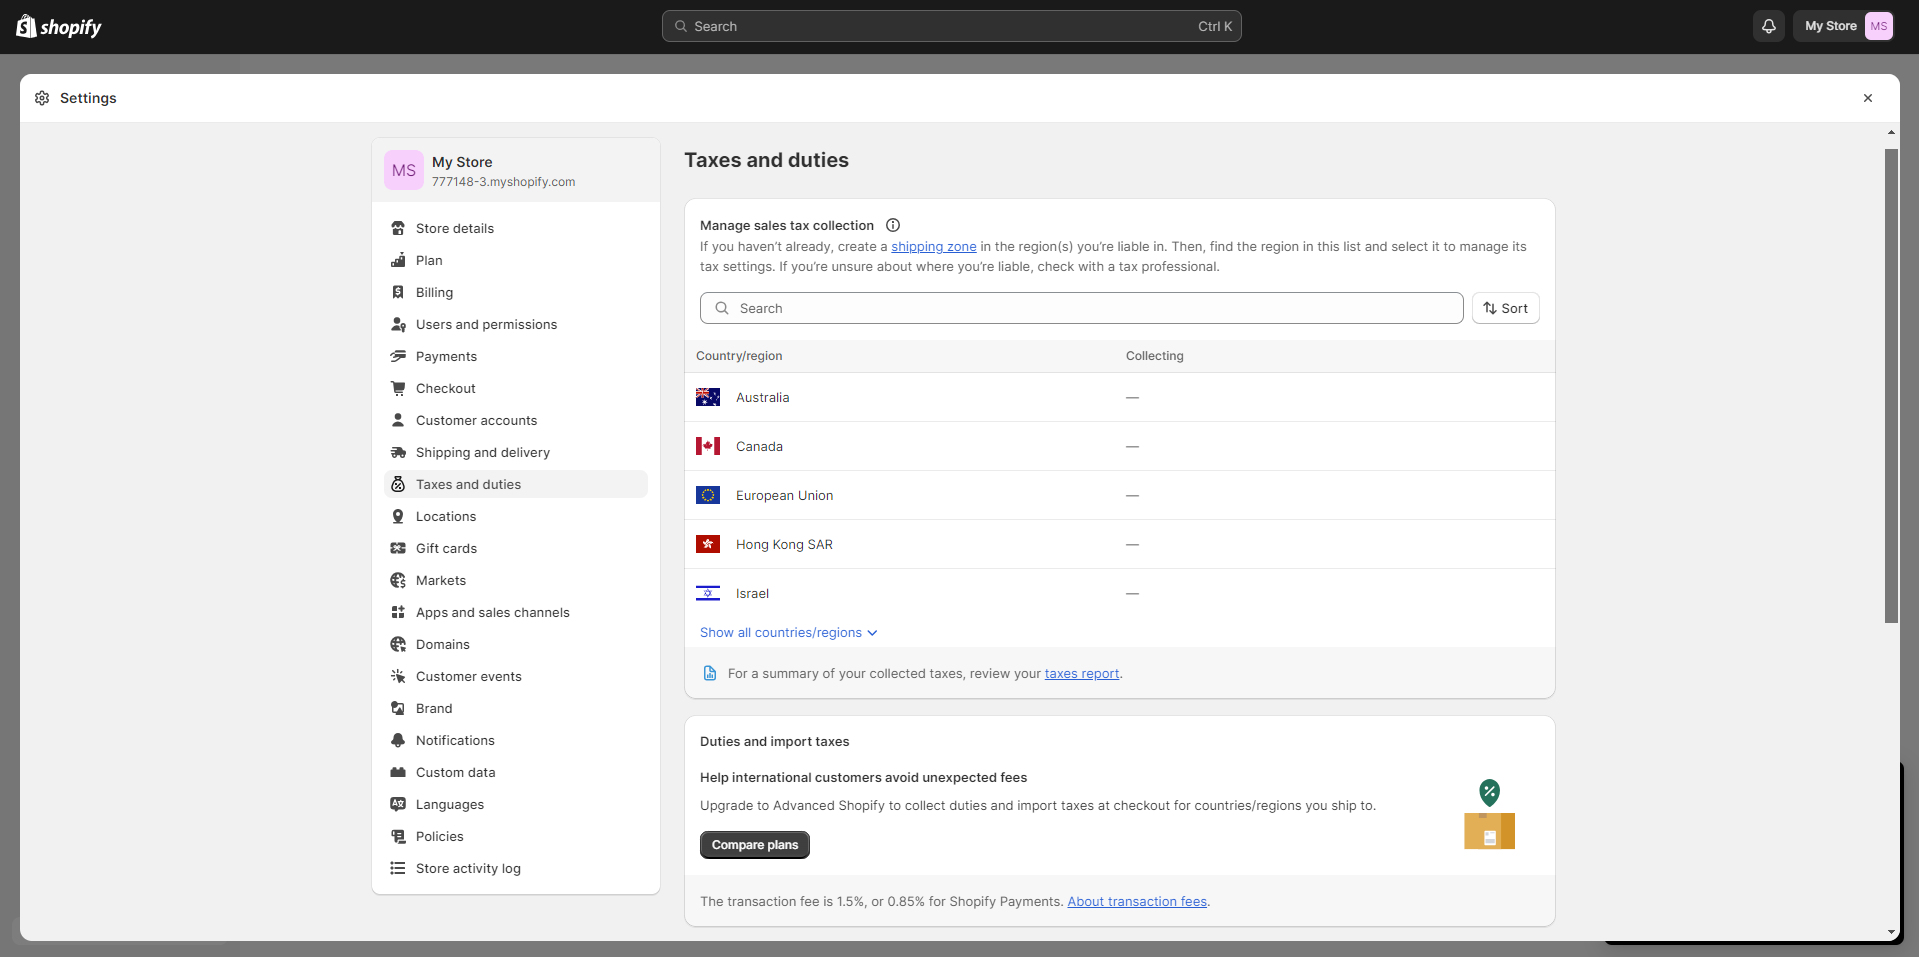
Even though Shopify will automatically handle most tax calculations for you by using default sales tax rates around the world, it’s still a good idea to do some research or ask a tax professional about how much sales tax you should be charging. If your region has different taxes for certain products or shipping, you need to change the default tax settings.
You can manage your tax regions by heading to Settings -> Taxes and Duties in Shopify. If you want, you can edit the default rates here, or apply overrides for special conditions that might be applied to your region or products.
Choose a Payment Gateway for Your Store
We’re in the final stretch of setting up your Shopify store. This is the last thing you have to do before your store is ready to go!
You can easily set up your payment provider by going to Settings -> Payments. Shopify offers the ability to accept many forms of payments through Shopify Payments.
If your business is located in one of the countries we support and isn’t a prohibited business, you can activate Shopify Payments with just one click. You won’t be charged any extra transaction fees. You also can offer your customers additional payment options, or you can choose from over 100 third-party payment providers on Shopify.
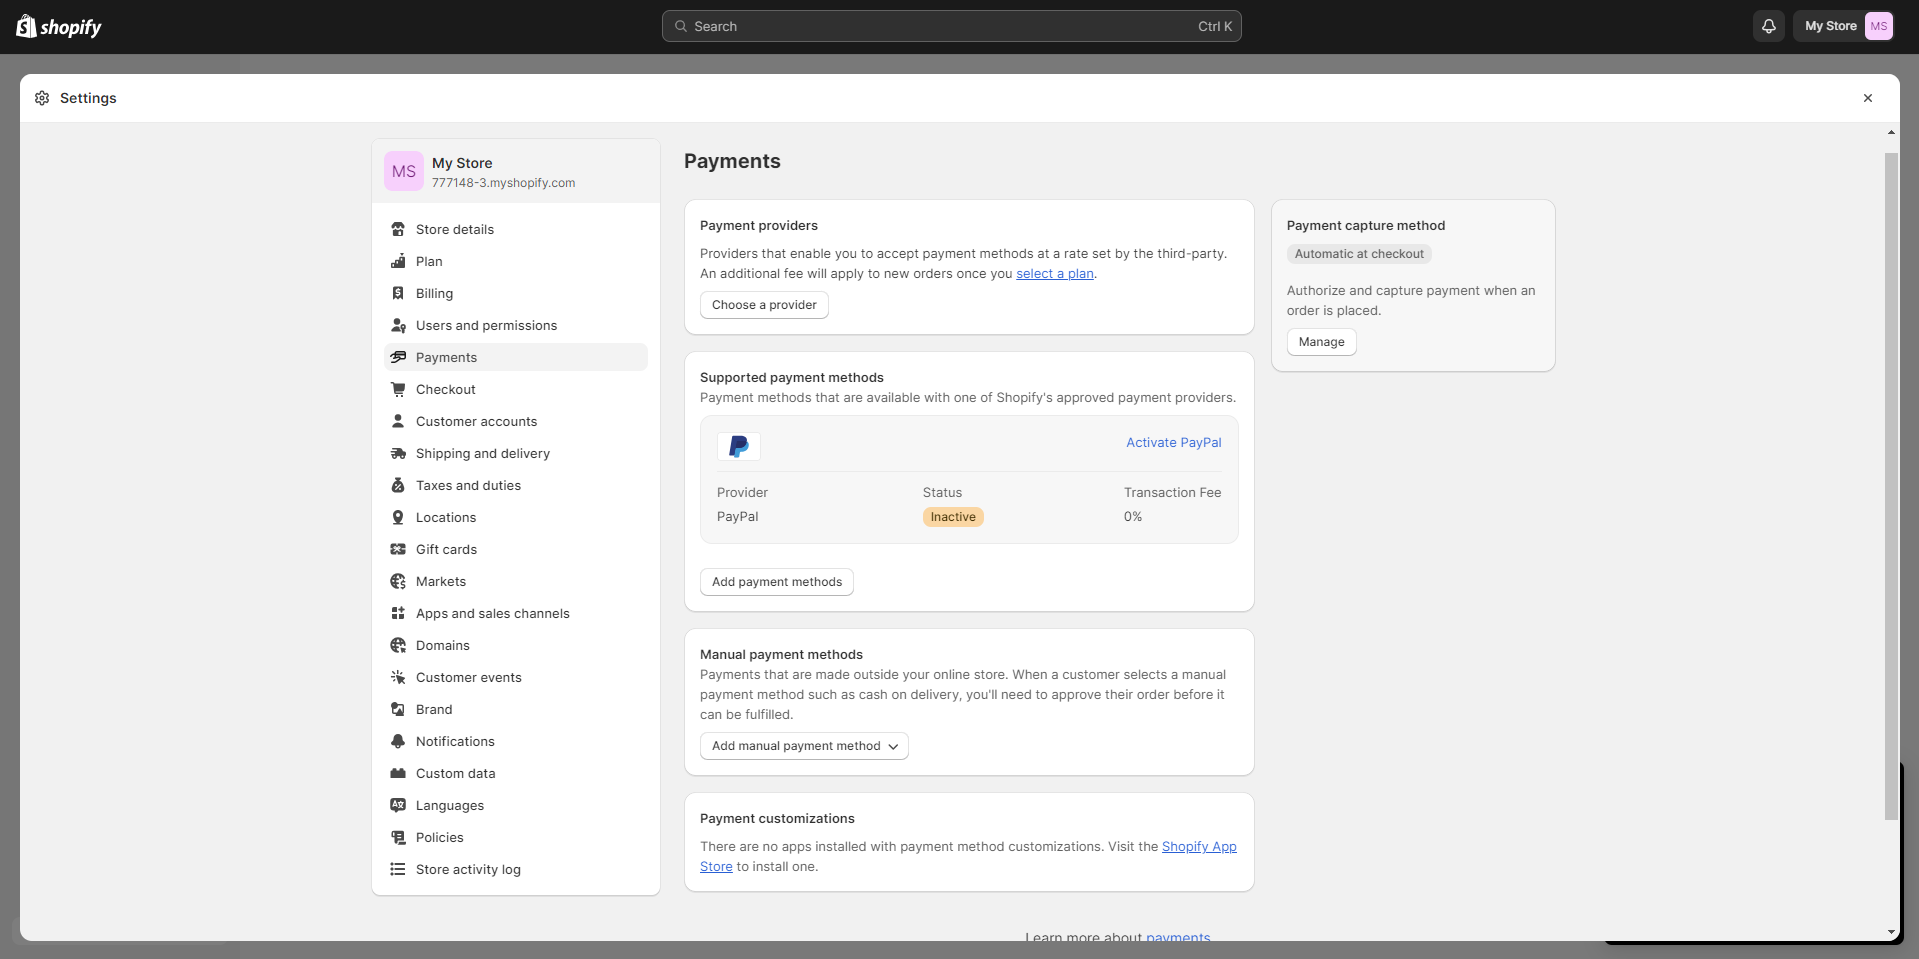
After you click Complete account set up, enter your name, address, last 4 digits of SSN, banking information, and a few other pieces of data about yourself and your business.
With Shopify Payments, you can:
- Offering Convenient Payment Options: Shopify Payments provides you with the capability to offer your customers a range of payment options, including various credit card types and one-click payment methods. This flexibility accommodates the diverse preferences of your customers, ensuring a smooth and convenient checkout process that contributes to higher conversion rates.
- Selling in Multiple Currencies: Expanding your market reach becomes seamless with Shopify Payments. You have the ability to sell in multiple currencies, and if you enable this feature, the prices will be automatically converted into the customer’s currency. This eliminates the need for customers to manually convert prices, creating a more seamless and accessible shopping experience for international buyers.
- Customizable Payout Schedule: Shopify Payments empowers you to manage your cash flow efficiently. You can choose the frequency of your payouts, whether it’s daily, weekly, or monthly. This flexibility enables you to align your payout schedule with your business’s financial needs and operations, ensuring balanced and sustainable cash flow management.
- Enhanced Security Measures: Security is paramount in online transactions. Shopify Payments offers an extra layer of fraud prevention through security measures such as CVV (Card Verification Value) and postal/ZIP code verification. These safeguards mitigate the risk of fraudulent transactions, safeguarding both your business and your customers’ sensitive information.
- Branding on Bank Statements: With Shopify Payments, you have control over how your business appears on your customer’s bank statements. This branding feature allows you to create a recognizable and consistent experience for your customers, reinforcing your brand identity even beyond the online shopping environment.
Prepare Your Store for the Launch
Now that you’re finished, it’s time to let your store go live! But before you do, we recommend going through the following four options. They’ll ensure that your Shopify store stands out among the competition.
Connect Shopify Apps
You can find a range of apps on the Shopify marketplace to improve your store, no matter how successful it currently is. To explore the possibilities, go to Apps on your admin panel.
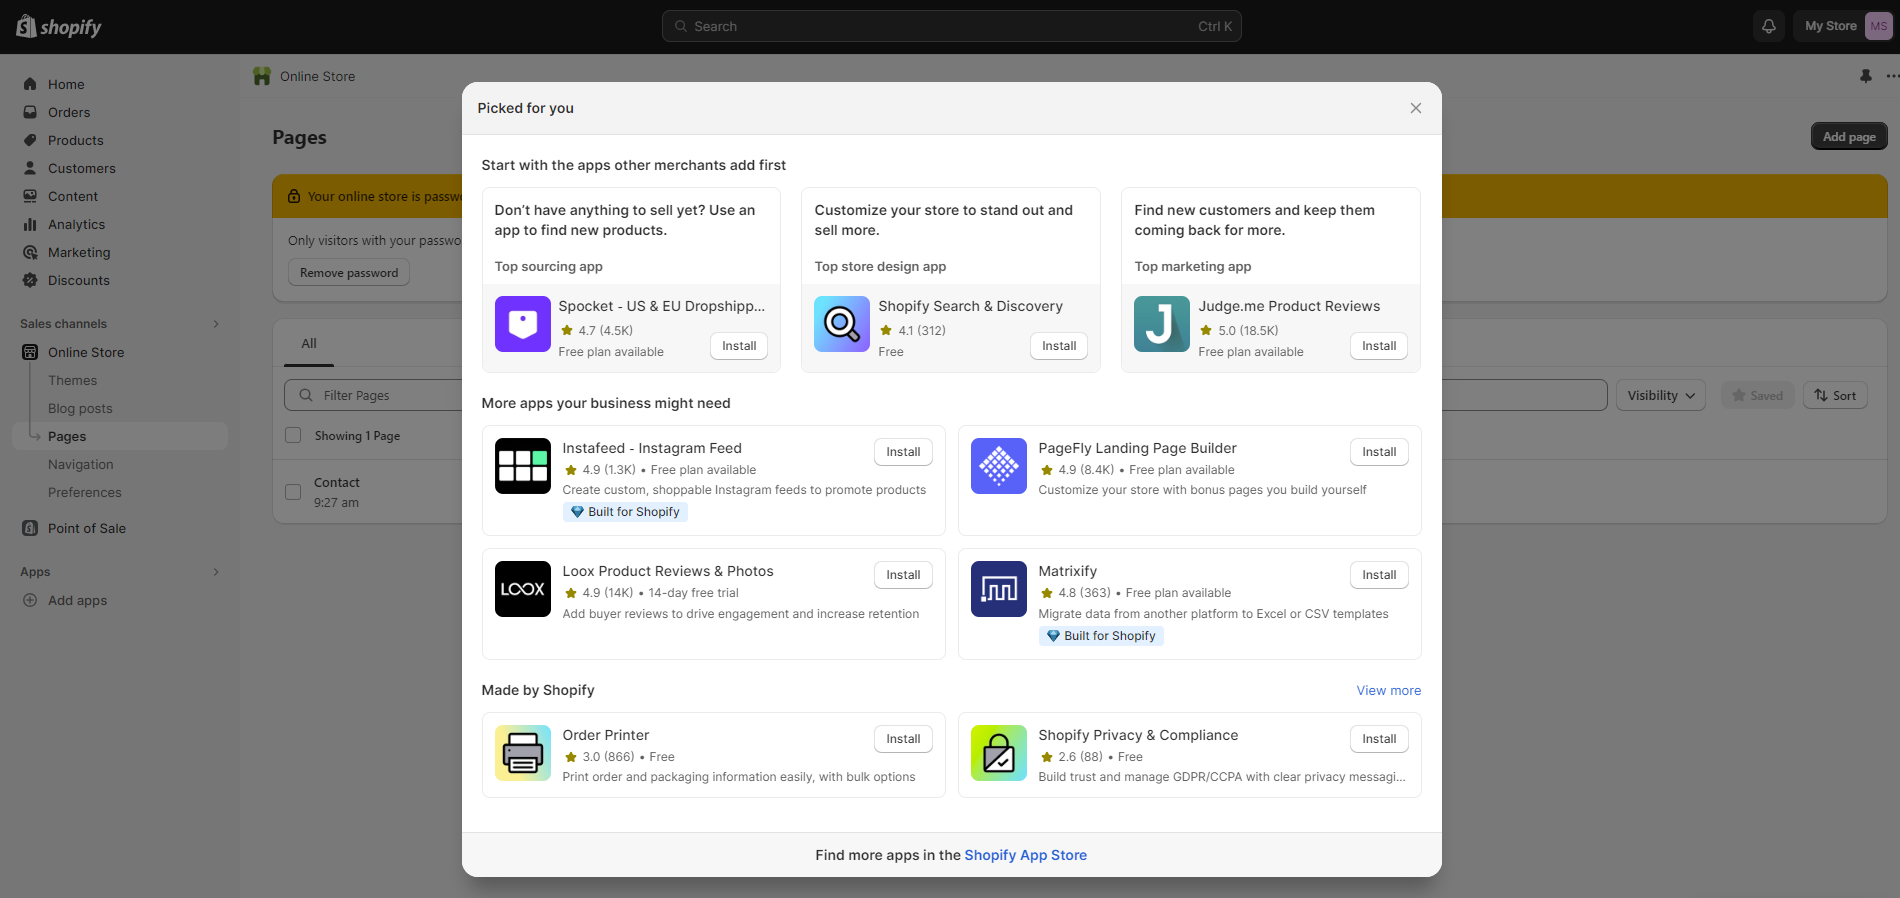
With so many options in the Apps library, you’re sure to find an app that meets your needs – whether it’s for referral programs, monthly budget calculation, email list building, social media advertising, or upselling/cross-selling.
Add Sales Channels
By using Shopify, you not only create an online store but also have the opportunity to use other sales channels and meet your customers where they are. It’s easy to keep track of all your products, inventory, and reporting in one place so you always know what’s going on with your business.
But remember that not every sales channel will be relevant to your business, so you should check out some prominent channels:
- Shopify POS: This point-of-sale solution makes it easy to accept in-person payments and keep your Shopify store and inventory up to date.
- Social networks: You can sell your products directly on social media platforms like Facebook, Instagram, and Pinterest.
- Google channel: The Google channel allows you to list your products for free in the Shopping tab of Google search results, as well as running Google Shopping campaigns.
- Buy Button: If you want to sell your products on an existing website or blog, the Buy Button sales channel allows you to embed your products onto another webpage for customers’ convenience.
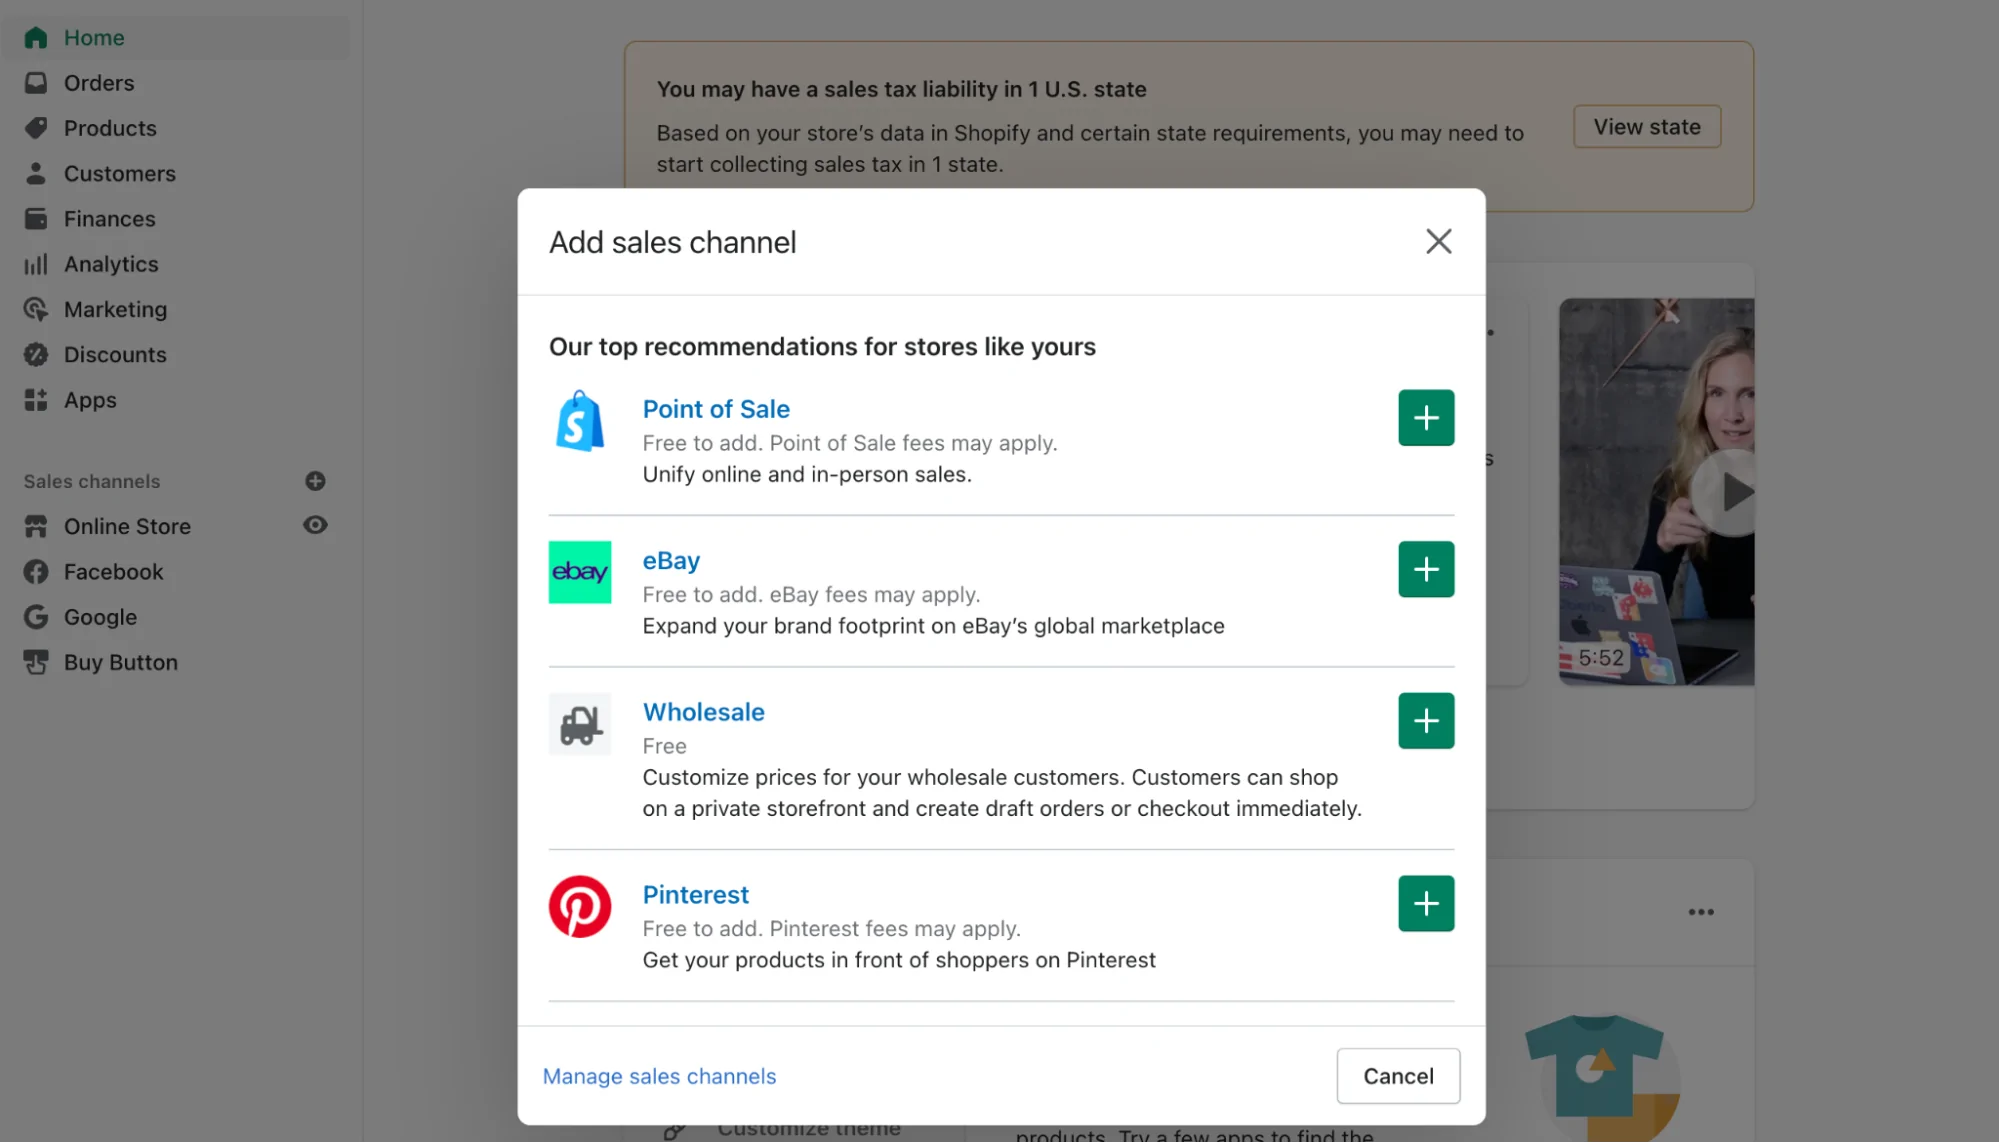
You also can easily add sales channels by clicking the + button next to Sales channels or explore the entire list of available sales channels in the Shopify App Store. Then, on your Product pages under Product Availability, select which products you want available for each channel.
Register a Domain
A custom domain URL is one that you brand and select to replace the store name URL created during setup. For example, if your generated store name URL is mystore.shopify.com, you could buy mystore.com as your public-facing URL instead.
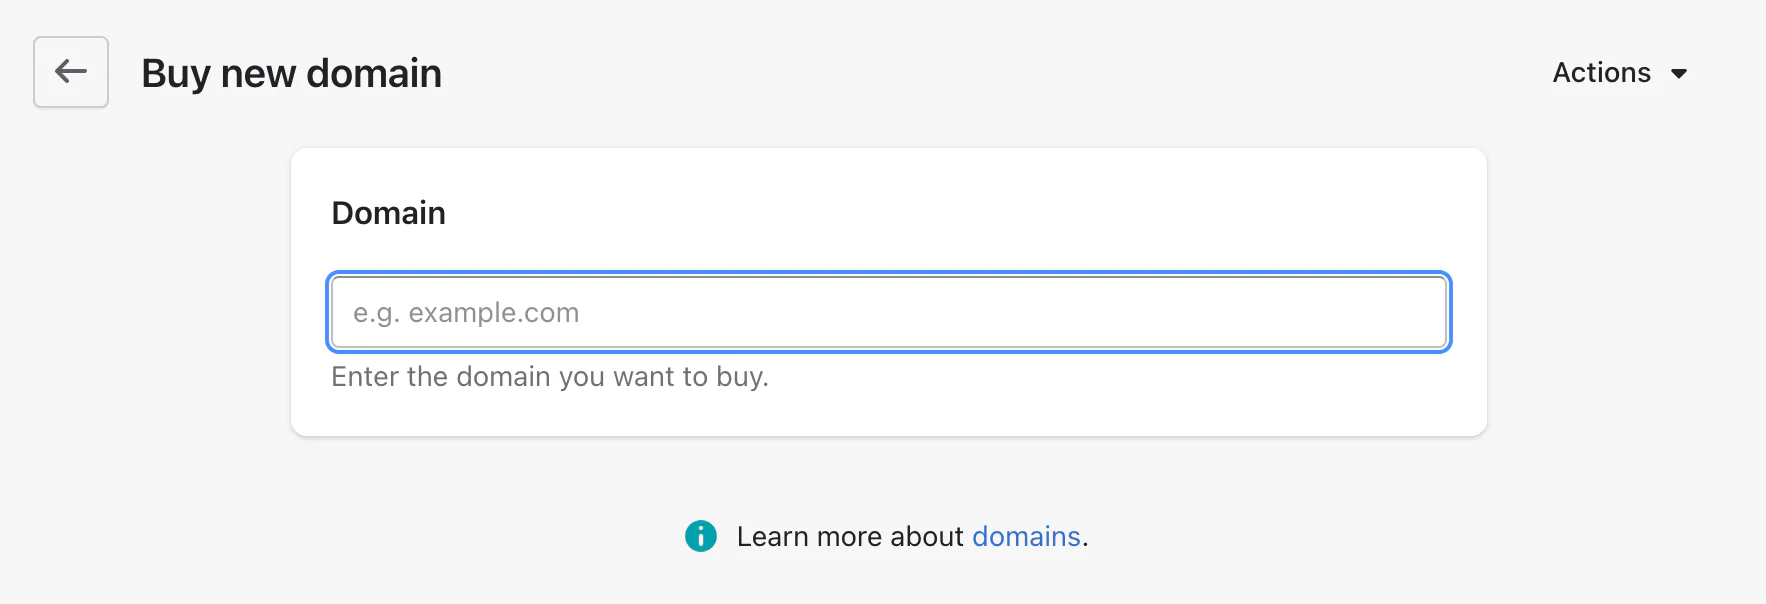
You can purchase a domain directly through Shopify or transfer an existing domain from another registrar in just a few clicks under Settings -> Domains in your admin panel.
Connect Analytics
A detailed report is necessary for any merchant, and Shopify’s Analytics system delivers just that. However, as an entrepreneur striving for success in online sales, you need even more data than what’s provided. You can get access to this by going to Sales Channels -> Online Store -> Preferences and entering your Google Analytics code and Facebook Pixel – both of which can be found in your Google and Facebook business accounts.
Launch Your Store
Excellent job! You’ve just completed creating your first Shopify store. To achieve success, open it to the public and begin advertising to attract potential customers. Your store is currently password-protected and only viewable by you or others who have the password.
To begin selling, go to Online Store -> Preferences. Once there, scroll to the bottom of the page and disable the password requirement. You will need to select a plan and pay Shopify before you can start using their services, but after that’s all taken care of – you’re good to go!
To conclude,
Creating an online storefront is effortless when you follow our beginner-friendly steps. With a low-cost investment and some time, Shopify can help your business achieve success by building a professional store. If you have questions along the way, don’t hesitate to reach out to us! Our team has years of experience helping businesses like yours to build a high-converting Shopify store.