In today’s fast-paced digital landscape, live chat has become an essential customer service tool and a valuable asset for online businesses. It provides Real-time Customer Support, boosts sales, and generates customer behavior data for further study. Nowadays, there are plenty of Live Chat services for you to choose from. In this article, we will guide you through the process to integrate Live Chat in Magento 2 sites.
Table of Contents
How To Integrate A Live Chat To Magento 2 with 5 Steps
Step 1: Create a module
In this section, we set up a module called “LiveChat”.
In order to create a module, you need to create a registration file: your_magento_base/app/code/Magenest/LiveChat/resgistration.php
(Magenest is our company name, you can set it up with any name)
<?php
\Magento\Framework\Component\ComponentRegistrar::register(
    \Magento\Framework\Component\ComponentRegistrar::MODULE,
    'Magenest_LiveChat',
    __DIR__
);
Then create: your_magento_base/app/code/Magenest/LiveChat/etc/module.xml
<?xml version="1.0"?>
<config xmlns:xsi="//www.w3.org/2001/XMLSchema-instance"
xsi:noNamespaceSchemaLocation="urn:magento:framework:Module/etc/module.xsd">
<module name="Magenest_LiveChat" setup_version="1.0.0">
</module>
</config>
Open your terminal, type: cd /var/www/html/magento2.1.6/
(Note that I’m magento2.1.6, your path to the folder might be different)
Then type: sudo bin/magento setup:upgrade
and sudo chmod -R 777 var pub

Go to your phpmyadmin, if there is “Magenest_LiveChat” in setup_module, your module is installed.
Create: your_magento_base/app/code/Magenest/LiveChat/etc/adminhtml/menu.xml
<?xml version="1.0"?>
<config xmlns:xsi="//www.w3.org/2001/XMLSchema-instance" xsi:noNamespaceSchemaLocation="urn:magento:module:Magento_Backend:etc/menu.xsd">
    <menu>
        <add id="Magenest_LiveChat::menu"
             title="Live Chat"
             module="Magenest_LiveChat"
             sortOrder="25"
             resource="Magento_Backend::system" />
        <add id="Magenest_LiveChat::memberMenu"
             title="Live Chat Setting"
             module="Magenest_LiveChat"
             sortOrder="10"
             parent="Magenest_LiveChat::menu"
             resource="Magenest_LiveChat::config_livechat" />
        <add id="Magenest_LiveChat::configuration"
             title="Configuration"
             module="Magenest_LiveChat"
             sortOrder="15"
             action="adminhtml/system_config/edit/section/magenest_livechat/"
             parent="Magenest_LiveChat::memberMenu"
             resource="Magenest_LiveChat::config_livechat" />
    </menu>
</config>
In the terminal, type: sudo rm -rf var
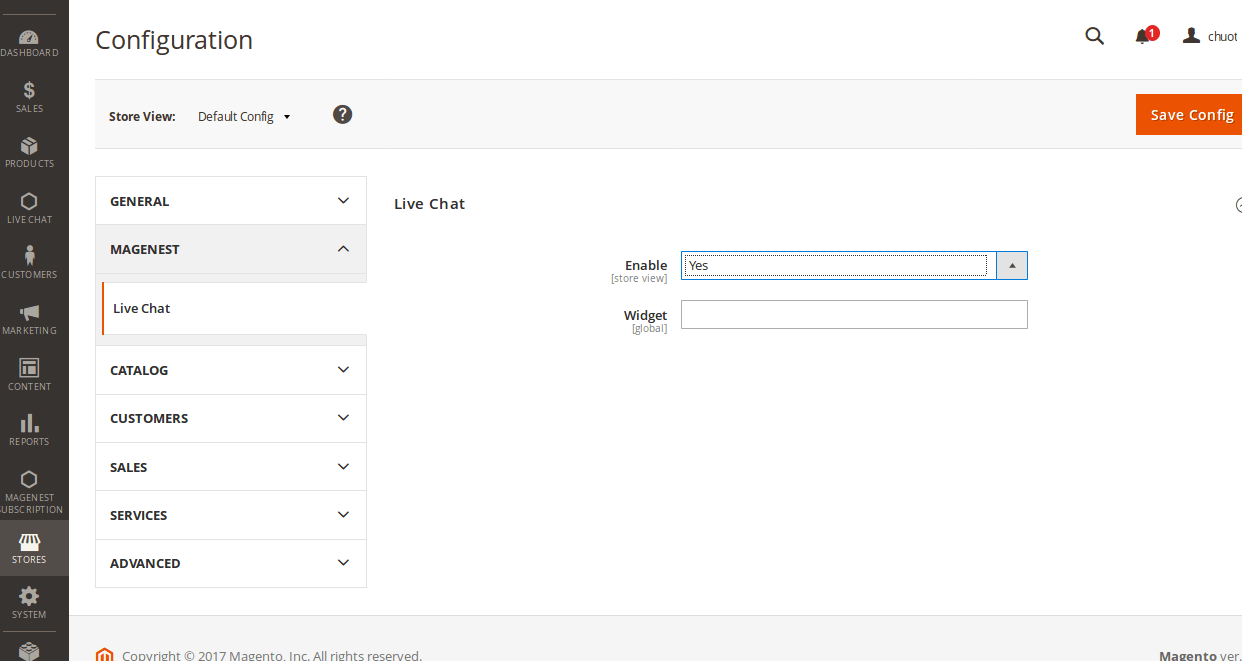
Step 3: Set up the configuration
In the previous step, we added an action:
action="adminhtml/system_config/edit/section/magenest_livechat/"
In order to go to the configuration, we need to set up the configuration for that link.
Create: your_magento_base/app/code/Magenest/LiveChat/etc/adminhtml/system.xml
<?xml version="1.0"?>
<config xmlns:xsi="//www.w3.org/2001/XMLSchema-instance"
        xsi:noNamespaceSchemaLocation="urn:magento:module:Magento_Config:etc/system_file.xsd">
    <system>
        <tab id="magenest" translate="label" sortOrder="200">
            <label>Magenest</label>
        </tab>
        <section id="magenest_livechat" translate="label" type="text" sortOrder="80" showInDefault="1" showInWebsite="1" showInStore="1">
            <class>separator-top</class>
            <label>Live Chat</label>
            <tab>magenest</tab>
            <resource>Magenest_LiveChat::config_livechat</resource>

            <group id="livechat" translate="label" type="select" sortOrder="30" showInDefault="1" showInWebsite="1"
                   showInStore="1">
                <label>Live Chat</label>
                <field id="enabled" translate="label comment" type="select" sortOrder="10" showInDefault="1"
                       showInWebsite="1" showInStore="1">
                    <label>Enable</label>
                    <source_model>Magento\Config\Model\Config\Source\Yesno</source_model>
                </field>
                <field id="widget" translate="label" type="text" sortOrder="20" showInDefault="1" showInWebsite="0"
                       showInStore="0">
                    <label>Widget</label>
                    <validate>required-entry</validate>
                    <depends>
                        <field id="enabled">1</field>
                    </depends>
                </field>
            </group>
        </section>
    </system>
</config>
In the terminal, type: sudo rm -rf var
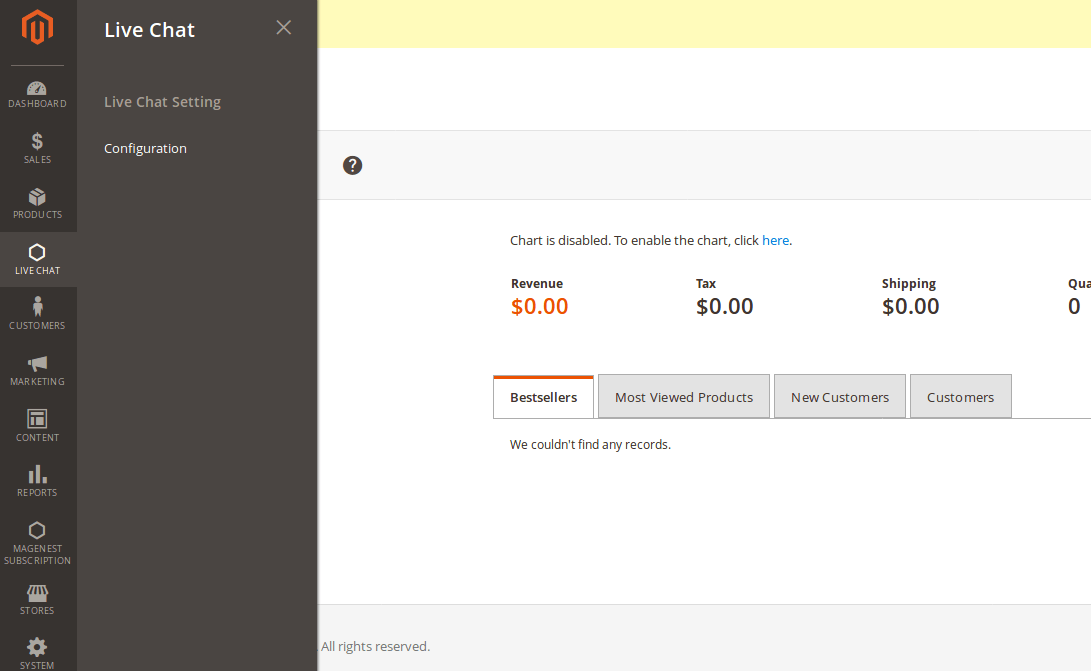
From the live chat menu, click LIVE CHAT > Configuration
Step 4: Get Widget Code from a live chat website
In this tutorial, we use Chat Pirate. Don’t be afraid, the other live chat websites also work in the same way as Chat Pirate.
First, sign up for an account on chatpirate.com and go to chat pirate dashboard.
Second, click Settings > Integrations > Website
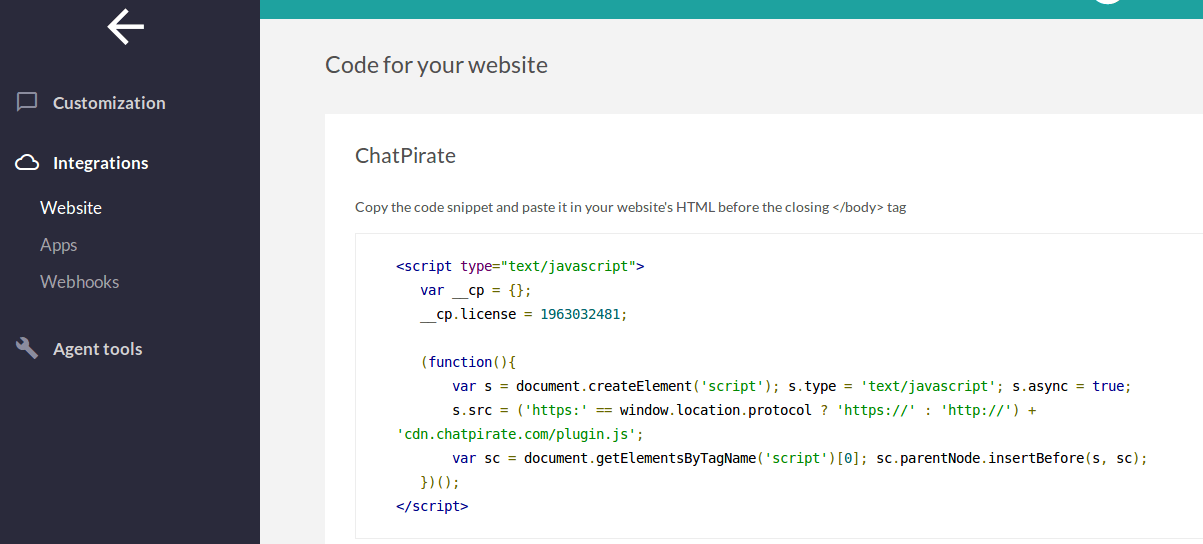
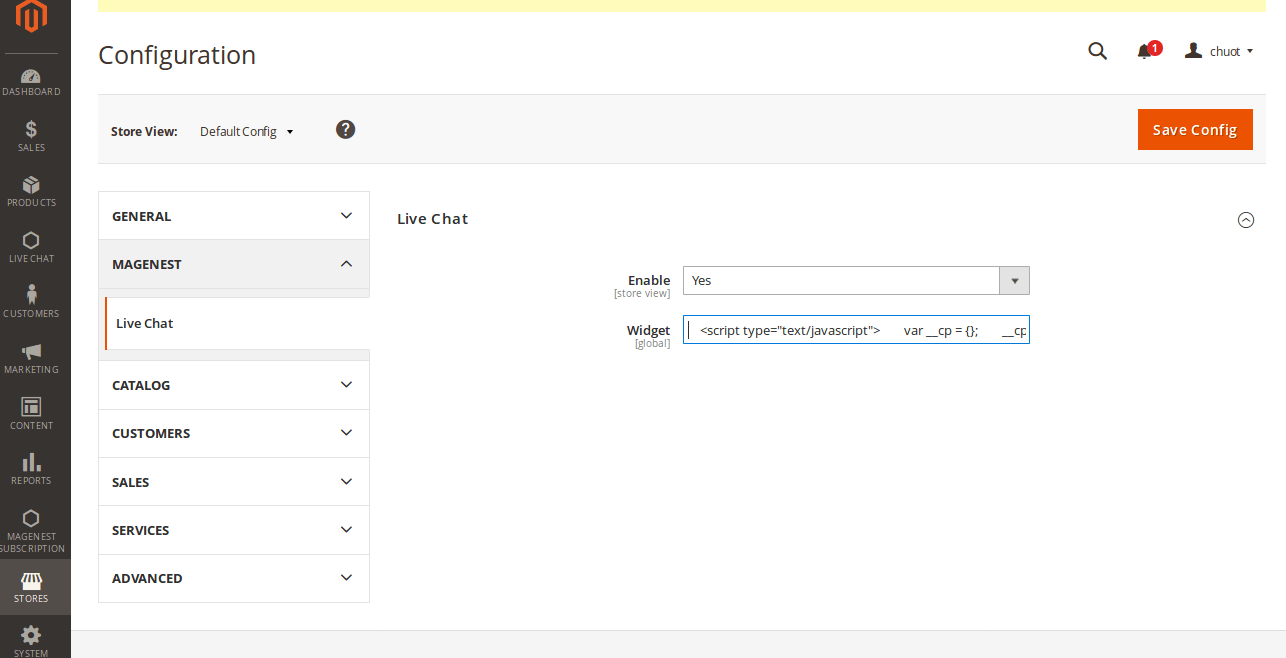
Third, copy these codes and save them in the Widget field in our live chat configuration.
Finally, click Save Config, and a Cache Management notification will appear, you need to refresh all cache by Select All and Submit refresh.
Ok, now you have the Widget Codes. All you need to do is run the Widget Codes on the front end. Before you can finally integrate live chat in Magento 2, perform the last step below.
Step 5: Set up the front-end
We need to get the Widget Codes from our Configuration.
Create: your_magento_base/app/code/Magenest/LiveChat/Block/Adminhtml/LiveChatHelper/LiveChatConfig.php
<?php
namespace Magenest\LiveChat\Block\Adminhtml\LiveChatHelper;
class LiveChatConfig extends \Magento\Framework\View\Element\Template
{
    protected $scopeConfig;
    const XML_PATH_ENABLED = 'magenest_livechat/livechat/enabled';
    const XML_PATH_WIDGET = 'magenest_livechat/livechat/widget';
    public function __construct(
        \Magento\Framework\App\Config\ScopeConfigInterface $scopeConfig,
        \Magento\Framework\View\Element\Template\Context $context
    )
    {
        $this->scopeConfig = $scopeConfig;
        parent::__construct($context);
    }
    public function isEnabled() {
        $storeScope = \Magento\Store\Model\ScopeInterface::SCOPE_STORE;
        return $this->scopeConfig->getValue(self::XML_PATH_ENABLED, $storeScope);
    }
    public function getWidget()
    {
        $storeScope = \Magento\Store\Model\ScopeInterface::SCOPE_STORE;
        return $this->scopeConfig->getValue(self::XML_PATH_WIDGET, $storeScope);
    }
}
Create: your_magento_base/app/code/Magenest/LiveChat/view/frontend/layout/default.xml
<?xml version="1.0"?>
<page xmlns:xsi="//www.w3.org/2001/XMLSchema-instance" xsi:noNamespaceSchemaLocation="../../../../../../../lib/internal/Magento/Framework/View/Layout/etc/page_configuration.xsd">
    <body>
        <referenceContainer name="content">
            <block class="Magenest\LiveChat\Block\Adminhtml\LiveChatHelper\LiveChatConfig"
                   name="front_livechat"
                   template="Magenest_LiveChat::livechatwidget.phtml" />
        </referenceContainer>
    </body>
</page>
Create: your_magento_base/app/code/Magenest/LiveChat/view/frontend/templates/livechatwidget.phtml
<?php
if($block->isEnabled()) {
    echo $block->getWidget();
}
?>
Finally, in the terminal, type: sudo rm -rf var
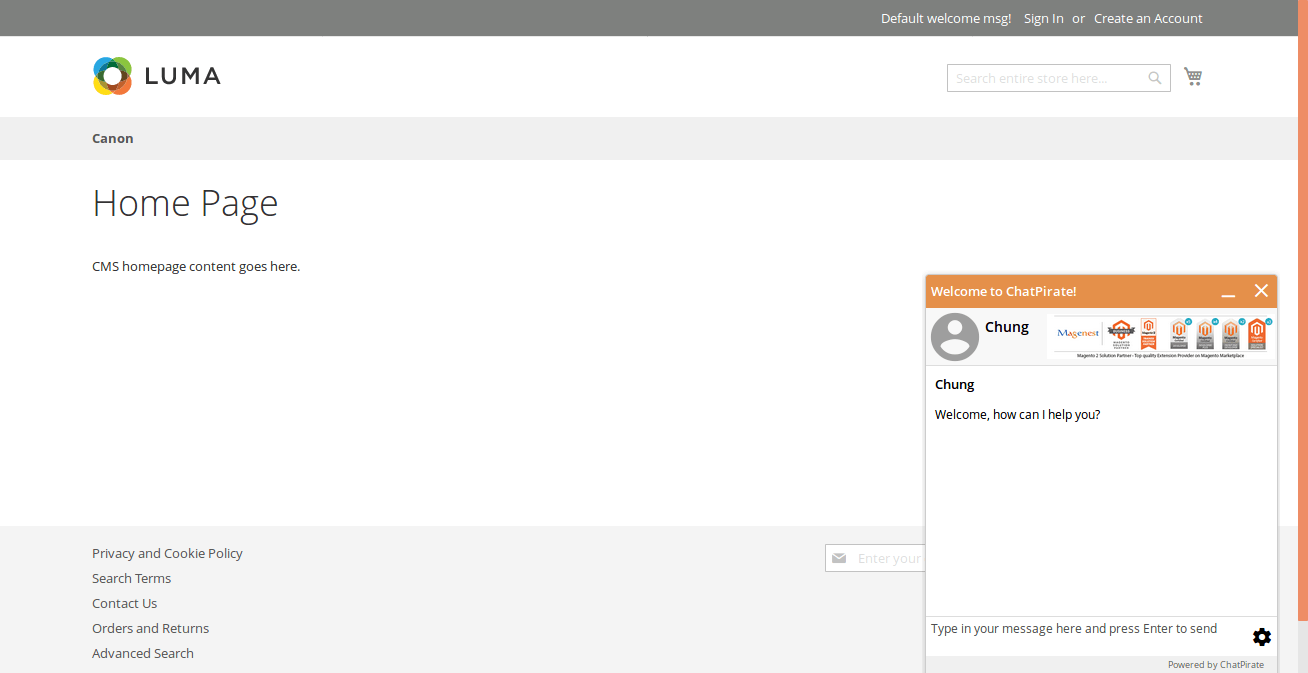
And here is the result.
If you don’t want to turn on live chat, just disable it in the live chat configuration.

That’s it! Now you can integrate live chat in Magento 2. The other live chat websites are also based on this operation, so this simple module can be applied easily. If you have any questions about this blog or face any problems in the process of integrating live chat into your Magento 2 store, feel free to contact our Magento experts and explore our seasoned Magento development services.
Why you should integrate a live chat in Magento 2
Now that you are ready to integrate a live chat in Magento 2 stores. Let’s review some benefits a live chat can bring to your store performance, helping you to decide whether you should start integrating one today!
Ability to provide real-time support for customers
Unlike email and phone support, the live chat role is to help customers connect with the support agent with a negligible wait time. A significant benefit of live chat integration is speed, which enables real-time communication between your businesses and your customers, resulting in a faster response rate and problem-solving. This is especially important when it comes to complex issues that require multiple, back-and-forth exchanges of information between the two parties.
Delivering prompt responses to customer queries in real-time via live chat support can significantly improve customer satisfaction, build stronger customer-businesses relationships and brand loyalty, and increase the likelihood of making a purchase.
Increase customer experience
Live chat contributes to boosting customer experience in many ways. The integration for Magento 2 comes with a minimalistic admin dashboard and a responsive default theme. This provides an easy-to-use interface and faster page load for customers.
This tool also offers a personalized and interactive experience for customers. It creates a humanized customer experience, providing tailored recommendations, addressing specific concerns, and acting as a guide for customers throughout their purchasing journey. This bridges the gap between online shopping and visiting a brick-and-mortar store, as customers appreciate the convenience of digital communication but also desire superior support when they contact your businesses.
Improve efficiency and productivity
Live chat for Magento comes with features such as a chat tool, customer data gathering, and sending proactive greetings, which can free up your agents’ time for customer support. It also enables support agents to handle multiple chats simultaneously, reducing the need for additional staff. In this way, your team can handle more inquiries in less time with less cost for staff and other additional tools, while still maintaining customer service quality, increasing overall efficiency.
In addition, with the automated chat tool and the ability to handle multiple inquiries, your business can provide a quicker response time to a greater number of customers, thereby reducing repetitive tasks, while support agents are provided with relevant customer information during conversations. As time spent on customer service decreases, you are able to devote more resources to prospective customers, resulting in increased productivity.
Enhance conversion rates and sales
As your business’s efficiency and productivity rise, along with customer satisfaction and engagement, there is a strong likelihood that conversion rates and sales will increase. During their buying process, customers may have uncertainties or doubts about their purchasing decision. Therefore, with continuous interaction and prompt responses to their concerns, this obstacle can be overcome, strengthening customer confidence in the product and resulting in higher conversion rates for your eCommerce stores.
Additionally, live chat comes with great opportunities to upsell and cross-sell. From the relationship established through live chat, as well as the insights you have gained from interacting with customers, you can easily recommend additional products or services that are tailored to their needs and preferences. This makes live chat a powerful tool for boosting revenue and sales for your businesses.
Conclusion
It is undeniable that integrating live chat in Magento 2 is essential for eCommerce businesses, given its numerous advantages. In this article, we’ve outlined a five-step process for integrating live chat in the Magento 2 platform, allowing you to take action at any time. If you have any questions about this blog or face any problems in the process of integrating live chat into your Magento 2 store, feel free to contact our Magento experts.