Customizing your Magento email templates is a crucial step towards differentiating your business in a crowded marketplace. Imagine if every Magento store used the same, unaltered email templates, it would hardly leave a lasting impression on customers.
To avoid this monotony and elevate your brand’s uniqueness, our guide will meticulously walk you through the process of how to customize Magento 2 email templates. Conveniently accessible through the Magento admin panel, these adjustments can be implemented swiftly, taking only a few minutes of your time to significantly enhance your customer communication.
Table of Contents
Overview of the Magento 2 Email Settings for Email Templates
Magento 2 offers a range of default email templates that cater to various functions such as order confirmations, account creation, newsletter subscriptions, and more. These templates are designed to facilitate immediate communication with customers.
However, default templates often lack the personal touch and branding that businesses need. Customizing these templates is essential for creating a unique and memorable customer experience.

The Magento 2 email settings for email templates offer a comprehensive and customizable platform for managing the way your eCommerce store communicates with its customers. These settings are the backbone of customer interaction, covering a wide array of notifications, including order confirmations, account updates, and newsletter subscriptions.
Key aspects of Magento 2’s Email Settings include:
- Template Selection and Customization: Magento 2 provides a variety of default templates that cater to different aspects of customer communication. These templates are fully customizable, allowing store owners to modify the layout, content, and design to better align with their brand identity.
- Variable Integration: One of the strengths of Magento 2’s email templates is the ability to integrate variables dynamically. This means that specific customer and order details can be automatically inserted into emails, enhancing the personalization of each communication.
- Responsive Design: With a significant portion of emails being accessed on mobile devices, Magento 2 ensures that all templates are responsive. This guarantees that emails will display correctly across various devices and screen sizes, providing a consistent user experience.
- Localization and Internationalization: For businesses operating in multiple regions, Magento 2 offers localization options. This includes the ability to create and manage email templates in different languages, ensuring that communications are relevant and accessible to a global customer base.
- Transactional Emails: These are automated emails triggered by specific actions on the website, such as placing an order or changing a password. Magento 2 allows for detailed customization of these emails to ensure they meet the specific needs and branding requirements of the store.
- User-Friendly Interface: The Magento 2 admin panel provides a user-friendly interface for managing email templates. This includes options for previewing emails, testing template designs, and easily updating content without needing extensive technical knowledge.
- Extension and Integration Support: Magento 2 supports a range of third-party extensions and integrations, allowing for enhanced functionality and customization of email templates. This includes advanced design tools, marketing automation integrations, and analytics for email performance.
How to Customize Magento 2 Email Templates
Customizing Magento 2 email templates is a straightforward process that allows you to tailor your store’s communication to better fit your brand’s voice and style. Here’s a step-by-step guide.
Loading Templates
To begin this process, you must first log into your Magento account and navigate to the Admin Panel. Here’s a step-by-step guide to loading a template:
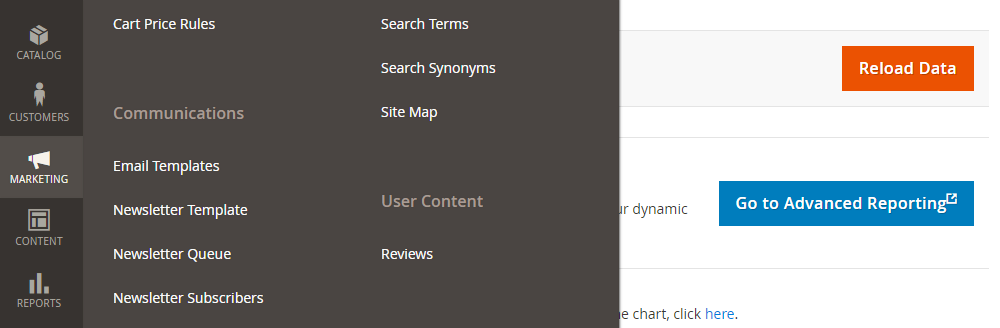
Start by logging into your Magento 2 account. From there, navigate to Marketing, then to Communications, and finally select Email Templates. This area allows you to view and manage all your email templates.
If you wish to edit an existing email template, you can select it from the list provided. Alternatively, if you’re looking to create a new template, click on the Add New Template button. This option is particularly useful for tailoring emails to better fit your brand’s messaging and design.
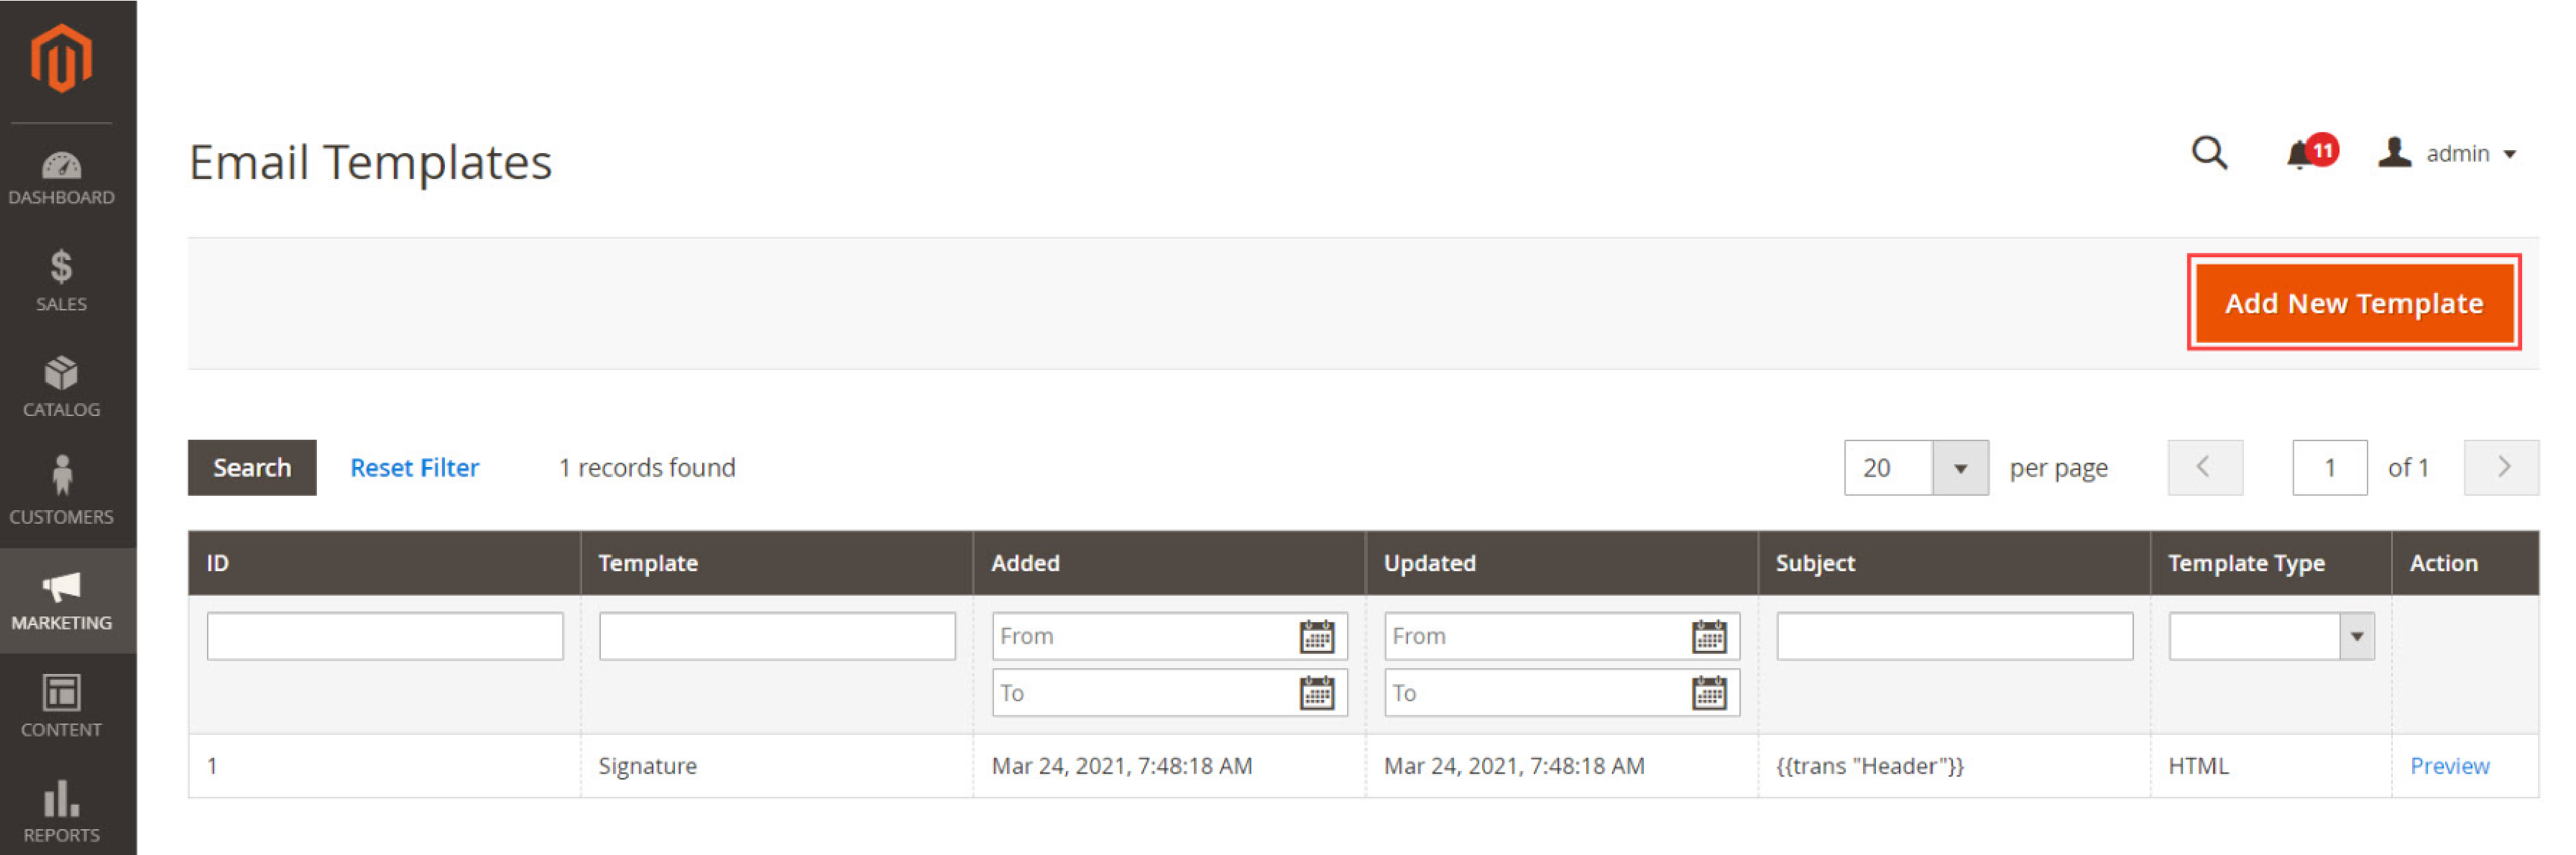
When adding a new template, it’s important to select a base for your design. In the Template field, choose the email template that most closely aligns with your needs. Once selected, click on the Load Template button. This action will load the chosen template, allowing you to start customizing it to your preferences.

During this process, you have the option to select the type of template you are working on. Whether it’s a Header, Footer, or Message Template, clicking on Load Template will bring up the corresponding format. This gives you a foundational structure to work with, which you can then edit and personalize to create an email that resonates with your brand and communicates effectively with your customers.
Editing Template Information
Once you’ve selected or loaded your email template in Magento 2, the next step involves editing the template information to suit your specific requirements. This is where you can add and customize various elements of the template.
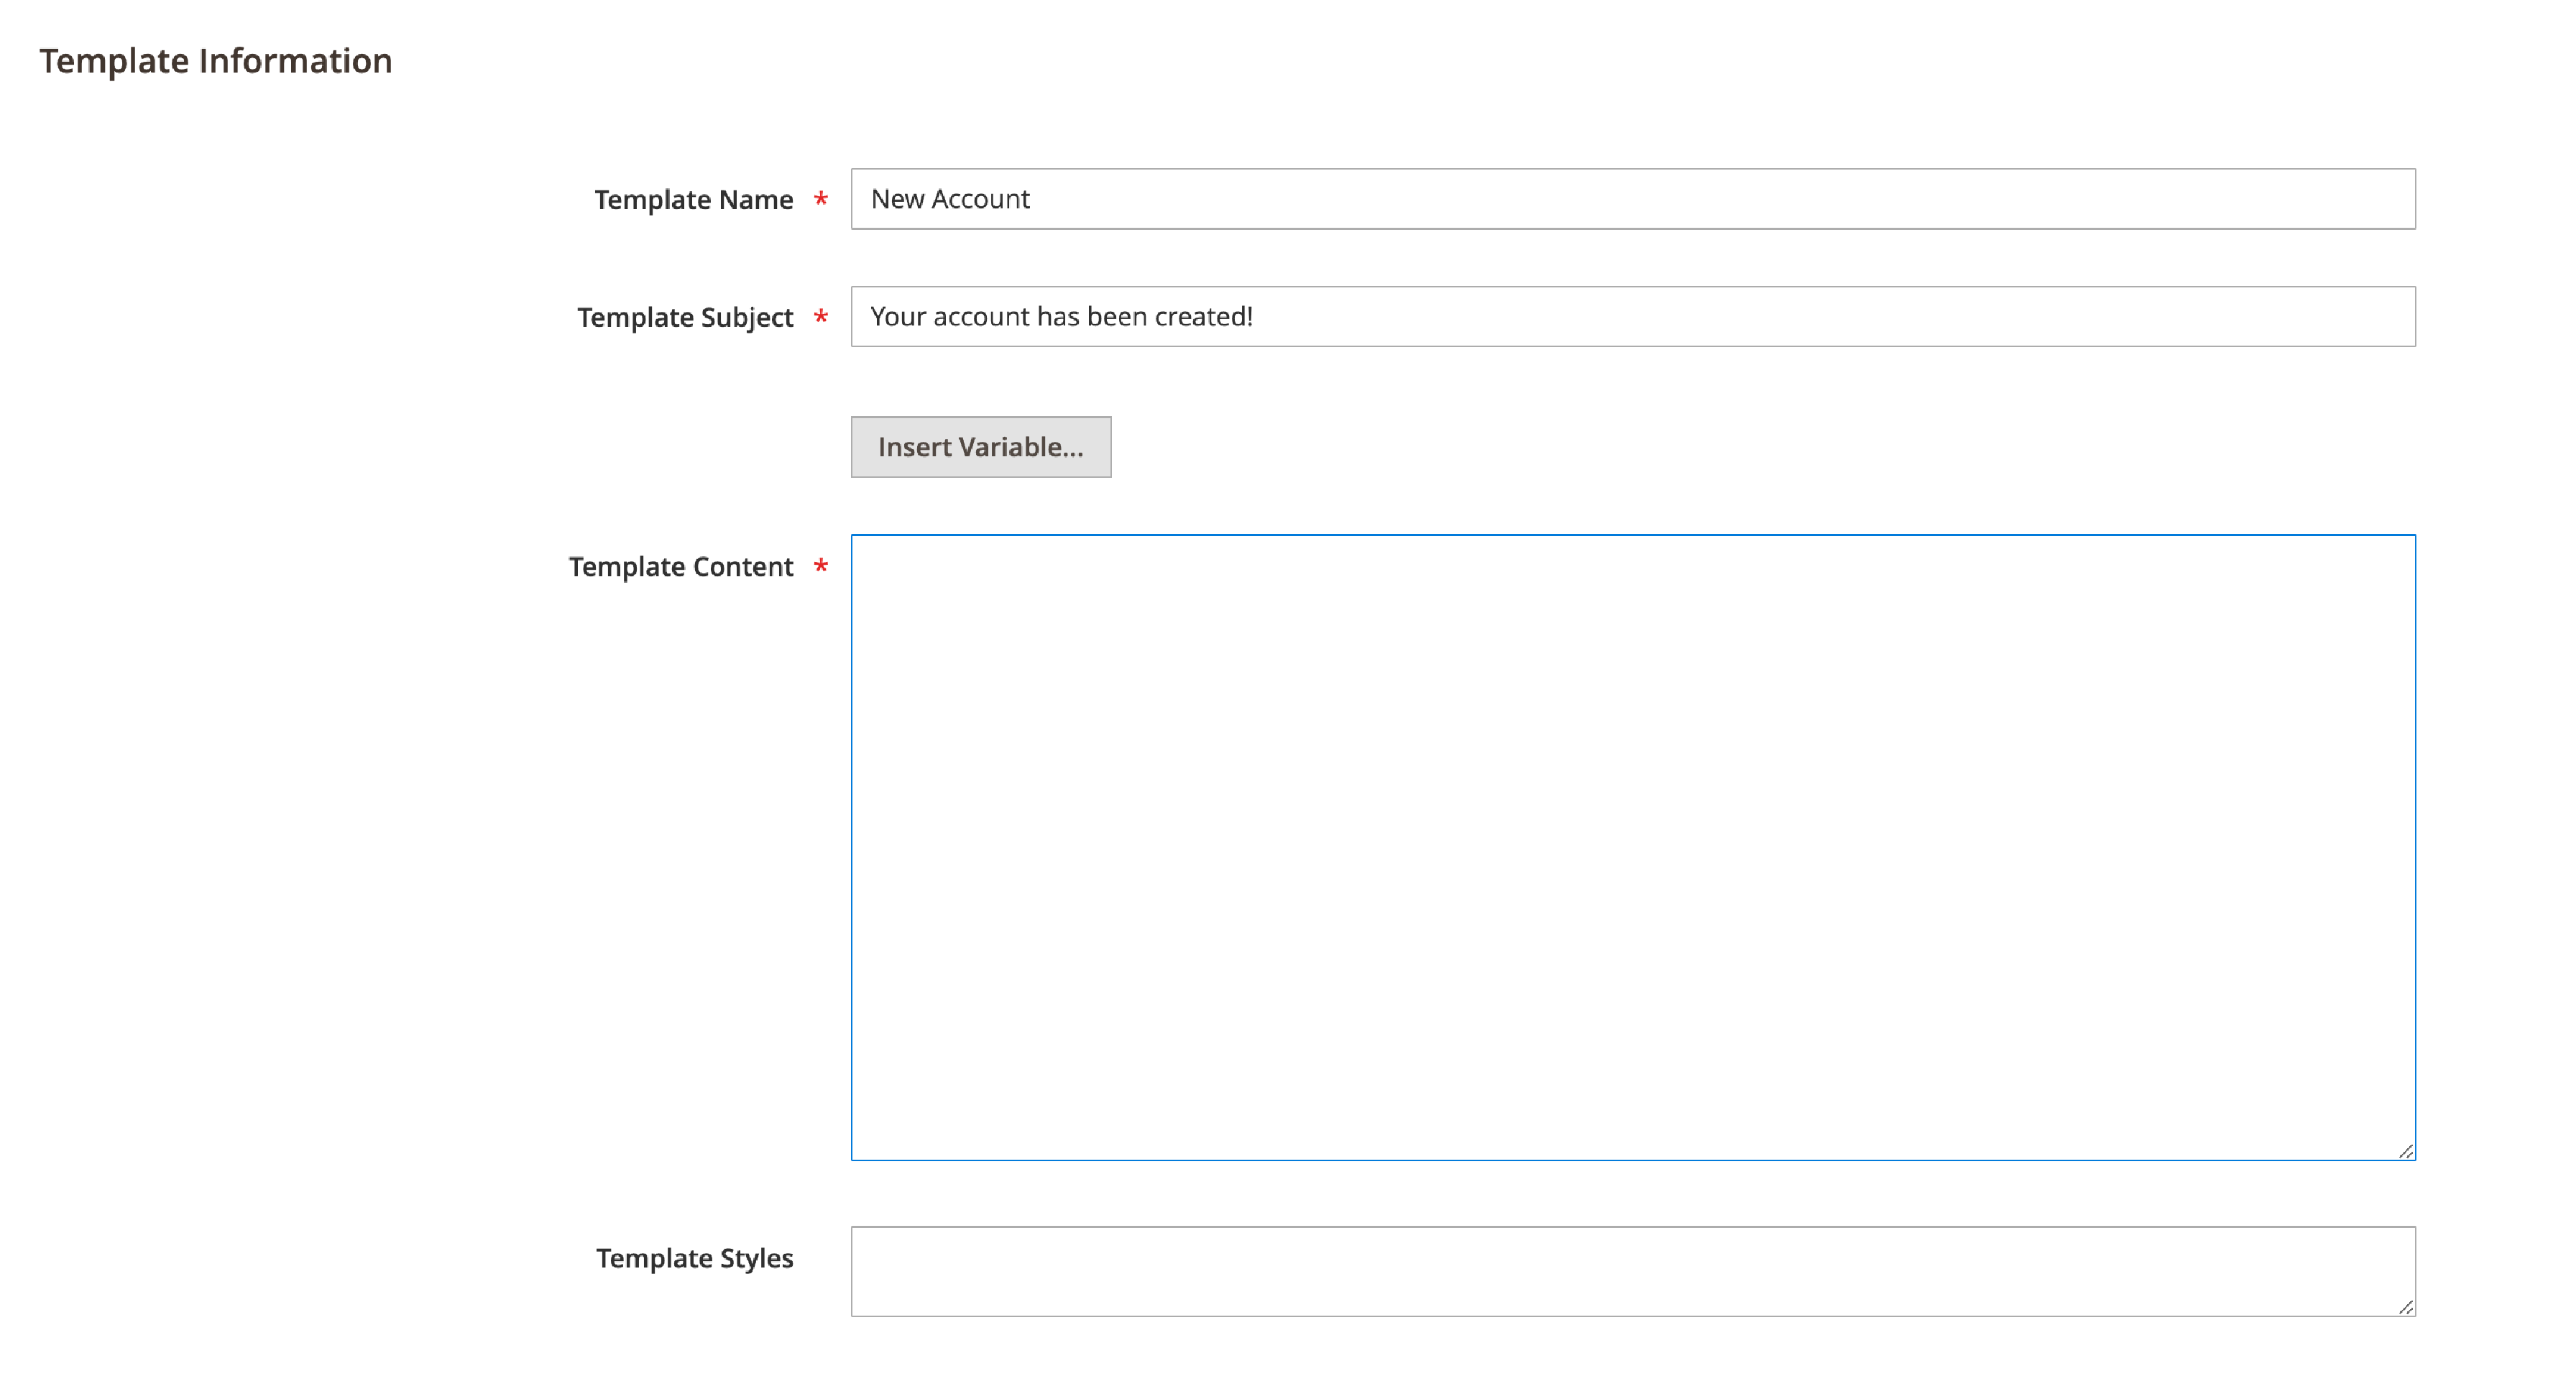
Start by naming your new template. Enter a descriptive name in the Template Name field. This name is crucial for organizational purposes, especially if you’re managing multiple templates.
Next, address the Template Subject. This is important for sorting and filtering your list of templates. A clear and descriptive subject helps in quickly identifying the purpose of each template.
The core of your customization happens in the Template Content box. Here, you can modify the HTML to meet your design and content needs. Whether it’s changing the layout, tweaking the text, or adding brand elements, this section provides complete control over the look and feel of your email.
For dynamic content, use the Insert Variable option. This feature allows you to add variables directly into the Template Content box. Variables are placeholders that automatically populate with specific data, like customer names or order details when the email is sent.
Lastly, if you need to define specific styles for your template, such as custom fonts or colors, you can enter CSS in the Template Styles box. This section is particularly useful for ensuring your email aligns with your brand’s visual identity.
Previewing and Saving the Template
After you customize Magento 2 email templates, the next essential step is to preview it. Click on Preview Template to get a visual confirmation of how your template will appear. This step is crucial to identify any layout issues or content misalignments that might not be evident in the editing view.
Once you’re satisfied with how the template looks, you can make any final adjustments. After these tweaks, click on Save Template to finalize your changes. This action will add your newly customized template to the list of available email templates in Magento 2, ready for use in your communications.
This streamlined process ensures that your email templates not only convey the desired message but also maintain the professional and consistent appearance that reflects your brand.
Assigning Email Templates
After creating a new email template in Magento 2, it’s important to assign it to the relevant function in your store. If you’ve created a New Order Template, you need to integrate it into the system where it’ll be used.
To do this, navigate through the Admin Panel by following the path: Stores > Settings > Configuration. Then, under the Sales section, go to Sales Emails. It’s important to note that this path may vary slightly depending on the specific template you are working with.
Once in the Sales Emails section, locate the template select box corresponding to the type of email you’ve customized. Here, uncheck the Use system value option. This allows you to select your new template from the dropdown list of available templates.
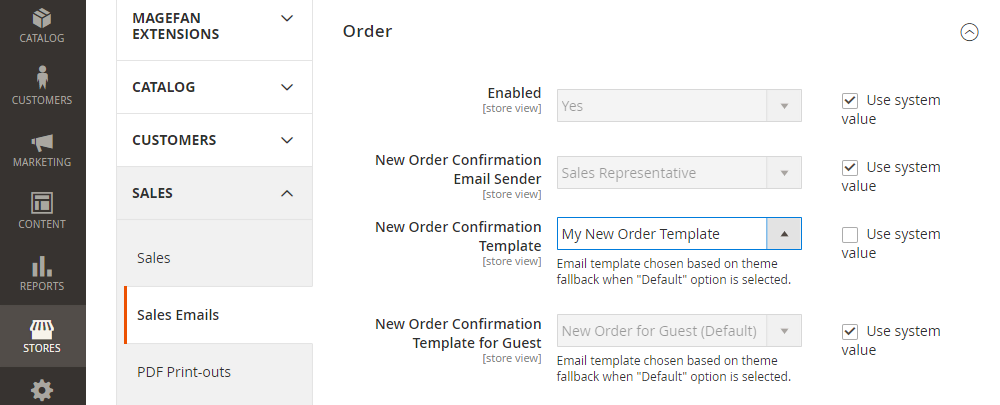
To finalize the process, click the Save Config button. This action ensures that your new email template is now actively assigned and will be used for the relevant email communications within your Magento 2 store.
Customize Email Logos
After crafting and assigning your email template in Magento 2, the next key step is customizing the email logo to reflect your brand identity. To begin this process, head to Content, then Design, and finally Configuration in your Magento 2 admin panel. Here, select the configuration scope where you want to customize the email logo.
Proceed to the Transactional Emails section. In this area, you have several options to personalize the logo:
- Upload the Logo Image: You can upload a new logo image directly. Alternatively, if you have previously uploaded images, you can select one from the gallery.
- Set the Logo Image Alt: Provide an alternate text for the logo. This is useful for SEO and accessibility.
- Enter the Logo Width and Height: This step is crucial, especially if you’re uploading a new logo. Setting the dimensions ensures that your logo displays correctly in the emails. Note that this isn’t necessary if you’re selecting the logo from the gallery, as these images already have predefined dimensions.
- Choose Header and Footer Templates: Select the appropriate header and footer templates that will accompany your logo in the emails.
To complete the customization, make sure to click on Save Configuration. This action ensures that your chosen logo and its settings are saved and will be reflected in your email communications.
Concisely, to successfully customize email templates in Magento 2, you’ll need to follow these simplified steps:
Firstly, navigate to Marketing > Email Templates in your Magento 2 admin panel. This is where you can either edit an existing template or create a new one.
Secondly, proceed to Stores > Configuration > [Your Specific Path], and locate the template select box for the email type you are customizing. Here, you can change its value to the template you’ve just created or edited.
Lastly, head over to Content > Design > Configuration to customize the email logo according to your branding needs.
These steps will guide you in effectively customizing your Magento 2 email templates and logos.
Additional Tips to Customize the Best Magento 2 Email Template
Creating the best Magento 2 email templates involves more than just technical customization. Here are some additional tips to ensure your email templates are effective and engaging:
- Focus on Branding: Your email templates should consistently reflect your brand’s visual identity. Use your brand’s color scheme, logo, and fonts to maintain consistency across all communications.
- Optimize for Mobile Devices: With a significant number of users accessing emails on mobile devices, ensure your templates are responsive and look great on all screen sizes.
- Personalize Content: Go beyond just using the customer’s name. Tailor content based on their purchase history, browsing behavior, and preferences. Personalization can significantly increase engagement and customer loyalty.
- Clear and Compelling Subject Lines: The subject line is the first thing a recipient sees. Make sure it is clear, engaging, and reflective of the email’s content.
- Use High-Quality Images: Visuals can greatly enhance the appeal of your emails. Use high-resolution images that are optimized for quick loading.
- Keep the Design Clean and Simple: Avoid cluttering the email with too much content or too many different design elements. A clean, simple layout is more effective and user-friendly.
- Include Clear Calls to Action (CTAs): Your email should guide customers on what to do next, whether it’s visiting your site, taking advantage of a sale, or reading about a new product.
- Test and Refine: Regularly test different elements of your email templates, like layouts, content, and CTAs. Use customer feedback and analytics to refine and improve your templates.
- Ensure Compliance with Email Regulations: Comply with email and spam regulations like GDPR and the CAN-SPAM Act. Include an easy unsubscribe option and respect user preferences.
- Add Social Media Links: Encourage customers to connect with you on social media by including links to your profiles in the email template.
In Conclusion,
By following this guide, you can customize Magento 2 email templates to enhance your eCommerce communication strategy. By personalizing the look, feel, and content of your emails, you not only align them with your brand identity but also significantly improve customer engagement.
Remember, a well-crafted email can do more than just convey information, it can build lasting relationships and drive business success. As you implement these guidelines and tips, you’ll find that your Magento 2 store stands out, not just for its products, but for its exceptional communication as well.
However, we understand that customizing email templates in the default Magento 2 can be a challenging task. That’s why we suggest considering partnering with a trustworthy eCommerce development company like Magenest. For more information or to discuss this further, feel free to contact us directly. We’re here to assist and engage in more detailed discussions about your specific needs.