In today’s digital landscape, data-driven decisions are paramount for online businesses. Facebook Pixel emerges as a powerful ally in this journey, particularly when integrated seamlessly with Shopify stores. But what exactly is Facebook Pixel, how to add Meta Pixel to Shopify store, and what are the compelling benefits it brings to your eCommerce venture?
Table of Contents
- What Are Facebook Pixel?
- Step by Step on How to Add Facebook Pixel to Shopify Store
- All You Need to Know about Facebook Pixel’s Events
- Is It a Good Idea to Add Facebook Pixel to Shopify Store
- Best Practices and Tips for Utilizing Facebook Pixel Data
- What Are Facebook Pixel’s Targeting Options You Can Access from Your Shopify Store?
What Are Facebook Pixel?
The Facebook Pixel (recently has been changed to Meta Pixel) is a powerful tracking tool offered by Meta that plays a crucial role in online advertising and eCommerce. It is a piece of code that you can add to your website, including your Shopify store, to collect valuable data on user interactions and behaviors.
The importance of Facebook Pixel lies in its ability to provide businesses with deep insights into their website visitors’ activities, which can be used to optimize marketing strategies and enhance the overall customer experience.
Here are some key reasons why Meta Pixel is important. Firstly, it enables precise Conversion Tracking, allowing you to monitor user actions on your website, such as purchases, newsletter sign-ups, or product views. This data is instrumental in evaluating the effectiveness of your Facebook ad campaigns in driving conversions.
Additionally, Facebook Pixel facilitates Audience Building by creating custom audiences based on user behavior, enabling retargeting efforts toward those who visited specific product pages but didn’t make a purchase.
Moreover, it aids in Optimizing Ad Campaigns by providing insights into website performance, ensuring that your ads reach the right audience at the optimal time. Understanding attribution through Facebook Pixel is also crucial as it sheds light on how different touchpoints contribute to conversions, whether they originate from Facebook ads or other sources.
Lastly, for eCommerce stores, Meta Pixel’s Dynamic Ads capability is a game-changer, automatically displaying personalized product recommendations to users based on their site browsing behavior, ultimately boosting sales.
Step by Step on How to Add Facebook Pixel to Shopify Store
Step 1: Preparing to Add Facebook Pixel to Shopify Store
Before you can add Facebook Pixel to your Shopify store, you need to ensure that you have the necessary accounts set up:
Create a Shopify Store
If you haven’t already created a Shopify store, go to the Shopify website and click Start free trial to sign up for an account. You can only add Facebook Pixel to Shopify store when you have a Shopify store.
Follow Shopify’s prompts or our guidance on how to start a Shopify store to set up your online store, including choosing a store name, adding products, and configuring your store settings.
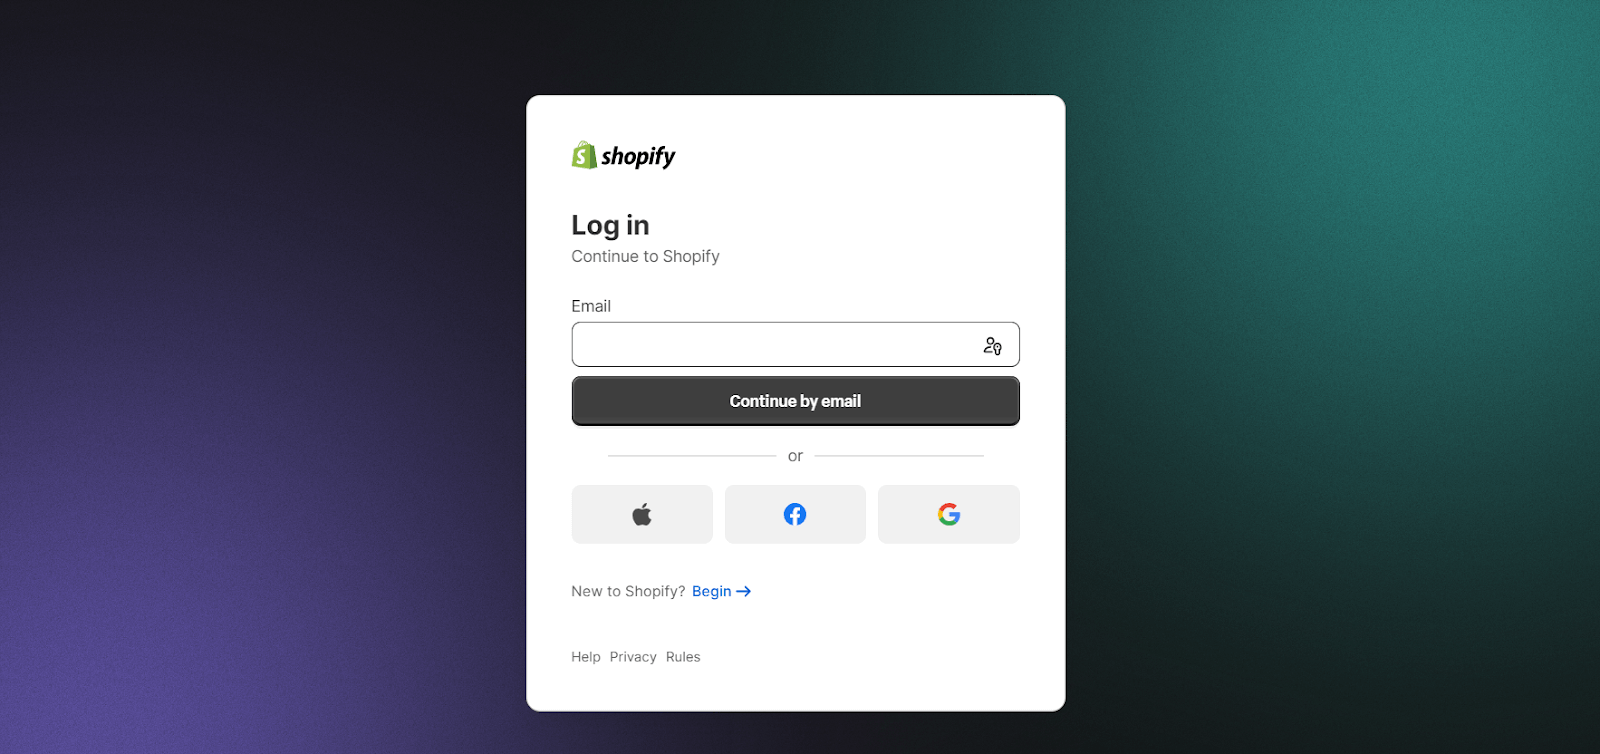
If you already have a Shopify store, you can simply click Log in to open your store.
Create a Facebook Business Manager Account
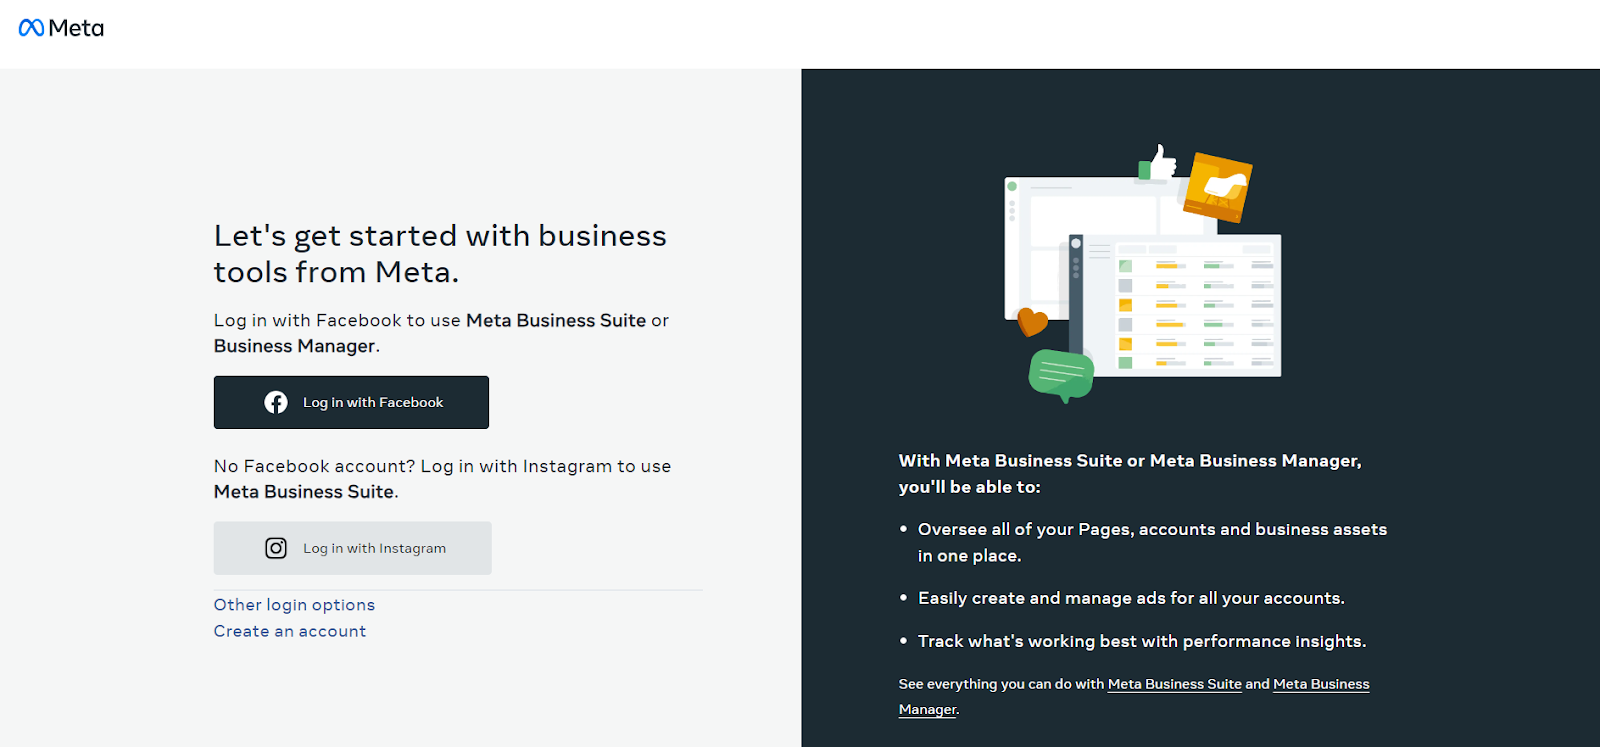
Visit the Facebook Business Manager website and click Create Account if you haven’t had a Facebook or Instagram account. Otherwise, Meta does provide an option to Log in using your existing Facebook or Instagram account.
Next, follow the on-screen instructions to set up your Facebook Business Manager account. This will serve as the central hub for managing your Facebook Pixel and advertising assets.
Set Up a Facebook Ads
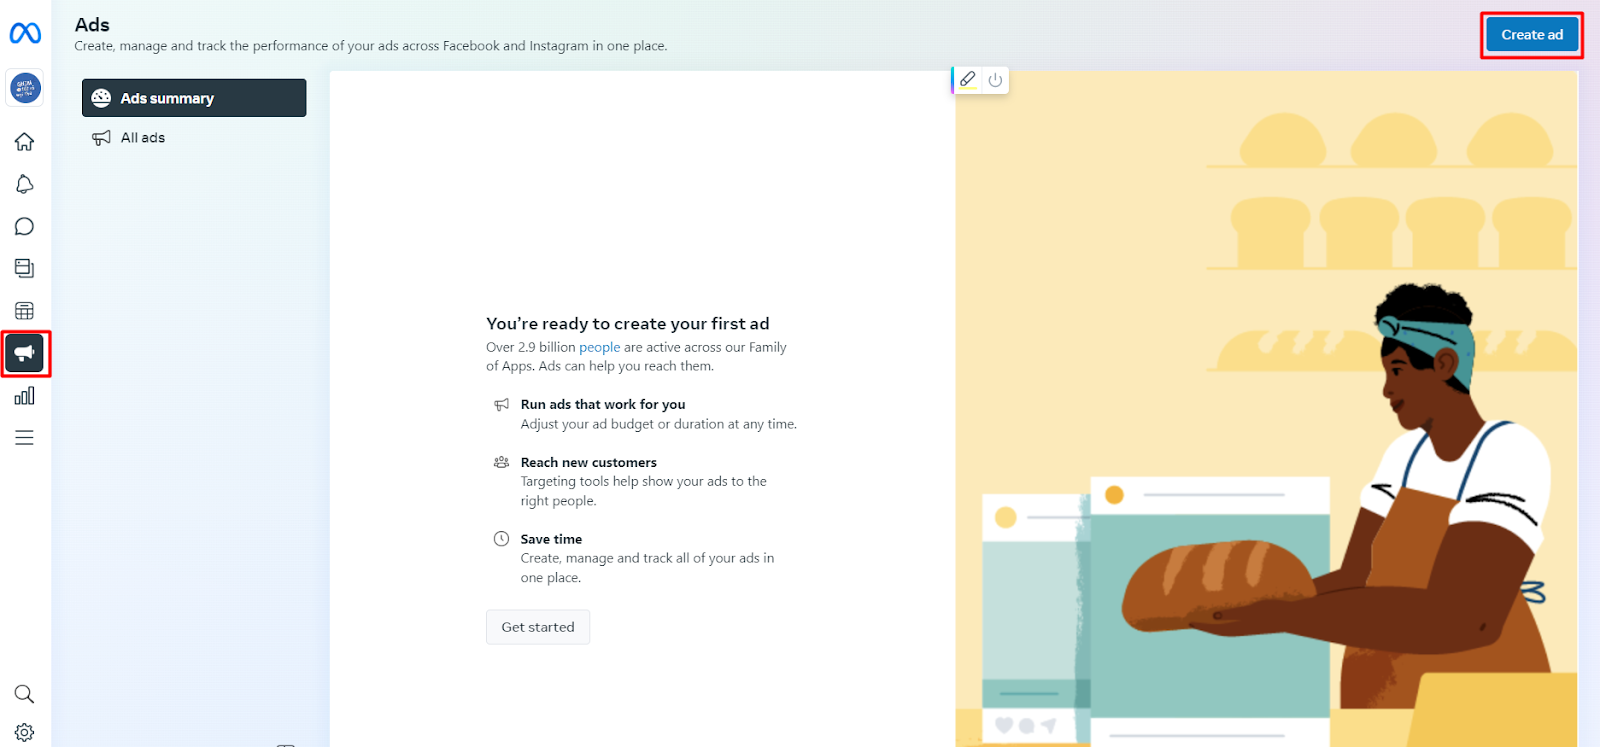
Inside your Facebook Business Manager account, go to the Ads Manager section. You can find the icon in the left-side menu.
Click Create ad and follow the prompts to create an ad. You can skip this step if you don’t want to create an ad, you still can track other metrics using Meta Pixel.
With these preliminary steps completed, you’re now ready to proceed with adding Facebook Pixel to your Shopify store.
Step 2: Generating Facebook Pixel Code
Now that you’ve prepared your accounts, you can proceed to generate the Facebook Pixel code that you’ll later add to your Shopify store. This serves add a bridge to add Facebook Pixel to Shopify store. Here’s how to do it:
Accessing Facebook Events Manager
Go to your Facebook Business Manager and log in to your Facebook account that you have created.
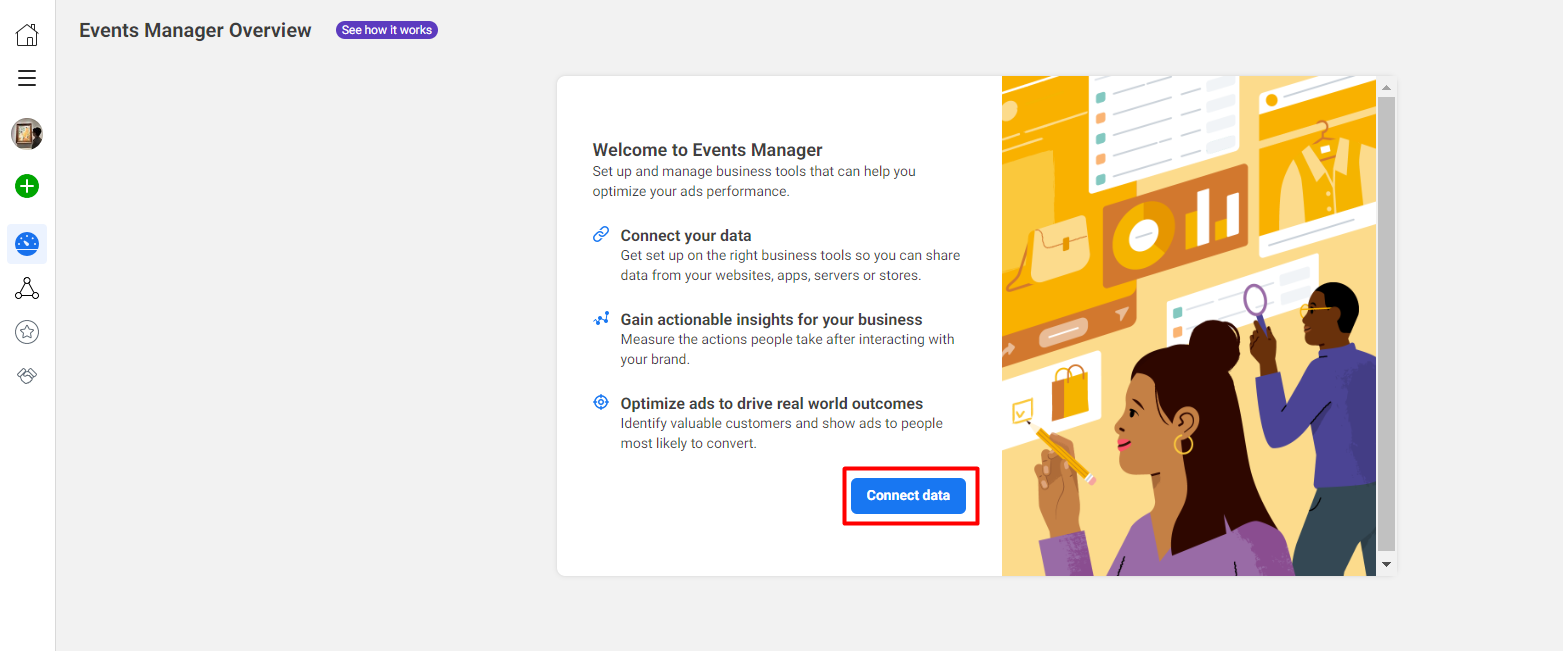
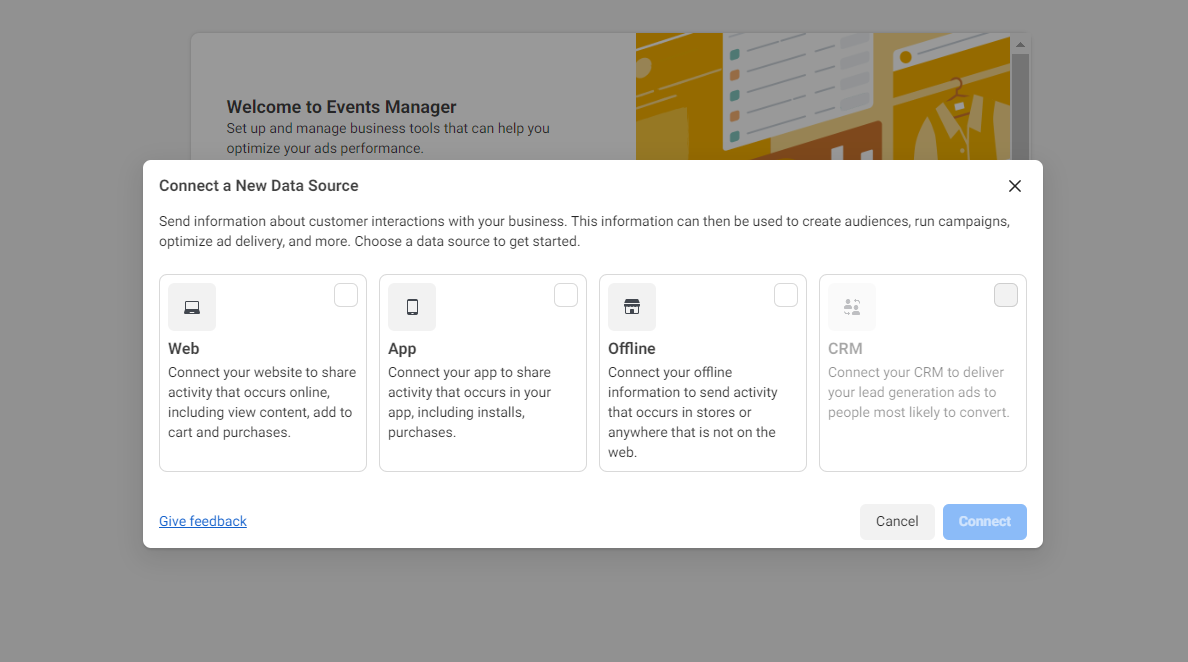
Click on Connect data and choose a data source. It could be a Web, an App, an Offline store, or your CRM platform (this CRM feature is currently not available).
To add Meta Pixel to Shopify store, select Web as your source of data.
Creating a New Pixel
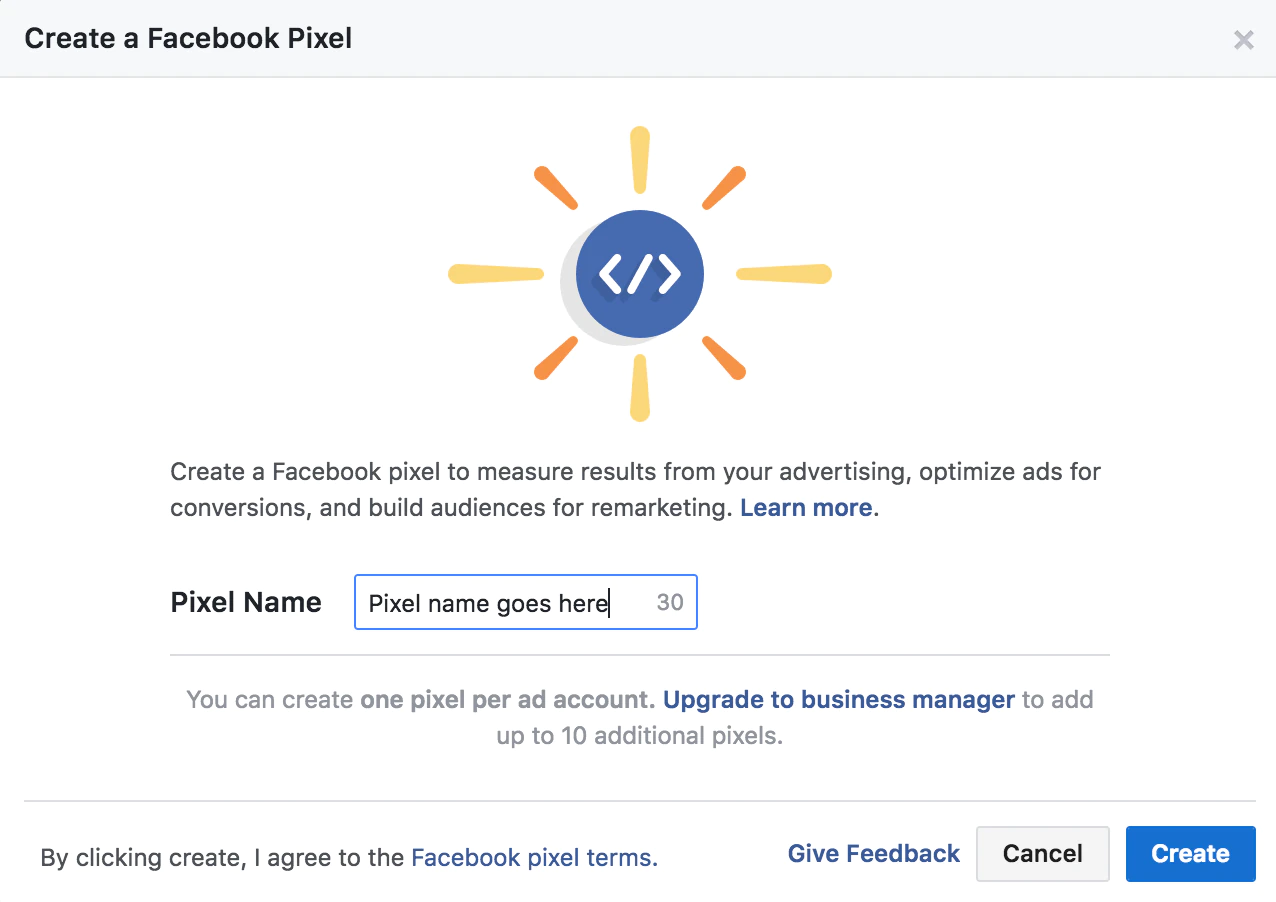
You will proceed to the Create Pixel section. Here, you can click on the Add button to create a new pixel. You will need to give your new pixel a name in the Name Your Pixel section (e.g., Shopify Pixel).
And click on the Create or Continue button when you are finished naming.
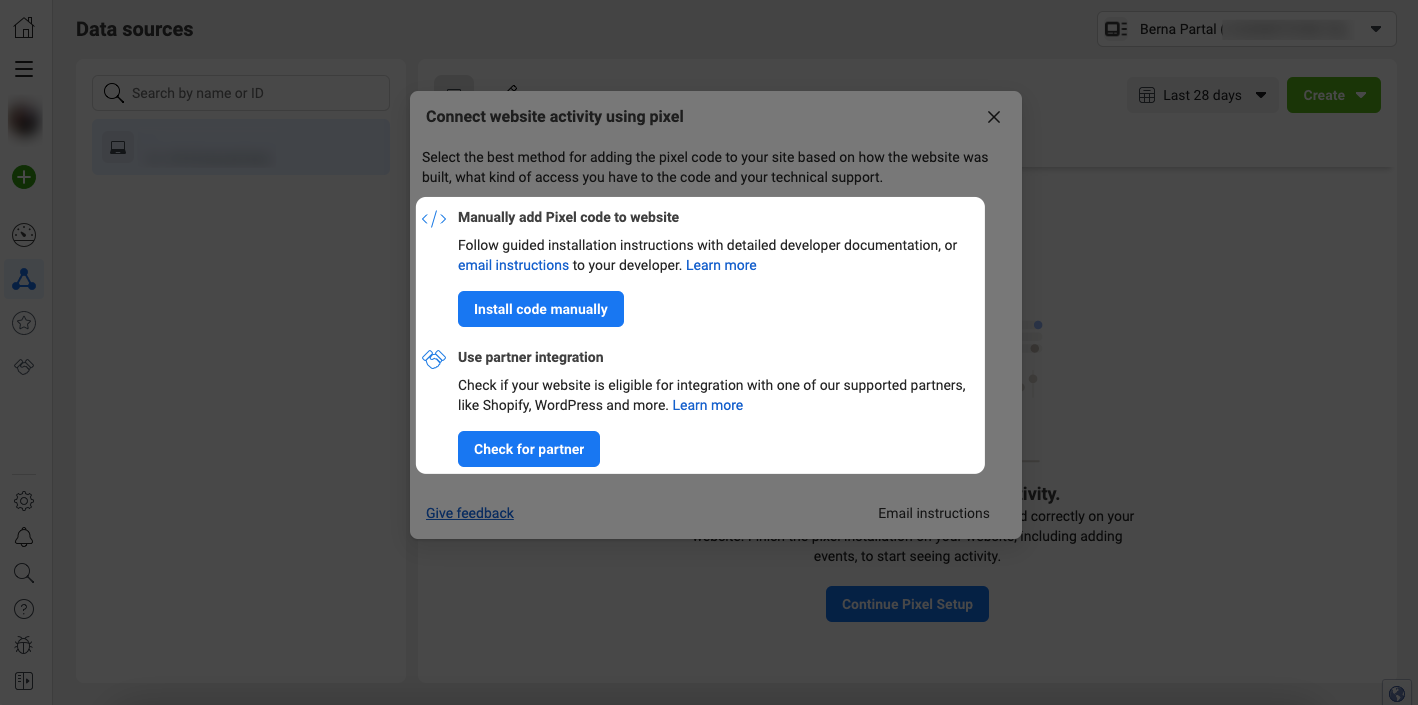
It will proceed you to the Check for partner integration section. This is where you can add your Shopify store website.
Here, you can add a pixel to your website using 2 ways:
The first way is that you can add Facebook Pixel to Shopify store Manually. Click Install code Manually button under the Manually add Pixel code to website section. But you will need a basic code understanding to be able to do this properly, that’s why, with Shopify merchants, we recommend you use the second way.
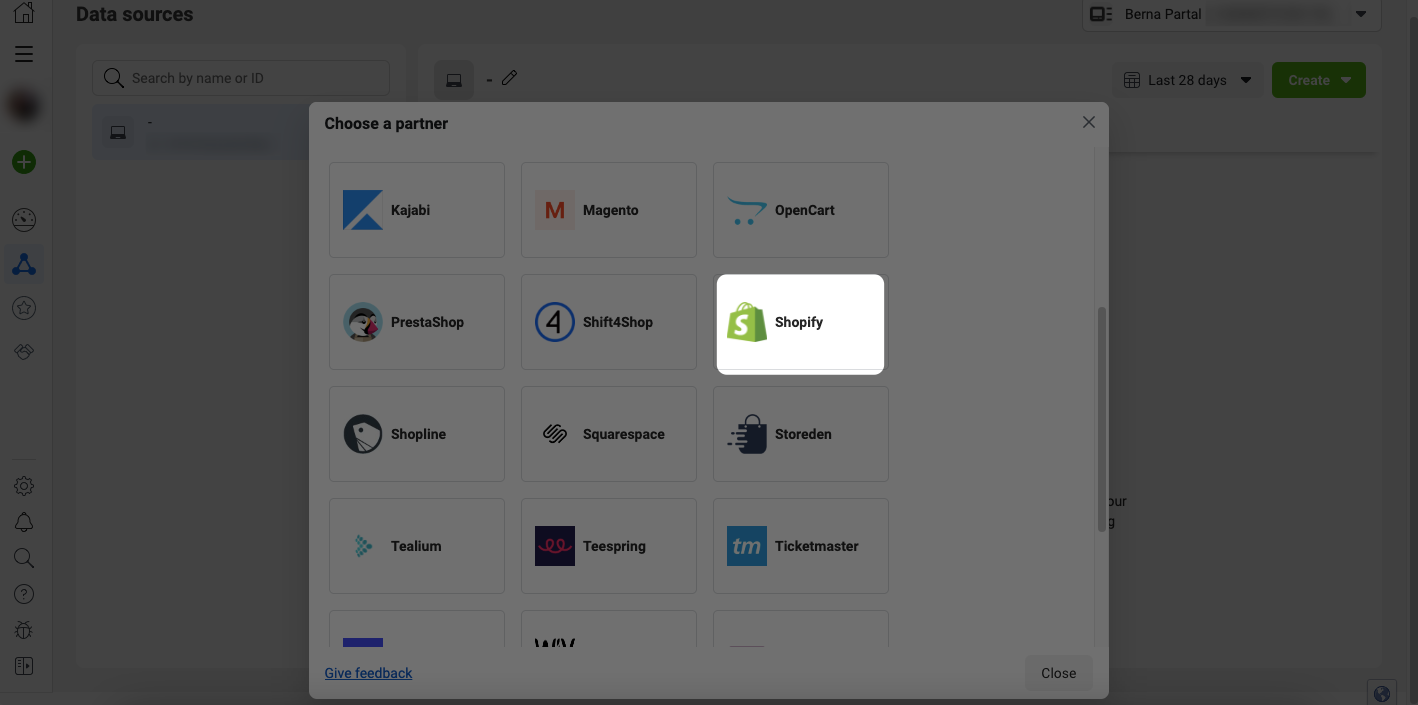
With the second way, you can add Facebook Pixel to Shopify store by using partner integration. Click on the Check for partner button and select Shopify from the menu.
Step 3: Adding Facebook Pixel to Shopify
Open a new tab, access the Shopify Admin Dashboard, and Log into your Shopify store.
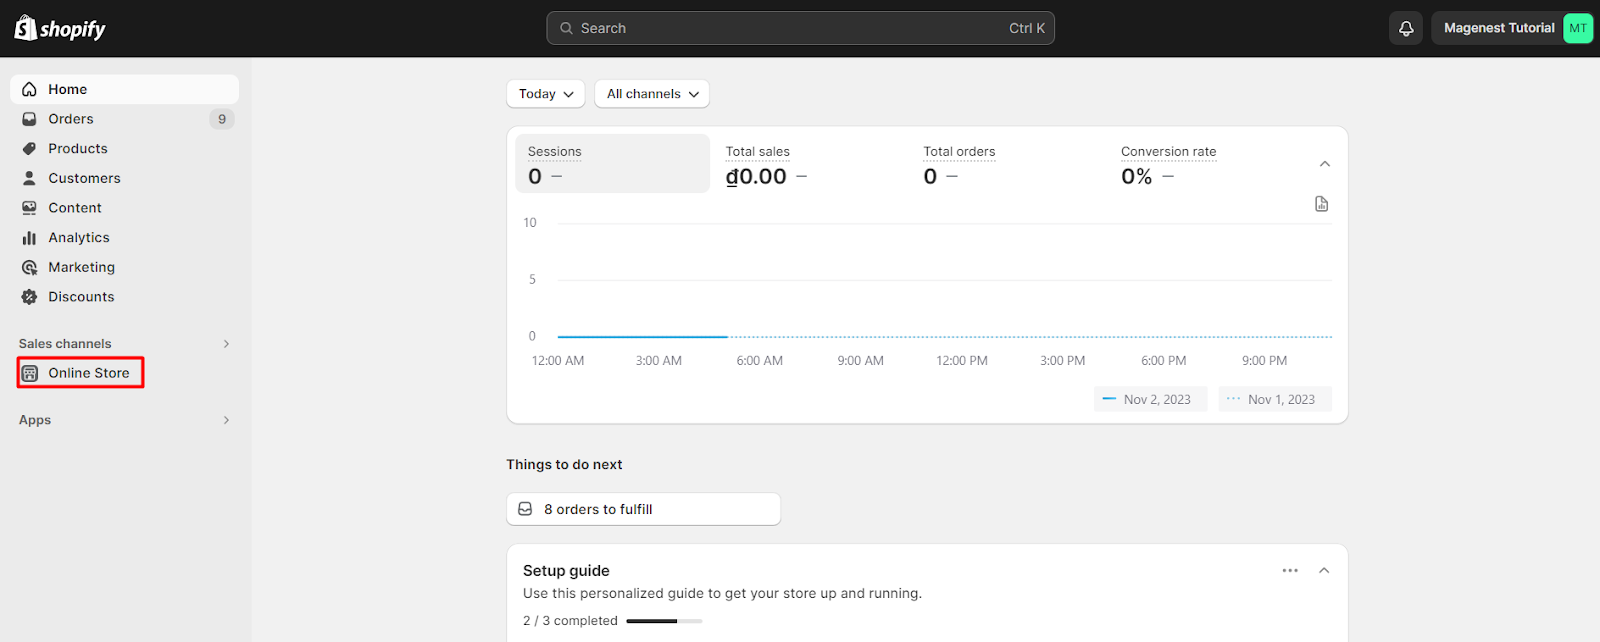
Navigating to the Online Store section, it’s right under the Sale channels section in the left side menu.
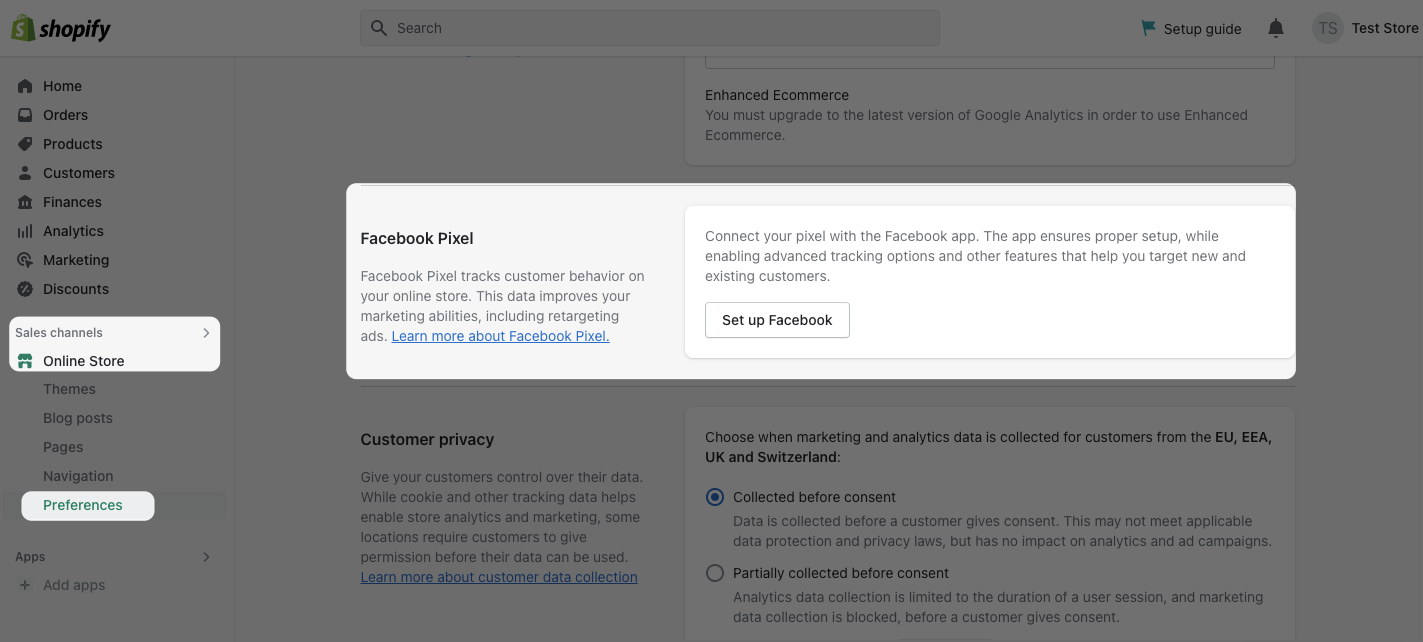
Within the Sales Channels section, find and select Preferences, then scroll down to the Facebook Pixel section.
Click the Set up Facebook button to initiate the integration with your store. This action will take you to the Facebook & Instagram app. You will need this app installed to be able to add Facebook Pixel to Shopify store.
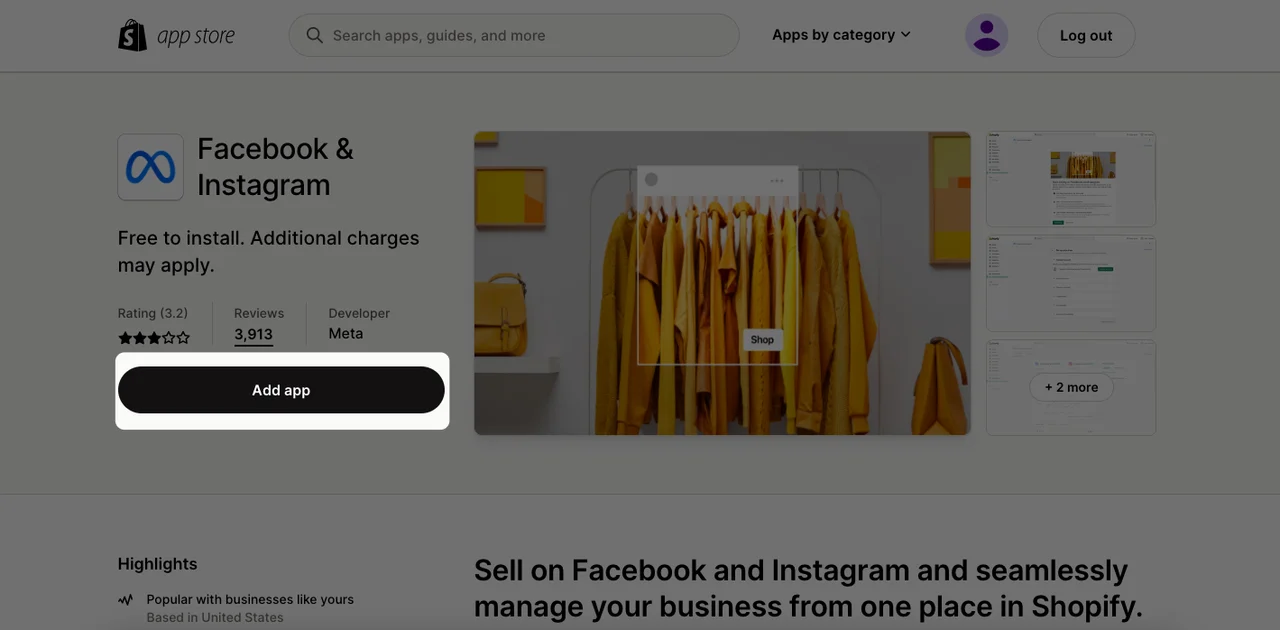
You will be directed to the Facebook & Instagram page on the Shopify app store, click on the Add app button to add it to your Shopify store.
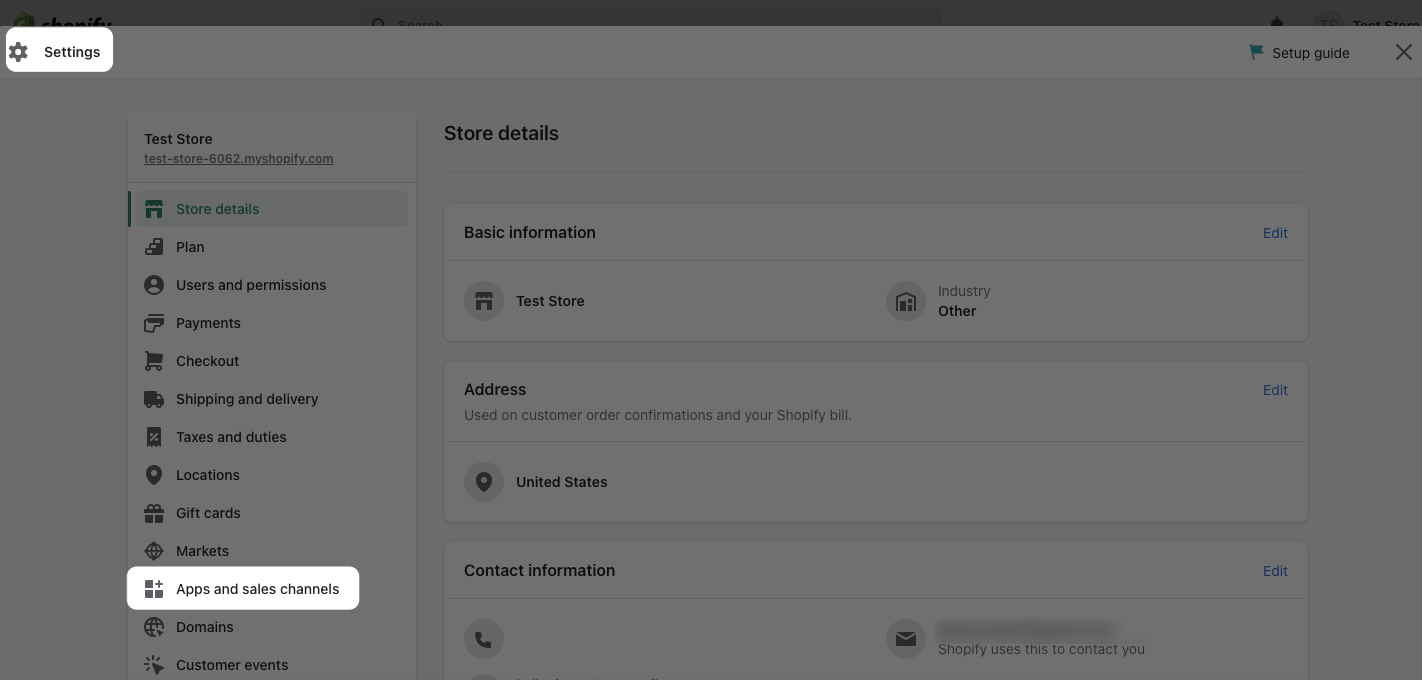
Return to your Shopify admin panel and navigate to the Settings section. Then, select Apps and sales channels from the left sidebar.
Find and click on Facebook & Instagram in the list of apps and sales channels, you will see the Facebook Pixel info and select it to access its settings.
Click Open sales channel and within the Settings section, select Data sharing settings.
Enable data-sharing by selecting Enable data-sharing within the Customer data-sharing section.
Choose the appropriate data-sharing level, either Standard, Enhanced, or Maximum, based on your needs.
Confirm your selection by clicking the Confirm button.
When you need to delete Meta Pixel from your Shopify store, simply select Disconnect in your store’s Facebook & Instagram app to disable your Facebook Pixel.
All You Need to Know about Facebook Pixel’s Events
Understanding Facebook Pixel’s Standard Events and Customized Events
There are 2 types of Facebook Pixel Events:
Standard events refer to specific actions taken by visitors to your website. These events help you track and analyze user interactions with your online store. Some essential standard events for eCommerce include:
- Page View: Tracking when a visitor views any page on your website, such as product details pages.
- View Content: Monitoring when a user views specific content, typically associated with product pages.
- Add To Cart: Triggered when a visitor adds a product to their shopping cart.
- Initiate Checkout: Recorded when a user clicks on the checkout button during the purchase process.
- Purchase: Capturing the completion of a purchase, typically when customers reach the confirmation page.
- Search: Tracking when users perform searches for information or products within your store.
These standard events provide valuable data to help you understand user behavior and optimize your marketing strategies effectively. They are automatically tracked when you add Facebook Pixel to Shopify store.
In contrast, Customized events refer to events you need to set up manually using the Event Setup Tool.
How to Add Customized Facebook Pixel Events to Shopify Store
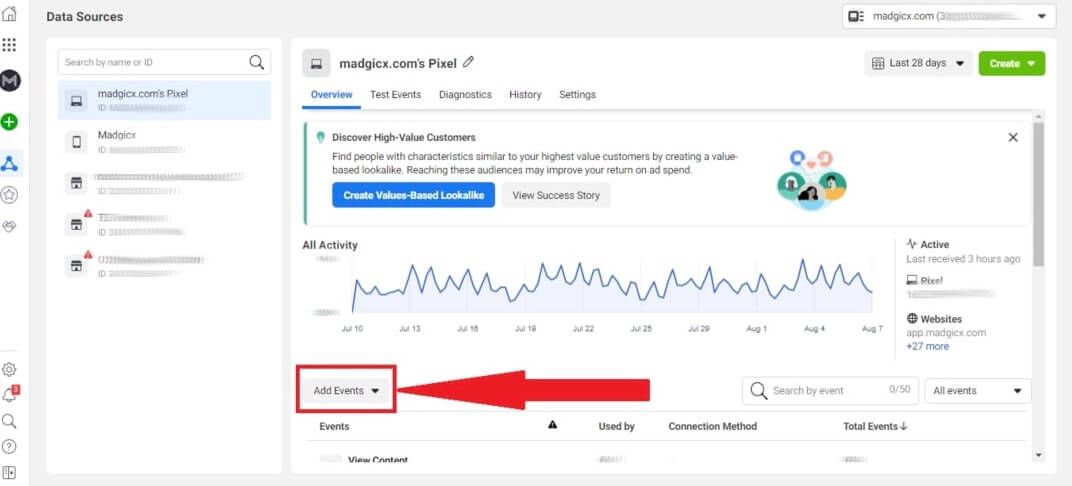
Open Facebook Events Manager, in the Overview tab of Facebook Events Manager, click Add Events.
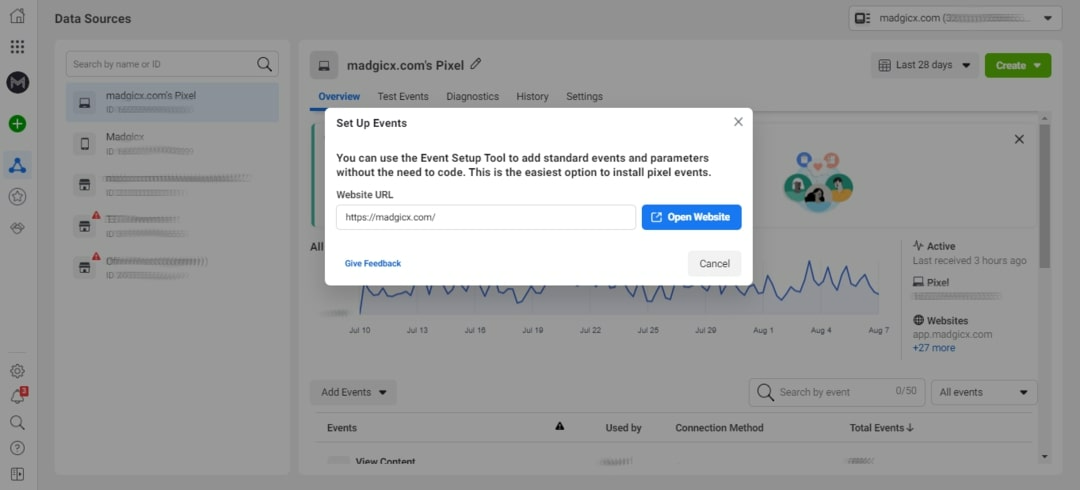
Select From the Pixel, click Open Event Setup Tool, and enter your Shopify store’s URL, and click Open Website. Ensure that you enter the complete URL with http:// or https:// at the beginning.
The Event Setup Tool will open on your website, and you can now proceed to customize events. For each page or action you want to track, you can add button clicks or URL tracking. You can also view the details of existing events and make edits or deletions as needed. Once you’ve configured and customized your desired events, you can choose to either click Finish Setup to complete the process or return to the Events Manager and click Disconnect if you want to exit.
Is It a Good Idea to Add Facebook Pixel to Shopify Store
Installing the Meta Pixel remains a valuable decision for advertisers, despite the limitations imposed by recent iOS updates. Here are compelling reasons to install the Facebook Pixel:
- Improve ROI of Facebook Ad Spend: Getting your ads in front of your target audience is just the initial step. The Facebook Pixel goes beyond that by collecting user data, enabling you to ensure that your ads reach the individuals most likely to respond positively to your calls to action. This data-driven approach enhances the effectiveness of your ad campaigns, ultimately improving the return on investment (ROI) of your Facebook ad spend.
- Leverage Facebook Conversion Tracking: The Meta Pixel provides vital insights into how your audience interacts with your ads and website. It tracks user behavior, such as website interactions and device switching (e.g., from desktop to mobile). This data empowers you to fine-tune your marketing strategy, making it more responsive to user preferences and behaviors. However, be mindful of how iOS 15 updates may impact certain Facebook Pixel features.
- Run Retargeting Ads: The Facebook Pixel’s retargeting capabilities are a game-changer. It enables you to display ads to individuals who have already engaged with your website. This means you can deliver highly personalized ads, targeting products or content that users have previously shown interest in. For instance, you can retarget someone with an ad for an item they abandoned in their shopping cart or add to their wishlist. While iOS updates like iOS 14 and iOS 15 may affect retargeting audience size, they do not eliminate the potential benefits.
- Create Lookalike Audiences: Facebook’s wealth of targeting data, facilitated by the Meta Pixel, allows you to create lookalike audiences. These audiences share interests, preferences, and demographic characteristics with those who are already engaging with your website and ads. This powerful feature expands your customer base and might even uncover unexpected customer demographics, contributing to the growth of your business.
Best Practices and Tips for Utilizing Facebook Pixel Data
Analyzing Data in Facebook Ads Manager
Regularly review and analyze the data collected by Facebook Pixel in the Facebook Ads Manager. Pay attention to key metrics such as conversion rates, click-through rates, and return on ad spend (ROAS). Utilize Facebook’s ad reporting tools to gain insights into which ad campaigns, ad sets, and creatives are performing best. Identify trends and patterns in user behavior to refine your targeting and content strategies.
Creating Custom Audiences Based on Pixel Data
After adding Facebook Pixel to Shopify store, you can leverage Facebook Pixel data to create custom audiences. Segment your audience based on their interactions with your website, such as specific page views, add-to-cart actions, or completed purchases. Experiment with different custom audience combinations to deliver highly targeted ads to different user groups. Use lookalike audiences to expand your reach by finding users who share characteristics with your existing custom audiences.
Optimizing Facebook ad Campaigns with Pixel Insights
Implement conversion tracking to measure the success of your ad campaigns. Optimize your ads for specific events like purchases or sign-ups. Use the Conversion Lift tool to assess the incremental impact of your Facebook ads on conversions. Employ dynamic ads to automatically show the most relevant products or content to users based on their past interactions with your website.
Keeping Your Pixel Up to Date
Ensure that you regularly update your Facebook Pixel code to the latest version to take advantage of new features and improvements. Keep your website up to date with any changes in structure or content that may affect how Pixel events are tracked.
Complying with Privacy Regulations
Facebook and Shopify have many policies to ensure that they are complying with many privacy regulations out there. But you, as a merchant, should familiarize yourself with privacy regulations relevant to your audience, such as the General Data Protection Regulation (GDPR) in Europe or the California Consumer Privacy Act (CCPA) in California. Implement consent mechanisms or opt-in options for users to control their data preferences, if required by regulations. Be transparent about data collection and use in your privacy policy, and provide users with clear information on how to opt-out if they choose to do so.
A/B Testing and Continuous Improvement
Conduct A/B tests on various ad elements, such as ad copy, images, and audience segments, to identify what resonates best with your audience. Use Pixel data to track the performance of different ad variations and make data-driven decisions to optimize your campaigns. Continuously monitor and adjust your ad strategies based on the insights gained from Meta Pixel data to improve ad relevance and overall campaign performance.
What Are Facebook Pixel’s Targeting Options You Can Access from Your Shopify Store?
By adding Facebook Pixel to Shopify store, you will be offered a robust set of features to help advertisers improve the return on investment (ROI) on Facebook and Instagram advertising. These core functions include:
- Custom Audiences from your website: This feature allows you to retarget website visitors who are simultaneously logged into Facebook based on their behavior on your site. You can create highly targeted groups of users, exclude specific groups, and even generate lookalike audiences to reach potential customers who resemble your current ones.
- Custom Conversions: Similar to Custom Audiences, Custom Conversions enable you to track and optimize specific actions on your website, such as completing a purchase or signing up. You can create and name these conversions independently of your Facebook ads, aiding in future campaign optimization.
- Standard and Custom Events: The Meta
- Pixel tracks user actions on your website as events: It supports 17 standard events recognized by Facebook, including purchases, sign-ups, and more. Additionally, you can define custom events, which allow for greater data collection and customization, such as tracking scroll depth or specific interactions.
- Dynamic Ads: Particularly beneficial for e-commerce businesses, dynamic ads, also known as catalog sales, automatically display products from your catalog to your target audience based on their behavior. This feature streamlines advertising for businesses with a vast product catalog, tailoring ad content to individual user preferences.
You can find out more about the targeting options that Facebook Pixel provides to your Shopify store at Shopify’s Meta Pixel Guide.
Conclusion
Adding Facebook Pixel into your Shopify store isn’t just a choice; it’s a strategic move that unlocks a realm of possibilities. By understanding its importance, following a step-by-step integration guide, and applying best practices, you can harness the full potential of Meta Pixel to supercharge your online store’s marketing efforts. It’s not just about data; it’s about empowering your business to thrive in the digital age.
If you find our guide useful and wish to receive more similar updates from us, please consider subscribing to our newsletter right below.


