Once you have completed developing your app in your initial development environment and have thoroughly tested it on mobile platforms, you can submit it for review and decide when to release it to the public. However, each mobile application platform has its own specific and distinct procedures for submission. This blog will outline the essential steps required to prepare and submit app on various mobile application platforms.
Table of Contents
- How to Submit App to App Store?
- Step 1: Signing up to the Apple Developer Program
- Step 2: Deal with App Store Listing by AppStore Connect
- Step 3: Create and Add a New App
- Step 4: Configure the Roles, Certificates, Identifiers and Profiles
- Step 5: Upload Your App Build Using Xcode
- Step 6: Update the Version Information
- Step 7: Set up Your Release Date and Submit App for Review
- How to Submit App to Google Play?
How to Submit App to App Store?
When the application advancement measure is finished, the following urgent advance is to present the App Store application. What’s more, it’s not as rudimentary as it sounds. There are plenty of undertakings that continue transferring an application to the App Store.
While the authority directly from the App Stores expresses that by and large, half of the applications are checked on in 24 hours, and more than 90% are inspected in 48 hours, there are frequently delays brought about by fragmented entries and different issues with your application.
Our point in this article is twofold: to offer you straightforward accommodation and show you a portion of the regular blunders to look out to dodge dismissal from the App Store.

Initially, begin with your Mac framework with the most recent variant of macOS introduced and a legitimate Mastercard for the application accommodation expense. You would likewise require a trusted and solid improvement programming, like Xcode, that upholds Apple. You have the alternative to introduce Xcode programming from the Mac App Store.
In this guide, we will advise you on the most proficient method to stick to the App Store accommodation rules, steps to arrange the application, the approach to creating diverse engineer accreditations, and lastly, steps to submit app to the App Store.
Step 1: Signing up to the Apple Developer Program
First of all, you should be taken on the Apple Developer Program to have the option to post an application. The enrollment cost is $99 each year, yet it gives you admittance to a scope of highlights, including:
- Worldwide conveyance with no facilitating expenses: You are ready to arrive at a billion clients across the world through iPhone, iPad, Mac, Apple Watch, Apple TV, and iMessage. Apple handles all installment preparations for your benefit.
- A quick combination of the most recent Apple innovations: Apple clients are known for rapidly embracing new programming deliveries, and you’ll have the option to coordinate these into your applications rapidly.
- Setting up your accommodation application: It is worth completely having the chance to comply with the App Store rules before accommodation, as these will assist you with overcoming the application accreditation measure. In part beneath, we depict the entirety of the basic traps you ought to be aware of to guarantee a smooth endorsement measure and stay away from dismissal or postponement.
When registering as a legal entity, it’s necessary to undergo a verification process to acquire a D-U-N-S Number, which is a distinct nine-digit identifier for businesses. It’s advisable to obtain this number in advance, as the process of getting a D-U-N-S Number might take a while.
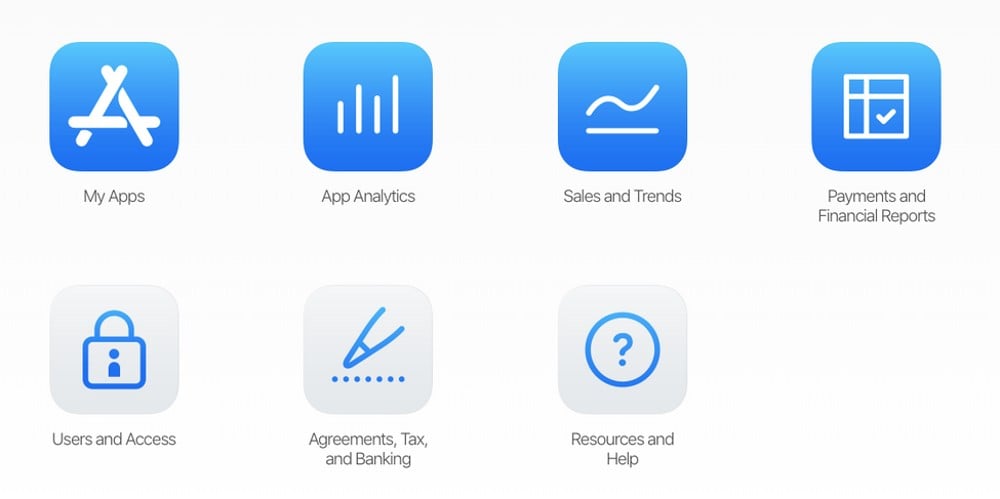
Step 2: Deal with App Store Listing by AppStore Connect
Sign in with the Apple ID you used to take on the Apple Developer Program. At that point, go to the MyApps symbol and press + to make another application. Select the stages that you might want it to show up on and give the application a name. Fill in the subtleties identified with the default language, pack ID, and SKU.
The structure is genuinely direct to follow, yet utilizes the ? work if there is something that you do not know about.
Kindly note that:
- Whenever you’ve filled in the above subtleties, they are hard to risk later, so we would prompt being really sure about them from the beginning.
- Know that the pack ID should coordinate with the group identifier in your Xcode project Info.list document
- This is a decent chance to utilize the correct catchphrases to give your application the most obvious opportunity regarding being found.
- The SKU will not be noticeable to clients, so do not worry about how it is arranged.
Decide on your pricing: You can then settle on a choice about where your application will be free or paid for and if the last-mentioned – what your value plan will be.
Settle on the strategy for discharge: Finally, you will have the option to settle on the technique for your application discharge from the three alternatives of the manual (from AppStore Connect), quick (following certificate), and On a date (booked after confirmation).
Step 3: Create and Add a New App
Creating and adding a new app to the App Store through iOS App Store Connect is a multi-step process that begins with the initial setup and culminates in the submission of detailed information for the App Store listing.
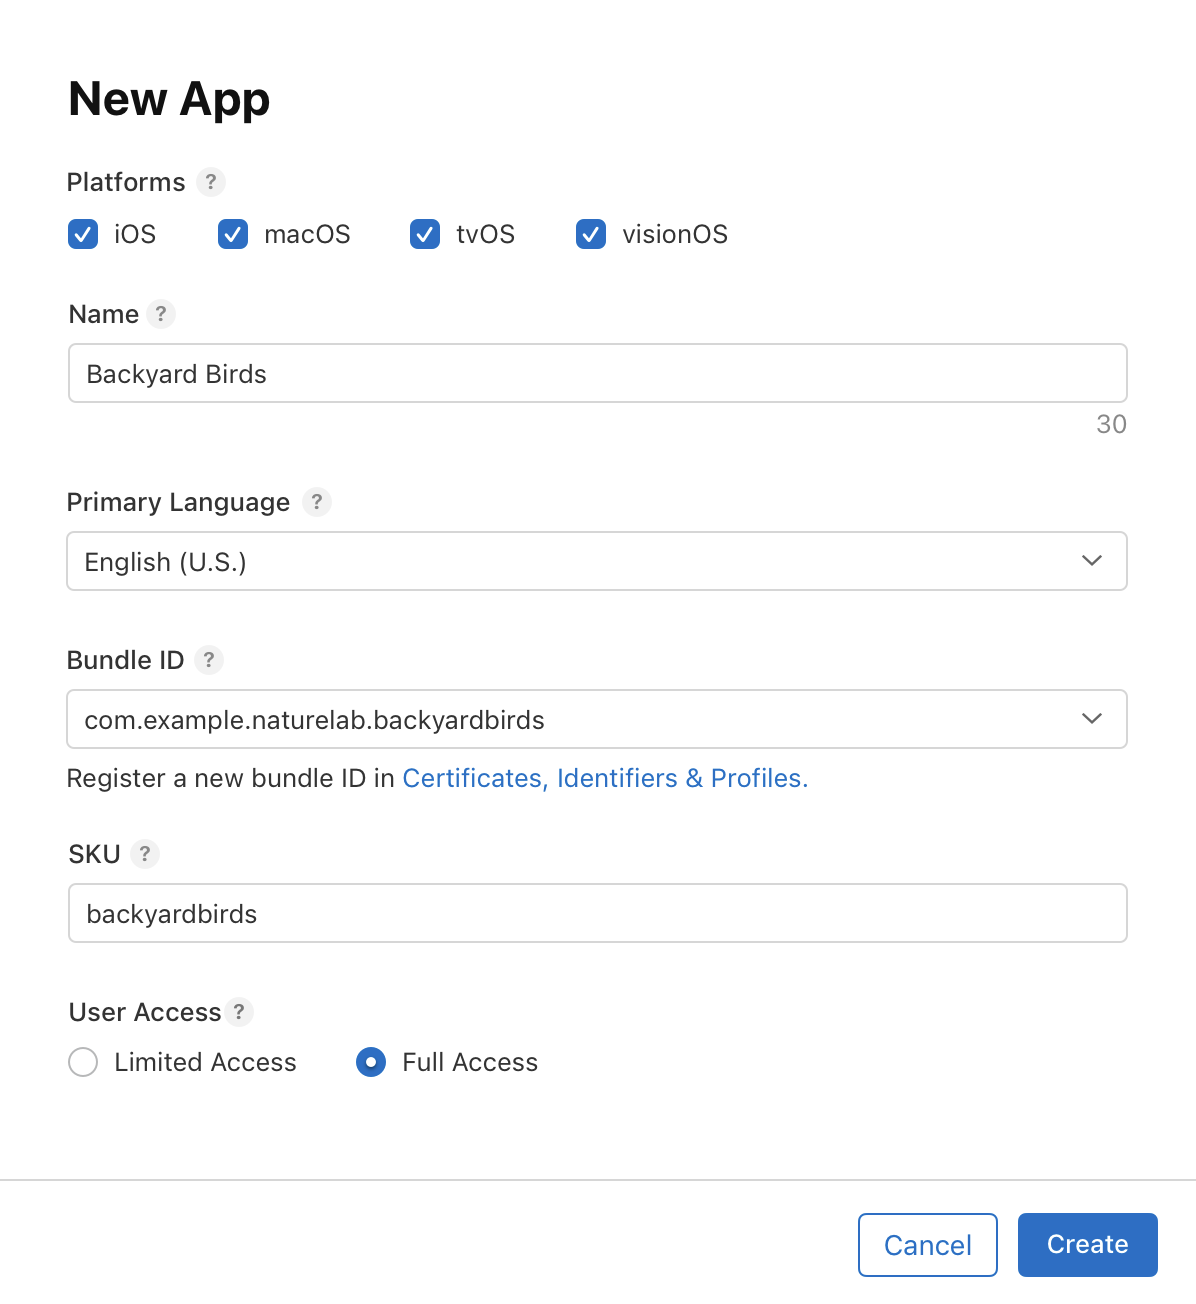
To start, you need to open the My Apps section in App Store Connect and tap the plus button. This initiates the process of creating a new app. You’ll be prompted to fill out various pieces of information on your Product Page, which include:
- Platforms: Here, you indicate which Apple platforms your app supports.
- App Name: This name, limited to 30 characters, is what users will see in the App Store. It’s crucial that this name be unique, as it undergoes a verification process.
- Primary Language: This is the main language in which your app’s information will be presented.
- Bundle ID: Select from app identifiers already registered in your developer account. The Bundle ID, unique to each app on the App Store, must precisely match the bundle identifier in your Xcode project’s Info.list file, specifically in the target’s General > Identity section.
- SKU: The Stock Keeping Unit, though optional and not visible to users, serves as an internal identifier for your company. It can be any identifier meaningful to you.
- User Access: You’ll need to specify whether your application should be accessible to all members of your App Store Connect organization or only to specific groups.
Upon completing these fields and hitting the Create button, you’re directed to the Product Page. In the App Information section, you can add localizable information, vital for iOS apps targeting various regions. If this isn’t specified, the app defaults to the primary language selected earlier.
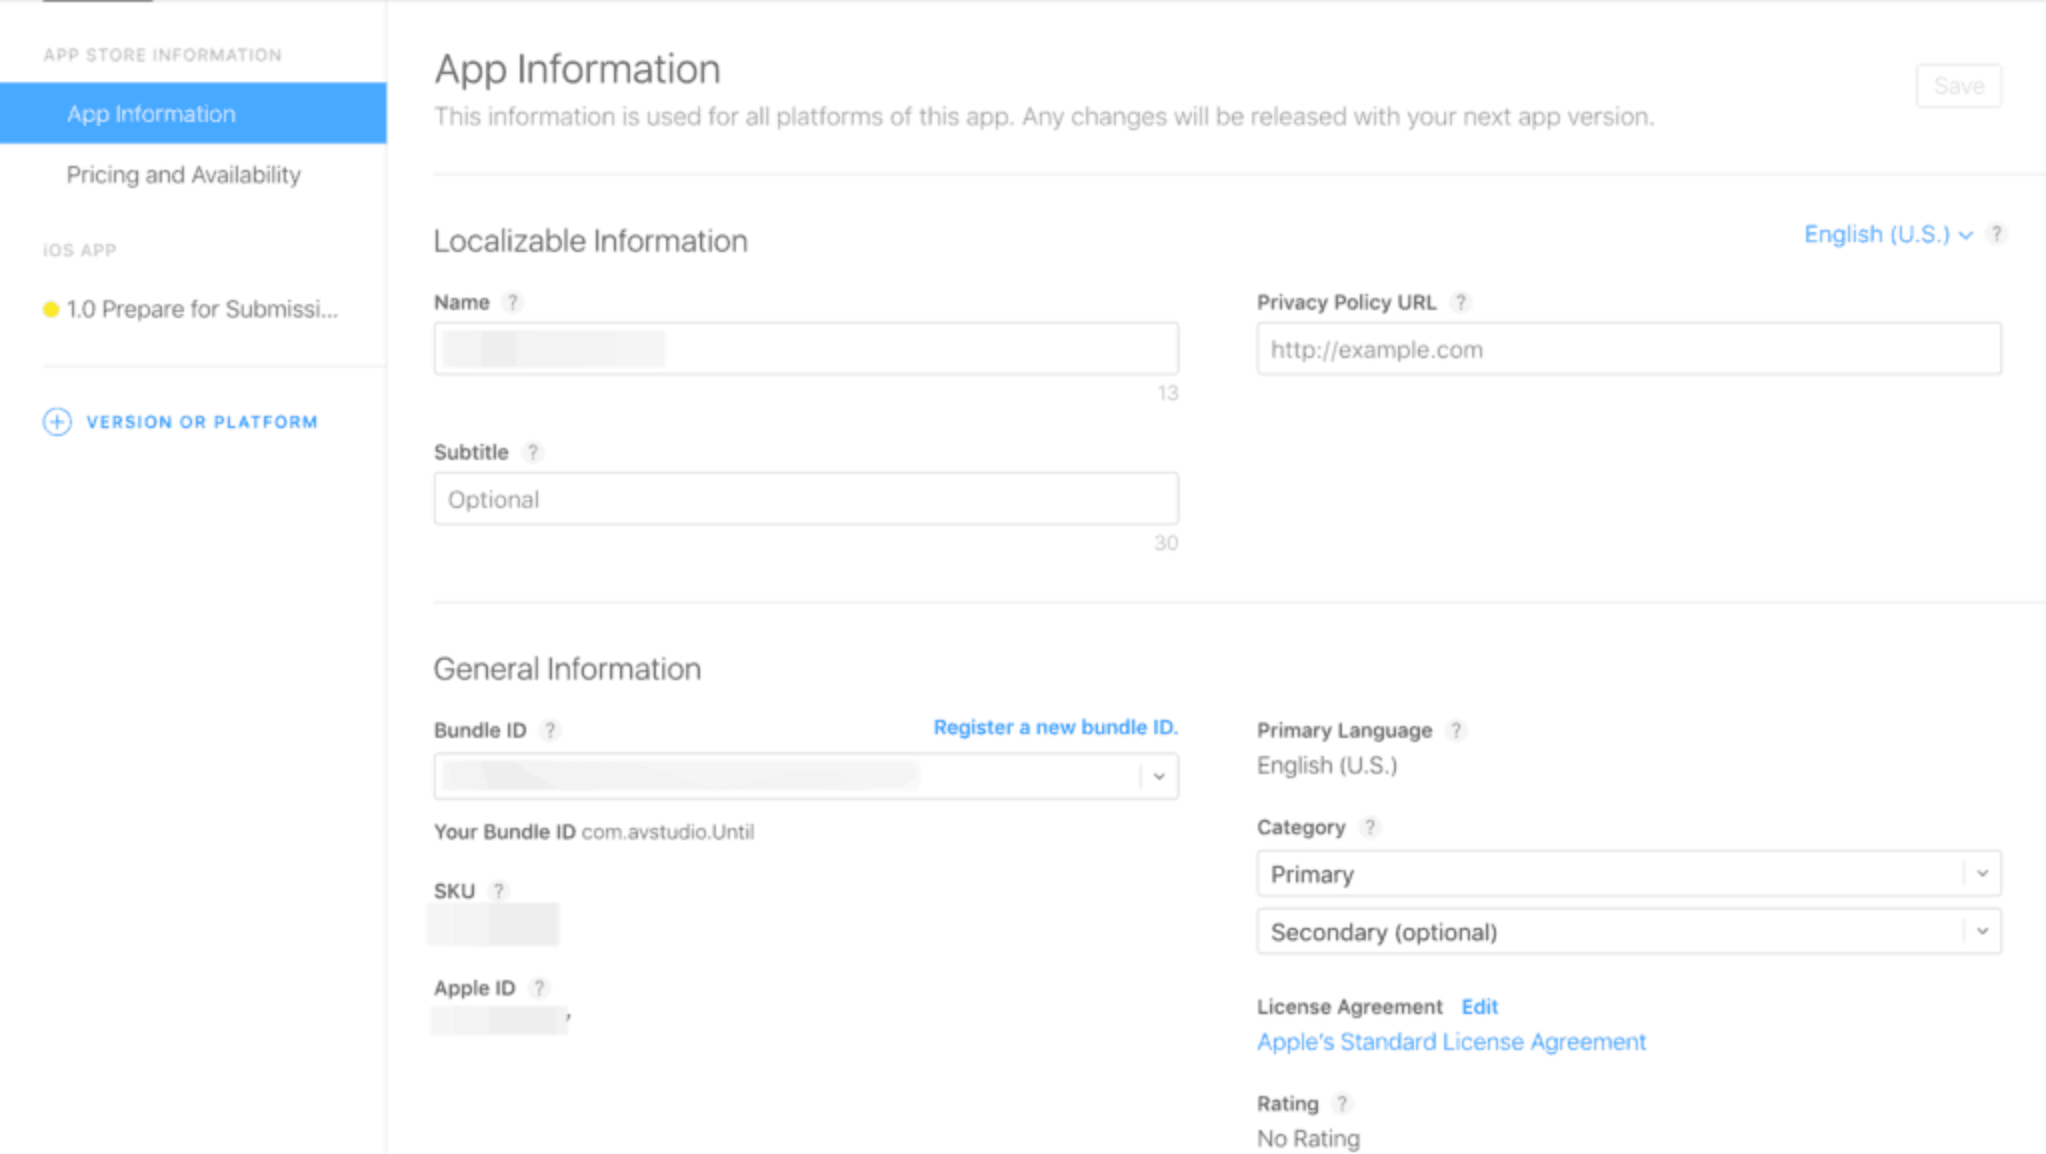
The app’s category is another critical choice. You must select a primary category for your app, and if applicable, a secondary category can also be chosen if your app fits into multiple categories.
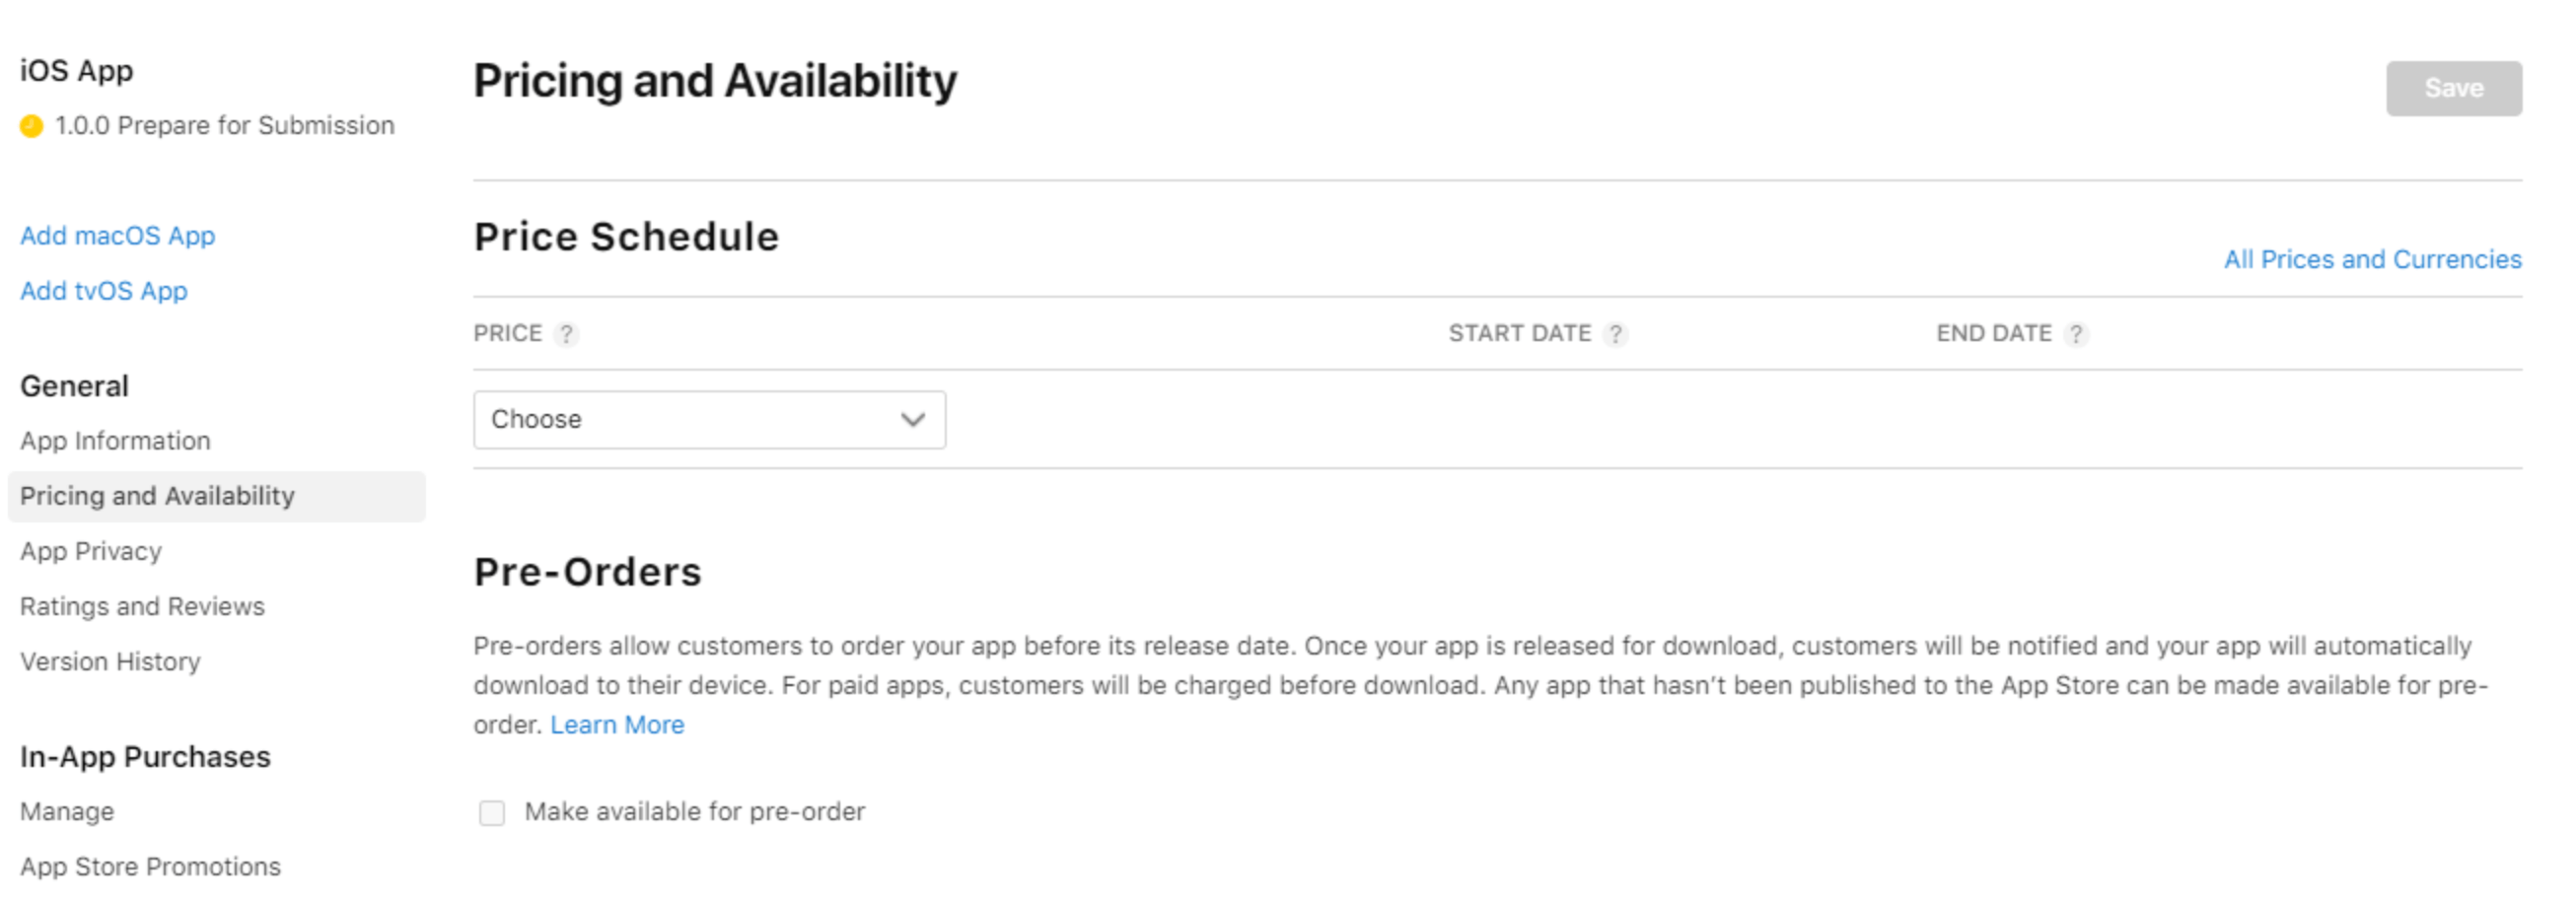
For paid apps, setting the pricing in the Pricing and Availability section is essential. Unlike Google Play, you don’t set a direct price but choose from predetermined price tiers. This section also allows you to manage your app’s availability in different countries, which is especially useful for soft launching.
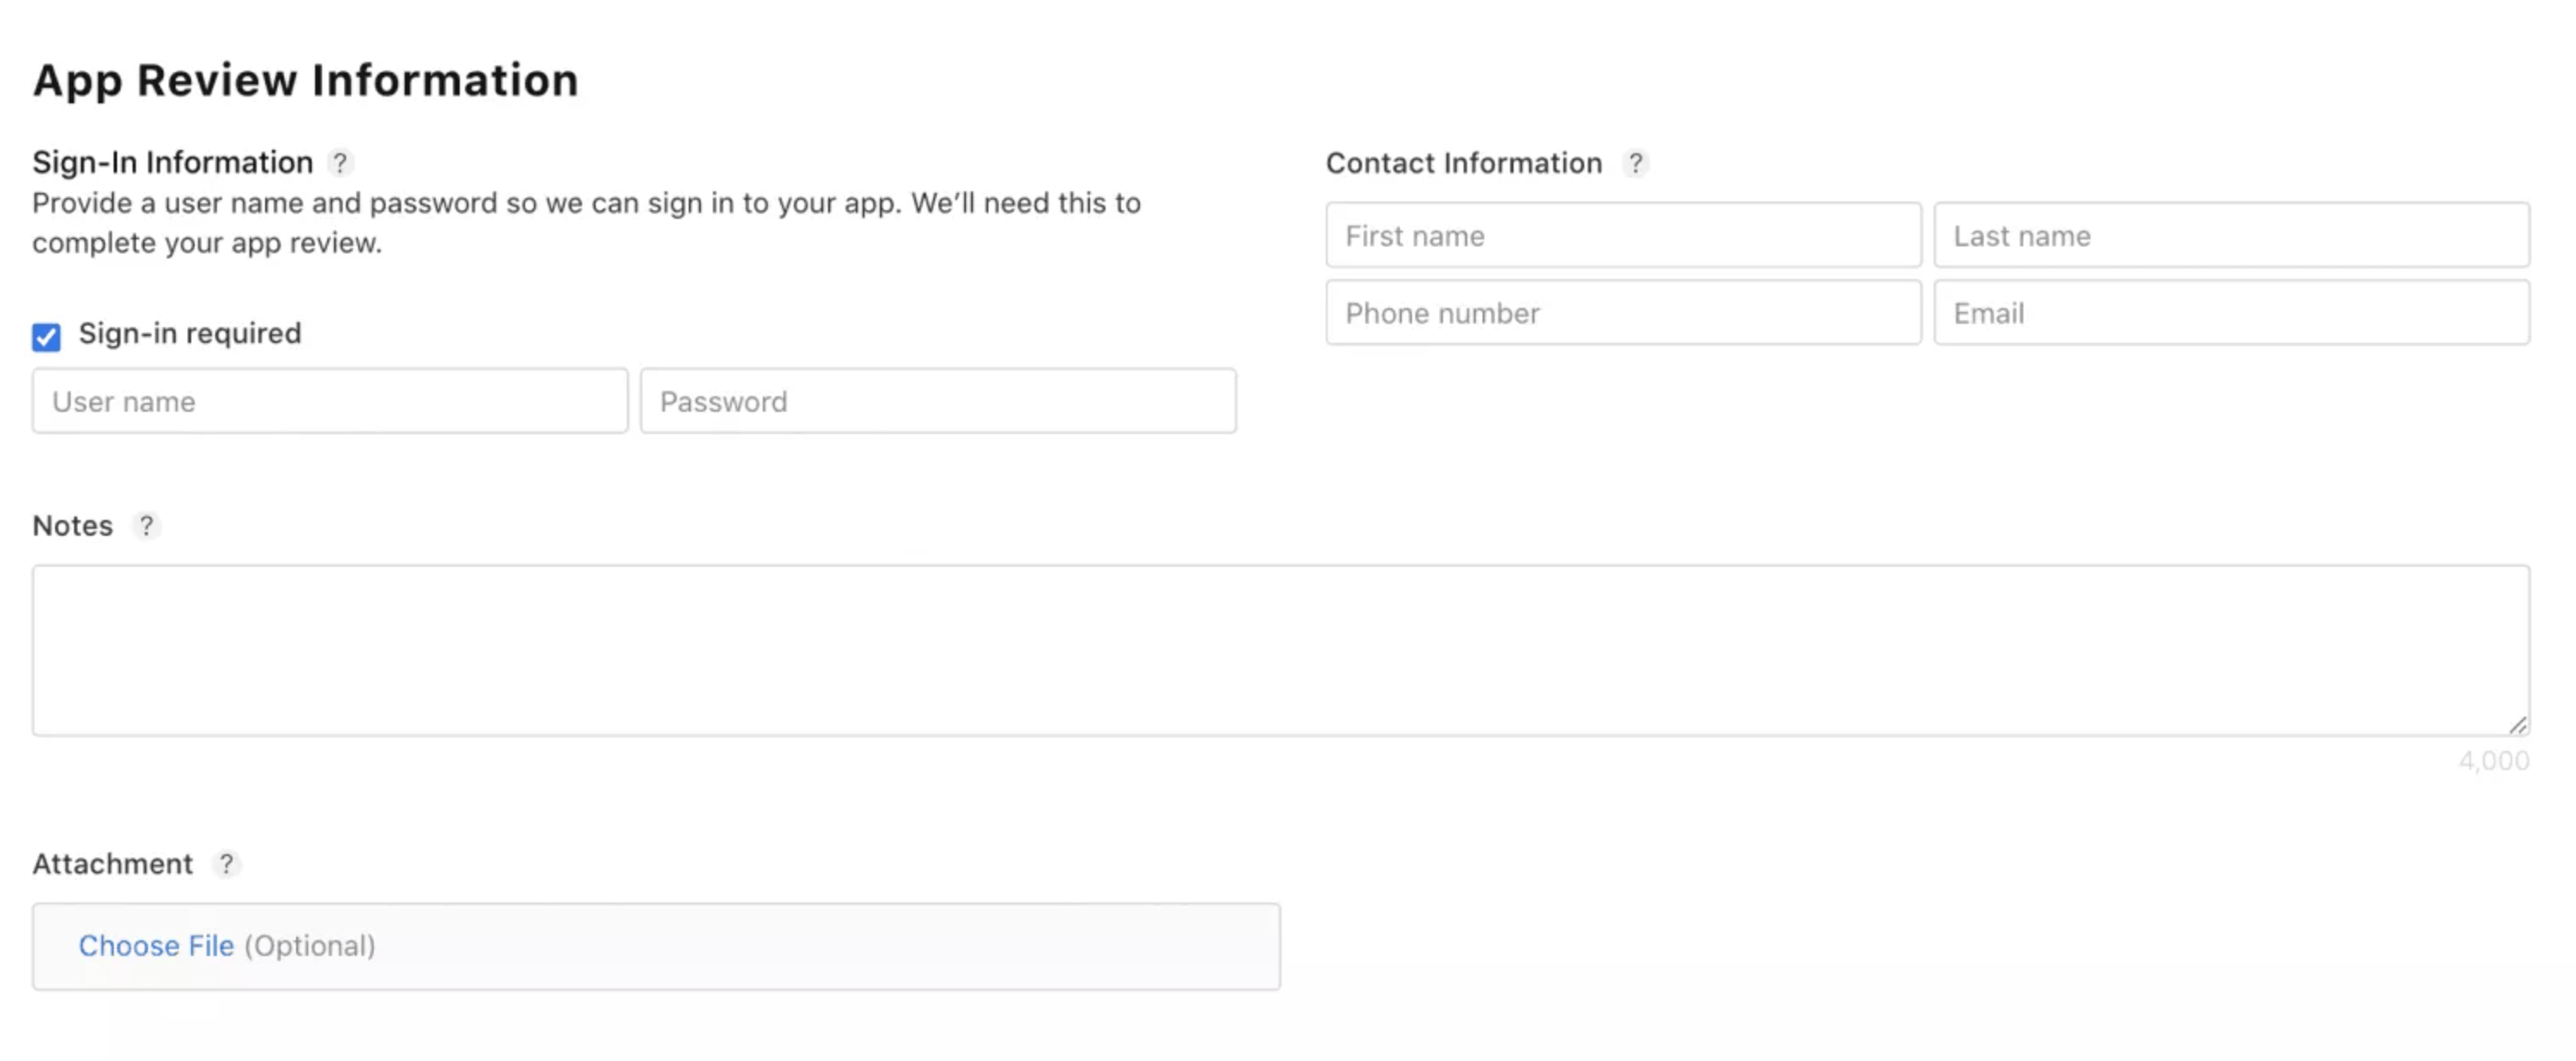
If your app requires user sign-in, you must provide test credentials for the Apple review process and fill in contact information for any queries Apple might have.
Lastly, in the App Privacy section, you need to include a Privacy Policy URL, which will be displayed on your app’s page. This URL can link to a PDF file or a web page.
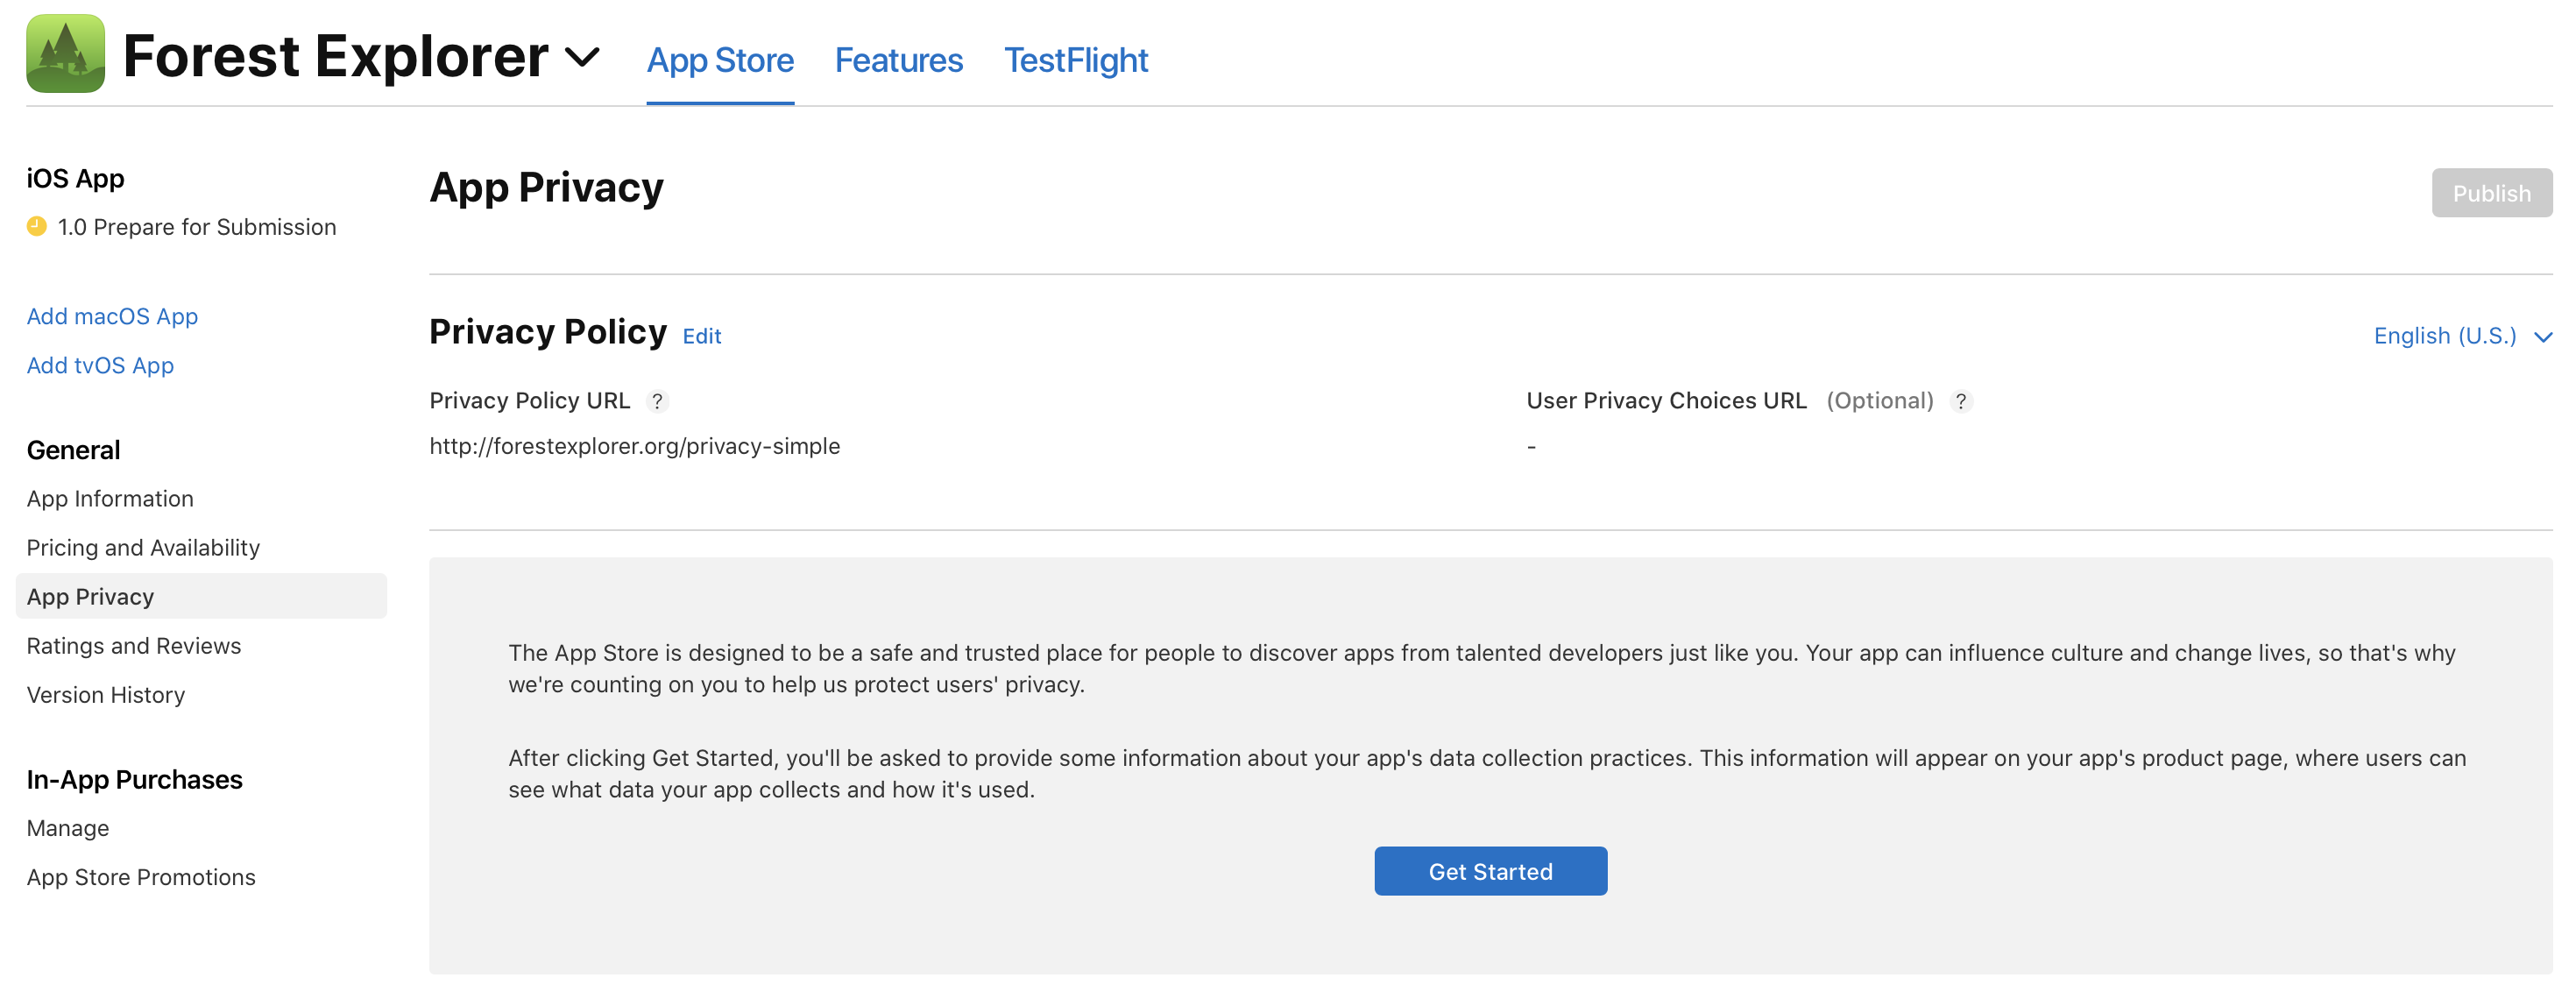
This comprehensive process ensures that all necessary information and settings are in place for your app’s successful submission to the App Store.
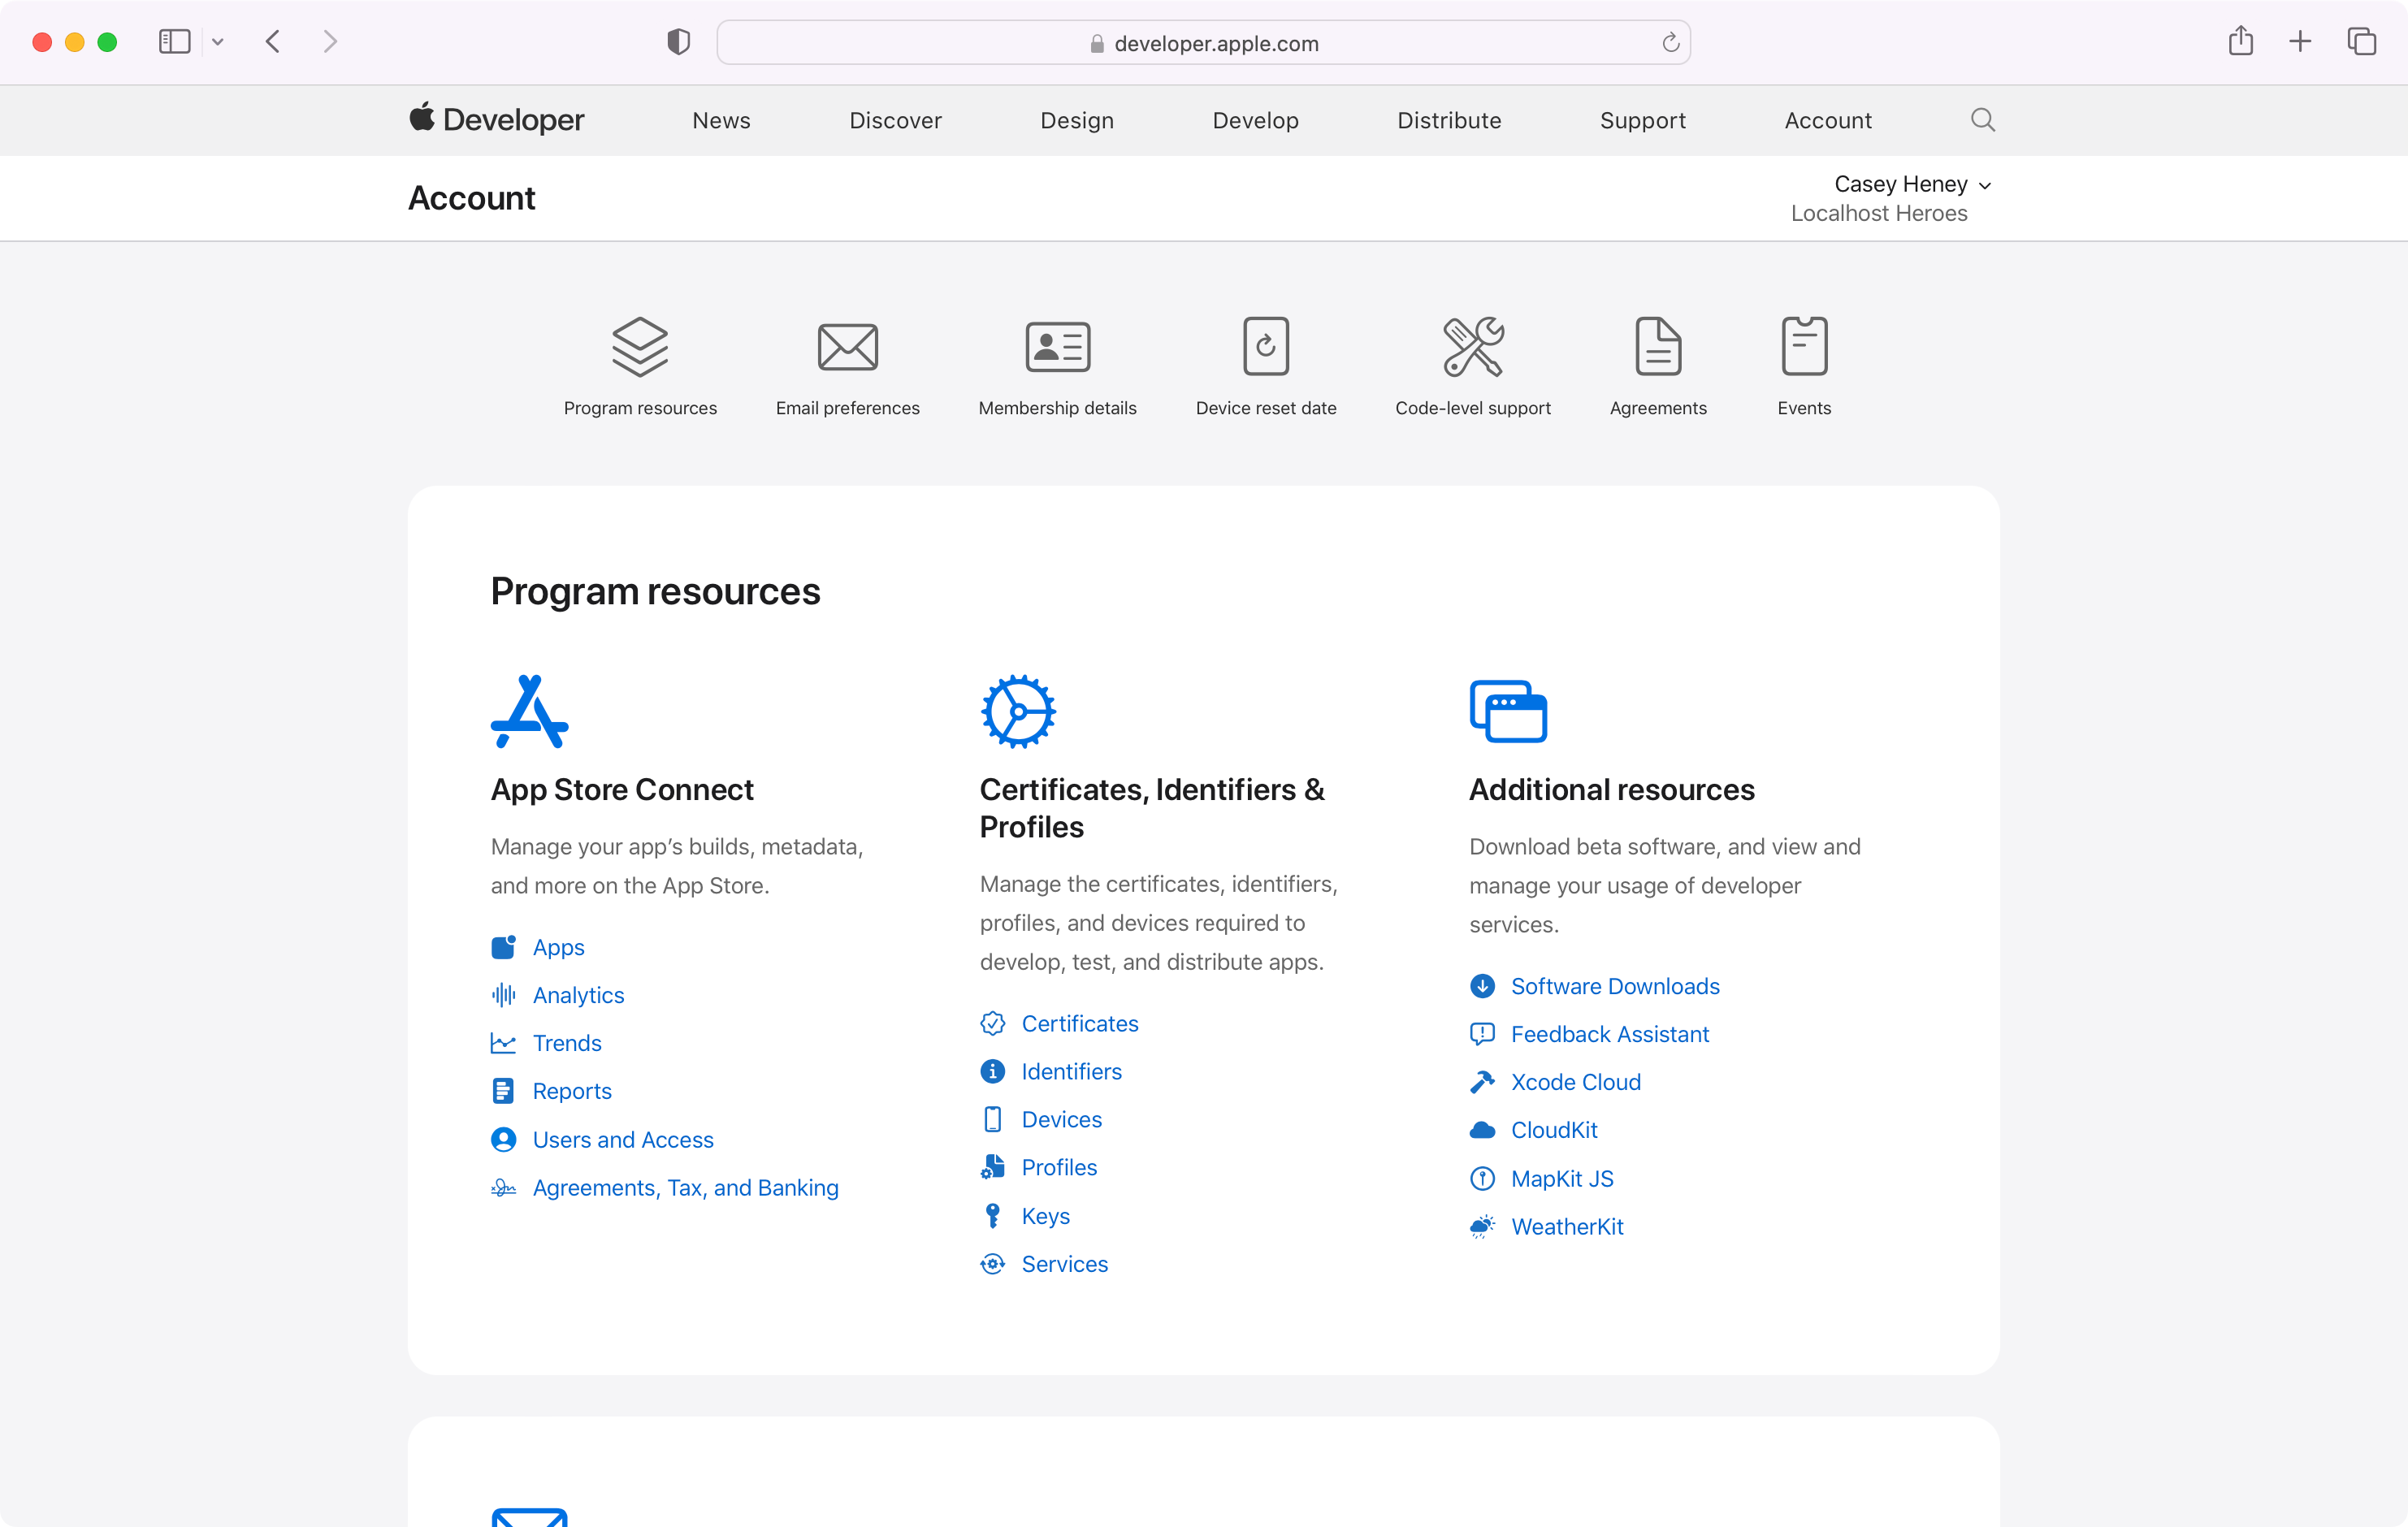
Step 4: Configure the Roles, Certificates, Identifiers and Profiles
Configuring roles, permissions, certificates, identifiers, and profiles is a crucial step once you are registered with the Apple Developer Program.
Firstly, understanding the various roles and permissions is essential. The Apple Developer Program offers a detailed guide on roles, which outlines the permissions each role has.
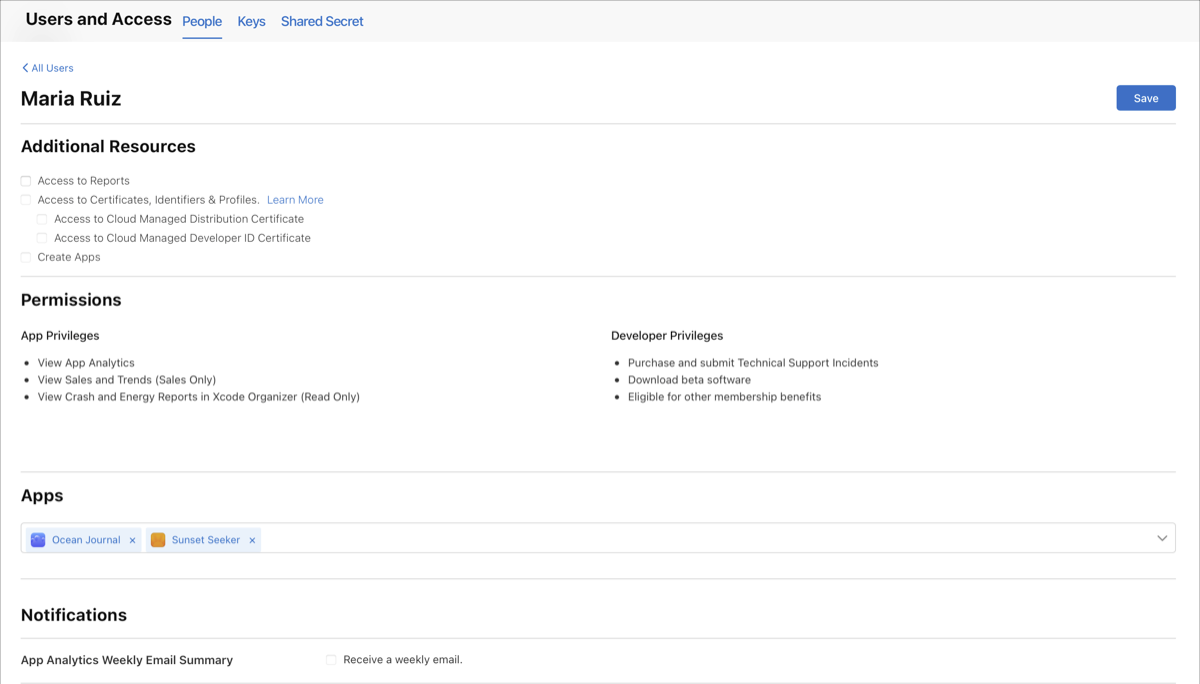
Developers must be granted appropriate permissions to create certificates and provisioning profiles, which are critical for app development and deployment. Without these permissions, developers won’t be able to make necessary changes.
Once the necessary permissions are in place, developers can proceed to sign their app and define its identifier and capabilities in the Certificates, Identifiers & Profiles section. This includes:
- Distribution Certificate: This certificate is vital as it identifies your app development team and is required to submit app to the App Store.
- App ID: This serves as your app’s identifier. The Bundle ID here must match the bundle identifier in your app’s binaries.
- Provisioning Profile: This is particularly important for testing the app on real devices before submission for review. Provisioning profiles, which are embedded in your app binaries, allow the app to run on specified devices before it is officially signed by Apple. A unique provisioning profile must be created for each app.
These configurations are key to ensuring that your app can be developed, tested, and ultimately submitted to the App Store correctly.
Step 5: Upload Your App Build Using Xcode
First, developers need to open the app project in Xcode. In the Signing and Capabilities section, it’s important to ensure that the correct account is selected. This is crucial for the app’s signing process.
Next, move to the General section to set the build version you intend to upload. For a new app, the app version should be set to 1.0.0. If you’re updating an existing app, remember to increment the build version accordingly.

Once all necessary information is in place, proceed to the Product menu and select Archive. This action bundles your app for release. After the archiving process is complete, the Archives window in Xcode will open. This window manages all the archives created by Xcode for your app.
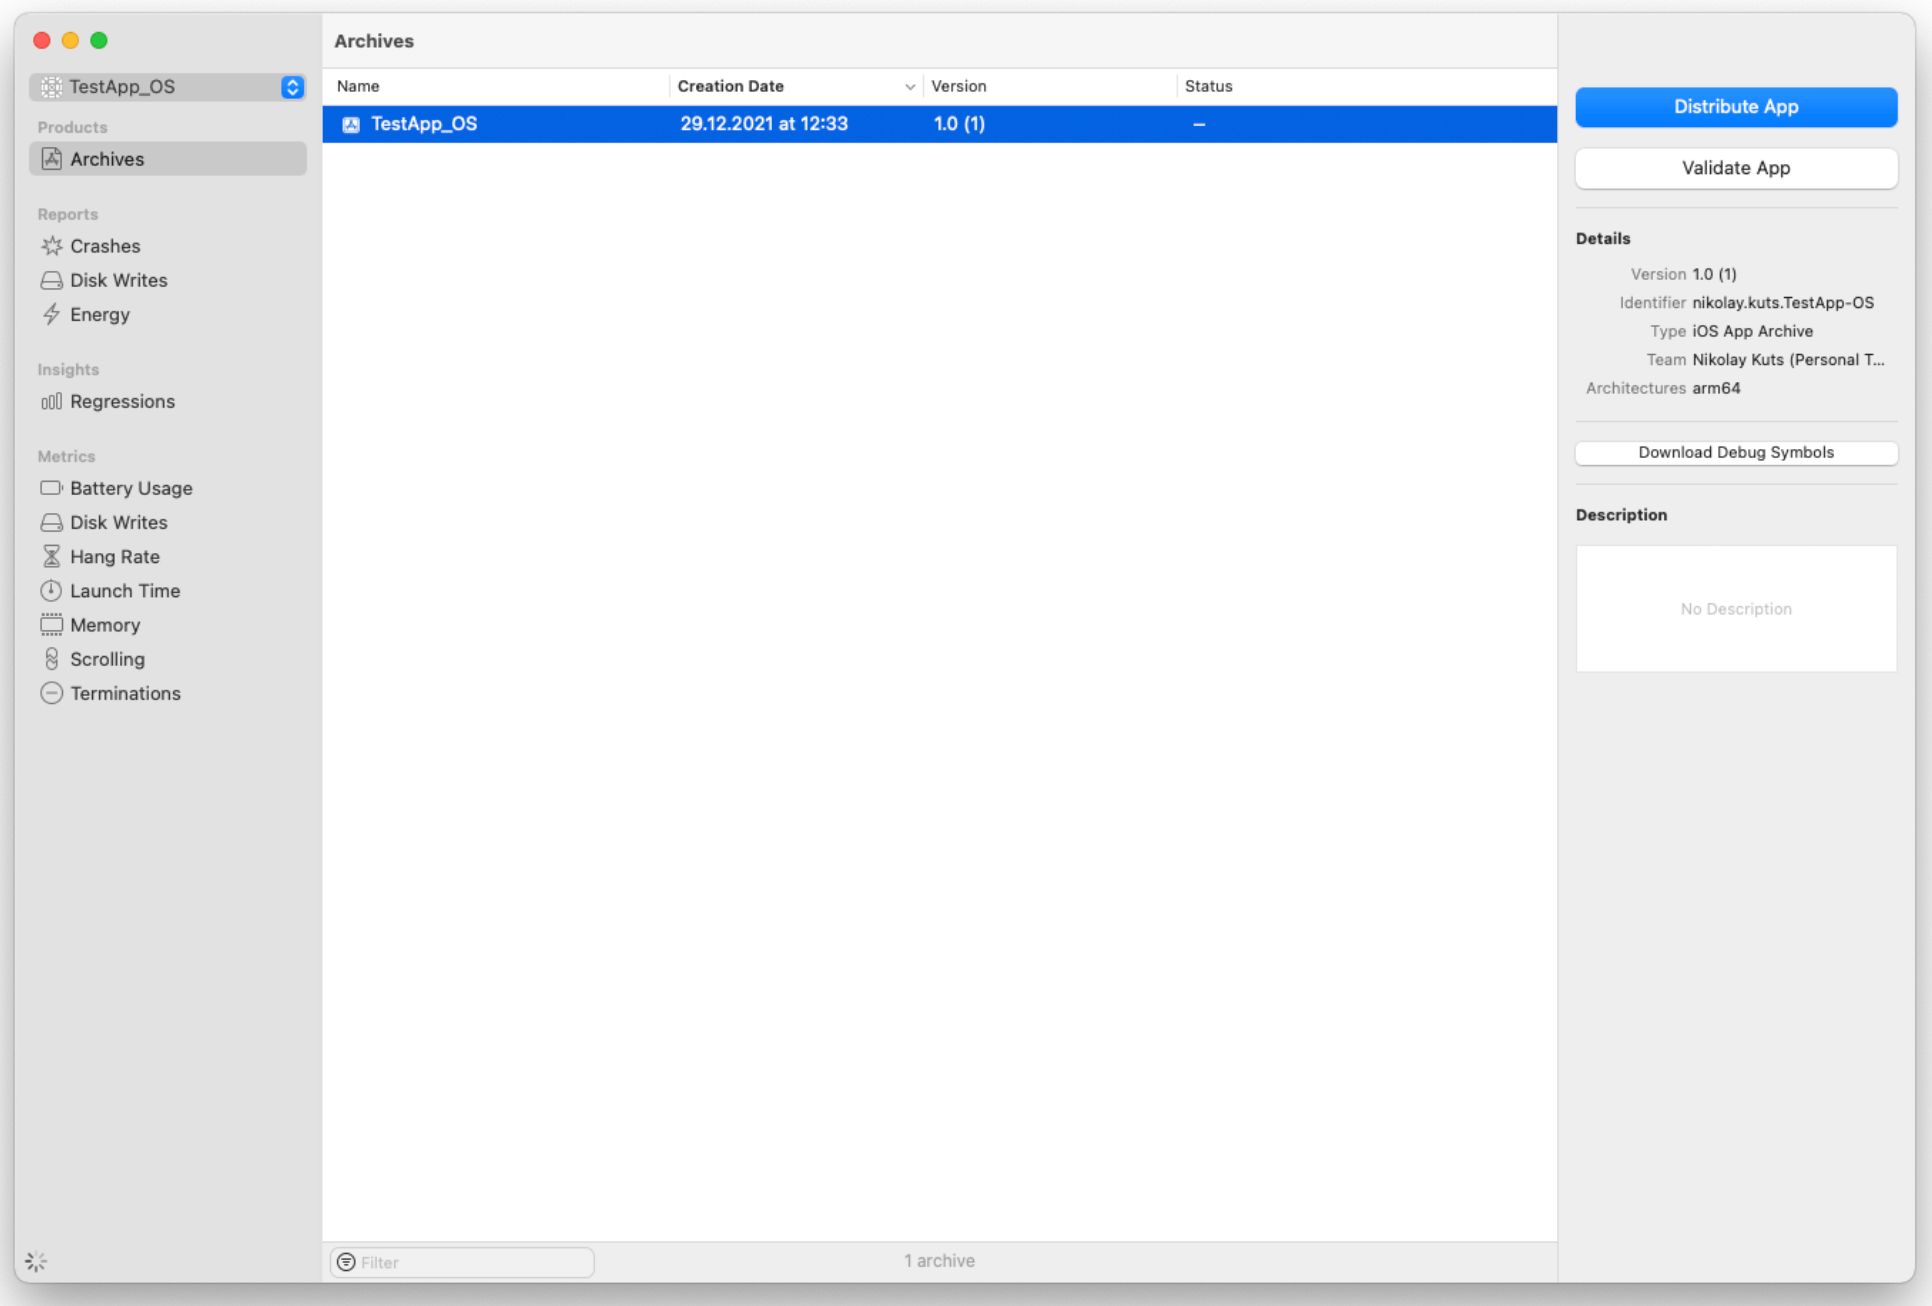
In the Archives window, find the latest archive of your app and click the Distribute App button. This action initiates the upload of your build to App Store Connect.
During this process, Xcode takes care of generating all the necessary certificates automatically. If there are any issues or errors during this process, Xcode will notify you, allowing you to address any problems before the submission is finalized.
Step 6: Update the Version Information
Updating the version information is a critical step in submitting your app to the App Store. This involves accessing App Store Connect and selecting the iOS app you wish to publish. Here, you are required to upload app screenshots and provide essential information about your app.
Screenshots: You can upload up to ten screenshots in either JPG or PNG format. Apple mandates screenshots for both 6.5-inch and 5.5-inch iPhone sizes. The first two screenshots are particularly crucial as they appear in search results, making them one of the first elements a user sees. These screenshots should be both informative and visually appealing. It’s important to note that screenshots can vary for each supported language. Apple provides specific screenshot specifications which should be consulted to ensure compliance.
App Previews: An app preview is a short, optional video, up to 30 seconds long, showcasing your app’s core features. You can add up to three app previews. Like screenshots, app previews can be localized to cater to different languages.
Promotional Text: This is an optional field that can be updated anytime without needing to submit a new version of the app. It’s visible to users before they click the Read More button.
Description: The description should encapsulate all the features of your app but must not exceed 4,000 characters. It’s a key section as it informs potential users about what your app does.
Keywords: Effective use of keywords can significantly enhance your app’s searchability in the App Store. The total length of keywords should be under 100 characters. Spaces are used to separate words within phrases, while commas separate different keywords or phrases.
Support URL: A mandatory field, the support URL directs users to a website for help and support. It’s advisable to have a dedicated website, but in its absence, a page created using a free website builder can suffice.
Marketing URL: This URL provides marketing information about the app and is an optional field.
Icons: The app icon is a crucial aspect of your app’s presentation. It must be unique and adhere to Apple’s Human Interface Guidelines. The required resolution is 1024x1024px at 72 dpi, in PNG format, RGB color space, flattened with no transparency, and must be square without rounded corners.
Remember, apart from the promotional text, you cannot change most of this information immediately after publishing your app on App Store Connect. These details can only be updated with new version releases, so it’s important to review them thoroughly before submission.
If your app includes features like App Clip, iMessage App, or Apple Watch support, you’ll also need to fill in additional sections specific to these functionalities.
Step 7: Set up Your Release Date and Submit App for Review
If you haven’t already, set up your marking and group data in Xcode. Your application ought to be set to 1.0.0 on the off chance that you are distributing another application. Xcode recently used to be more confounded.
However, the most recent rendition of it, Xcode11, has a fundamentally worked-on measure. Beginning April 2021, all iOS and iPadOS applications submitted to the App Store should be worked with Xcode 12 and the iOS 14 SDK.
Apple’s true group first surveys each application that gets submitted to the Apple application store.
- Initially, the clients need to pick the delivery type, which implies they have the alternative to pick between manual delivery and programmed discharge.
- Now, the iPhone application engineer needs to sit tight for endorsement from Apple’s side.
- The application survey measure normally goes from 2 to 3 weeks before Apple chooses new application accommodation.
- If the application isn’t affirmed, try to audit the notes in the Resolution Center area and work on the referenced focuses. When the progressions are executed, at that point, feel free to resubmit your iOS application.
The last step is the release of the application, which is, without a doubt, quite possibly the most anticipated stride for application engineers. When it comes to releasing your app, there are three options available:
- Manual Release: In this method, you need to manually click the Release button in App Store Connect once your app has received a positive review.
- Automatic Release: With this option, your app will automatically go live in the App Store immediately following a positive review.
- Automatic Release with Date Restriction: If you choose this option, your app will be released on a specific date you’ve set, provided it has passed the review process by that time.
If the client chooses the Manual delivery choice, they will get a Release alternative if they pass in their application. So, hang tight for the Prepared available to be purchased status of the application.
How to Submit App to Google Play?
The Google Play store is the greatest source Android clients go to for downloading applications, and having your application highlighted conspicuously on it guarantees more downloads. So how to submit app to the Google Play Store? This guide will tell you the best way to submit and deliver your application on the Google Play store.
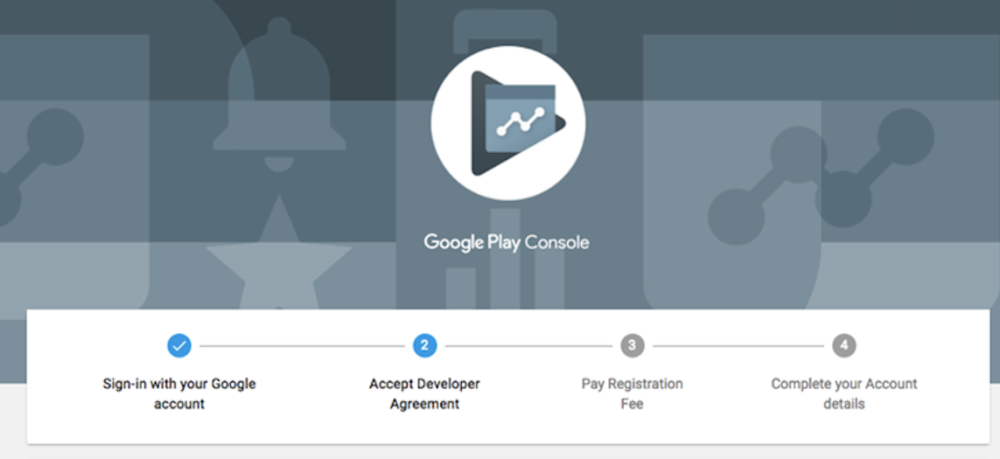
Step 1: Google Play Developer Console
To submit app to the Google Play Store, a designer dashboard is basic. Engineer support is somewhat of a backend controlling focus, from where designers present an application to the Play Store. There is a one-time charge of $25 by which an engineer can open a record, stacked with capacities and control highlights.
So this could be viewed as the only cost to submit app to Google Play. Subsequent to paying this one-time expense, you can submit app to Google Play for free.
You need to round out every one of the accreditations asked while making the record, like your name, country, and then some. When you present your record, it will take up to 48 hours to get affirmed.
Step 2: Link Developer Account with Google Wallet Merchant Account
If the application getting transferred to the Play Store upholds in-application buys, you will require a trader account. To make one you can sign in to your Google Console record and snap on Reports trailed by Monetary Reports choice. After this, you may choose the Set up a vendor account now alternative and just round out your subtleties.
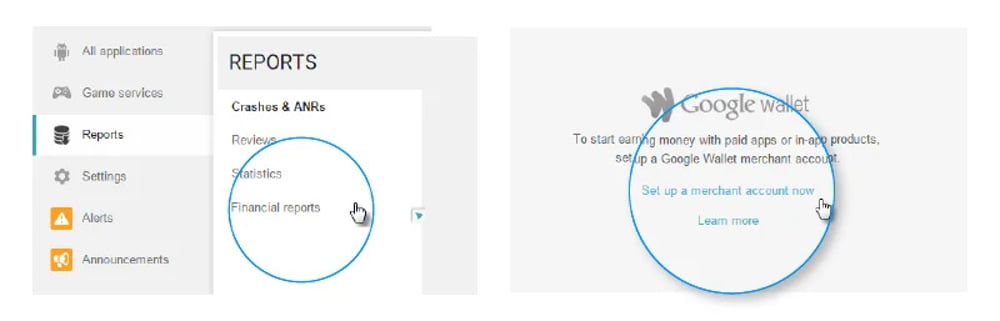
The vendor record will consequently get connected to your Google Console account and will permit you to oversee and inspect application deals.
Step 3: App Store Listing
If the application getting transferred to the Play Store upholds in-application buys, you will require a vendor account. To make one, you can sign in to your Google Console record and snap on Reports trailed by ‘Monetary Reports’ choice. After this, you may choose the Set up a vendor account now alternative and basically round out your subtleties.
The trader record will naturally connect to your Google Console account and permit you to oversee and inspect application deals.
Step 4: Fix App Pricing and Distribution
Now, you must be clear about what nations your application will be accessible in. The highlight note here is that Google doesn’t uphold distributing an application for all districts. The application will be distributed in chosen nations rather than around the world.
Also, allocating a cost to your application is essential. On the off chance that you need your application to be free, settle on sure that this choice is lasting, as Google does not permit you to change over free applications into paid ones. However, the cost of the application can be adjusted.
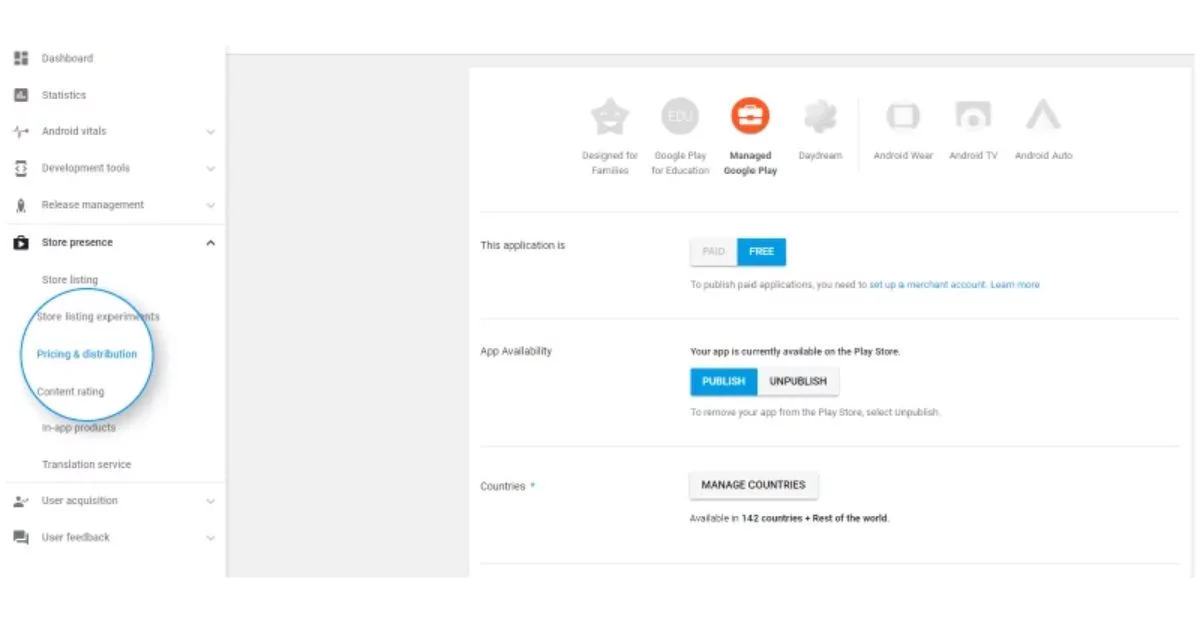
To do this, go to the Pricing and Distribution tab in the menu and afterward settle on a decision whether your application will be Free or Paid. You may now choose the nations you need your application to be delivered to. Furthermore, if your application is appropriate for youngsters younger than 13, you may choose Yes for Primary Child-Detected. On the off chance that in any case is the situation, essentially select No. Additionally, select the alternatives for permitting promotions into your application.
Step 5: Finally, Launch the Application
Whenever you are affirmed that everything is right, make the last stride of this guide on the best way to transfer an application on Play Store, i.e., add the application to the stage. You need to return to the Application Releases tab and select Oversee Production trailed by Alter Release. After this, click on Survey and pick the Start rollout to creation choice. To finish this cycle, select the Affirm alternative and Voila! You have effectively transferred the application to the Google Play Store for nothing.
All there is left to do now is to trust that your application will get endorsed. It, by and large, required around two hours for your application to get explored. In any case, Google Play’s refreshed protection strategy will currently require hours and even days for the equivalent, empowering portable application advancement organizations to make significantly more immaculate applications that get chosen in a split second. Thus, hold your energy in the spot and stand by.
Final Thought
We believe that these App Store and Google Play rules furnish you with a superior comprehension of what goes along the way toward distributing an application to the App Store. When the application is live, you would then be able to zero in on deciding on the privilege application store enhancement tips so that your application can perform better compared to the contenders.
However, these activities can be a challenging task for many merchants. We recommend you partner with a reliable digital transformation agency such as Magenest. We have a team of experienced developers and specialists who are equipped with numerous effective practices and tips that can help you gain competitive advantages.