Shopify is a user-friendly eCommerce platform that is tailored to make the process of selling online not only effortless but also quick. It allows you to construct a strong and captivating brand identity through the use of templates and simultaneously offers a plethora of beneficial add-ons and plugins. Nevertheless, before delving into more advanced strategies, one must first grasp the essentials. This involves understanding how to add products to Shopify store to drive sales.
Product pages are integral to your online store. They showcase each item with an accompanying SKU (Stock Keeping Unit), allowing you to track inventory along with other Shopify administrators. In this guide, we are going to demonstrate the correct approach how to add products to Shopify store.
Table of Contents
Straightforward Steps to Add Products to Shopify Manually
Step 1: Log Into Your Shopify Account
The first step of the guide on how to add products to your Shopify store, your first step involves gaining access to your account’s backend. To do this, you will need all your login credentials handy. Navigate to the Shopify website and click on the Log in button, then provide your store address, email address, and password.
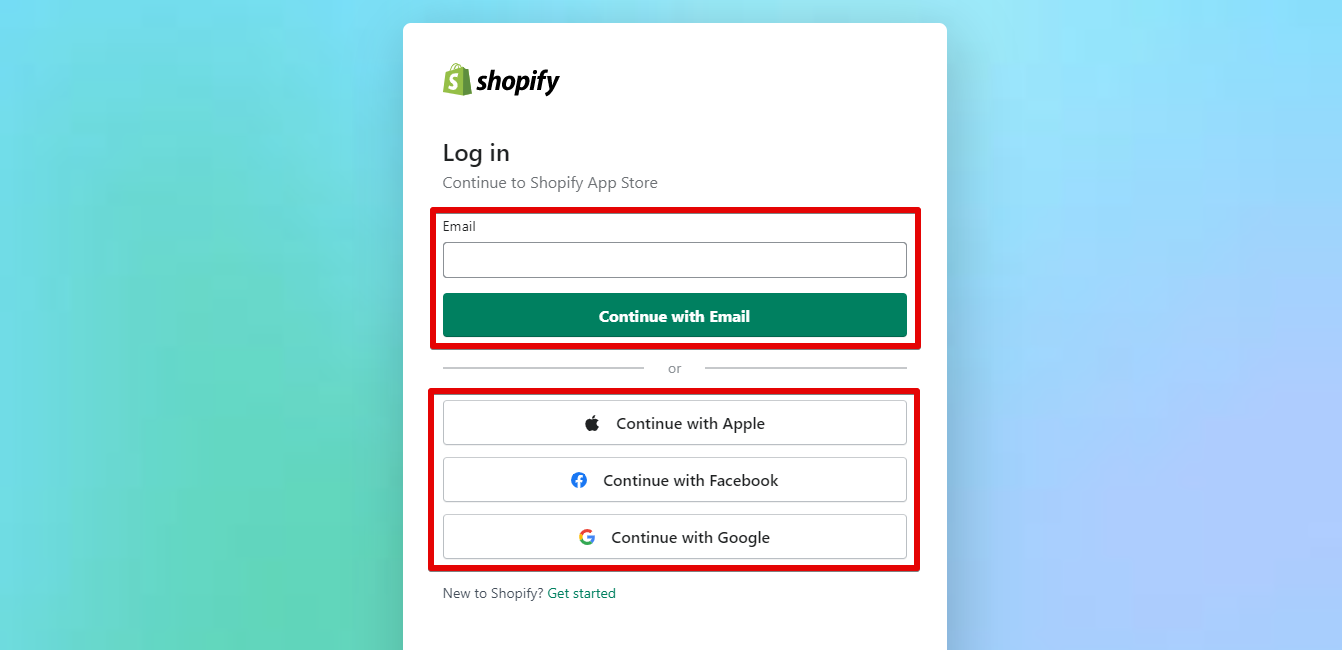
A common issue that users often encounter is forgetting their Shopify login passwords. If this happens, don’t fret as you can retrieve a Shopify verification code via your registered email address. To bypass this extra step in the future, consider utilizing the remember me option for faster account access. However, avoid using this option if you’re working on a shared device.
If you haven’t yet set up a Shopify store, head to the Shopify homepage to initiate a free trial.
Upon successful input of your account information, you’ll land on the Shopify dashboard, which is exclusive to administrators. On your Shopify account, locate the Products tab underneath the Search option. Upon clicking on this tab, you’ll be presented with options such as Add a product or Import products. Click on Add a product to navigate to the product page.
Step 2: Write the Product Details
Upon navigating to the product page, you’ll need to furnish detailed information about your product. This involves:
- Product Title
- Description
- Product Type
- Vendor
- Tags
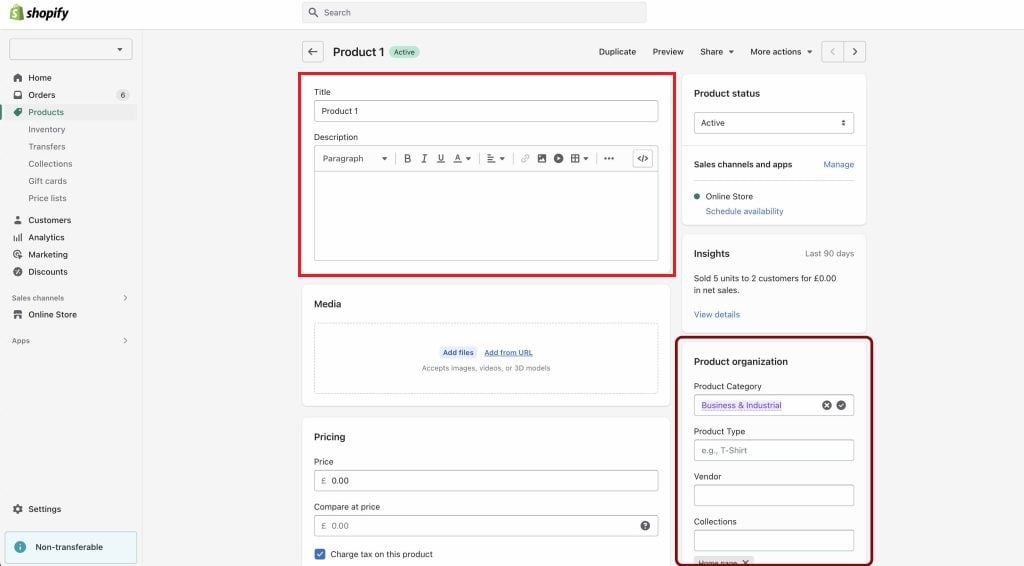
However, bear in mind that it’s not mandatory to furnish every product detail immediately. You can initially input the most essential ones and progressively supplement them with additional information as you proceed.
Product Title
Creating a product title requires a clear, concise, and descriptive approach. The ideal product title is succinct, clear, and informative, providing customers with necessary information without causing confusion or information overload. Here are a few examples:
- Men’s Stainless Steel Chronograph Watch
- Organic Aloe Vera Skincare Cream
- Vegan Chocolate Chip Cookies, Gluten-Free
- Premium Cotton Queen-Size Bed Sheet Set in White
- Kids Educational Wooden Puzzle Set
In each example, the title clearly identifies the product and provides some insight into its features or unique selling points, such as the material, purpose, target audience, or dietary considerations. Furthermore, it’s essential to maintain consistency in your product titles across all pages. If you initiate with the color of the product in one title, ensure you apply the same order to the titles on all other product pages.
Description
The product description plays a pivotal role on your product page. It’s your opportunity to grab your audience’s attention and persuade them of the value of what you’re selling. When crafting a compelling product description, prioritize outlining the benefits your customers will derive from the product.
Additionally, ensure your description is easy to understand. Avoid jargon and use simple, everyday language whenever possible. Keywords related to your product that your potential customers might use in search engines need to be incorporated. But remember, your primary audience is human, so make sure the text reads naturally.
For example, if you’re selling a Premium Cotton Queen-Size Bed Sheet Set in White, your description might look something like this:
Experience the luxury of our Premium Cotton Queen-Size Bed Sheet Set in White. Made from 100% Egyptian cotton with a 400 thread count, these sheets are incredibly soft, breathable, and durable. Perfect for year-round comfort, they keep you warm in winter and cool in summer.
Our set includes a flat sheet, a fitted sheet, and two pillowcases. With its deep pockets, the fitted sheet ensures a snug fit on mattresses up to 14 inches deep.
Experience a great night’s sleep with our high-quality bed sheet set. Order yours today!
When introducing a new product to your website, maintain consistency by following the same format for each description. This might involve listing product features in bullet points or suggesting complementary products that would enhance the primary purchase. If you have an outstanding and attractive CTA, it’s so great to encourage customers to make a purchase.
Sometimes, writing an informative and unique description of your product may be a daunting task. Fortunately, in February 2023, Shopify unveiled an AI tool designed to automate the generation of product descriptions.
Product Type
Product type helps you to organize your store and allows customers to filter their searches according to their needs. They could range across numerous categories, depending on the nature of your store. Examples include clothing, furniture, kitchen appliances, electronics, or beauty products. When you classify your products effectively, it simplifies navigation for your customers, enhancing their shopping experience and potentially increasing the likelihood of sales.
Vendor
If the item is of your own creation, you can insert your brand name in this section. However, if you’re retailing a product from another brand, use the Vendor field to attribute the manufacturer or supplier. Identifying the vendor can help customers search for products from their preferred brands. Additionally, if customers have had a positive experience with a certain brand, recognizing the vendor can lead to repeat purchases. It’s always beneficial to give your customers as much information as possible to guide their buying decisions.
Tags
Tags are essential elements that further categorize your products and enhance the search functionality within your store. They help customers find exactly what they’re looking for, improving their shopping experience and increasing the likelihood of purchase.
When adding tags, consider using keywords related to the product’s features, uses, or any other relevant descriptors. Remember to separate each tag with a comma. The Shopify system will recognize these as individual tags and use them to help customers better navigate your store. Also, consistently review and update your tags as your product range and customer needs evolve.
Step 3: Adding Product Images
Visual elements play a crucial role in online shopping as they help customers make informed purchase decisions. High-quality images provide a better understanding of the product’s features and usage, which can positively influence sales.
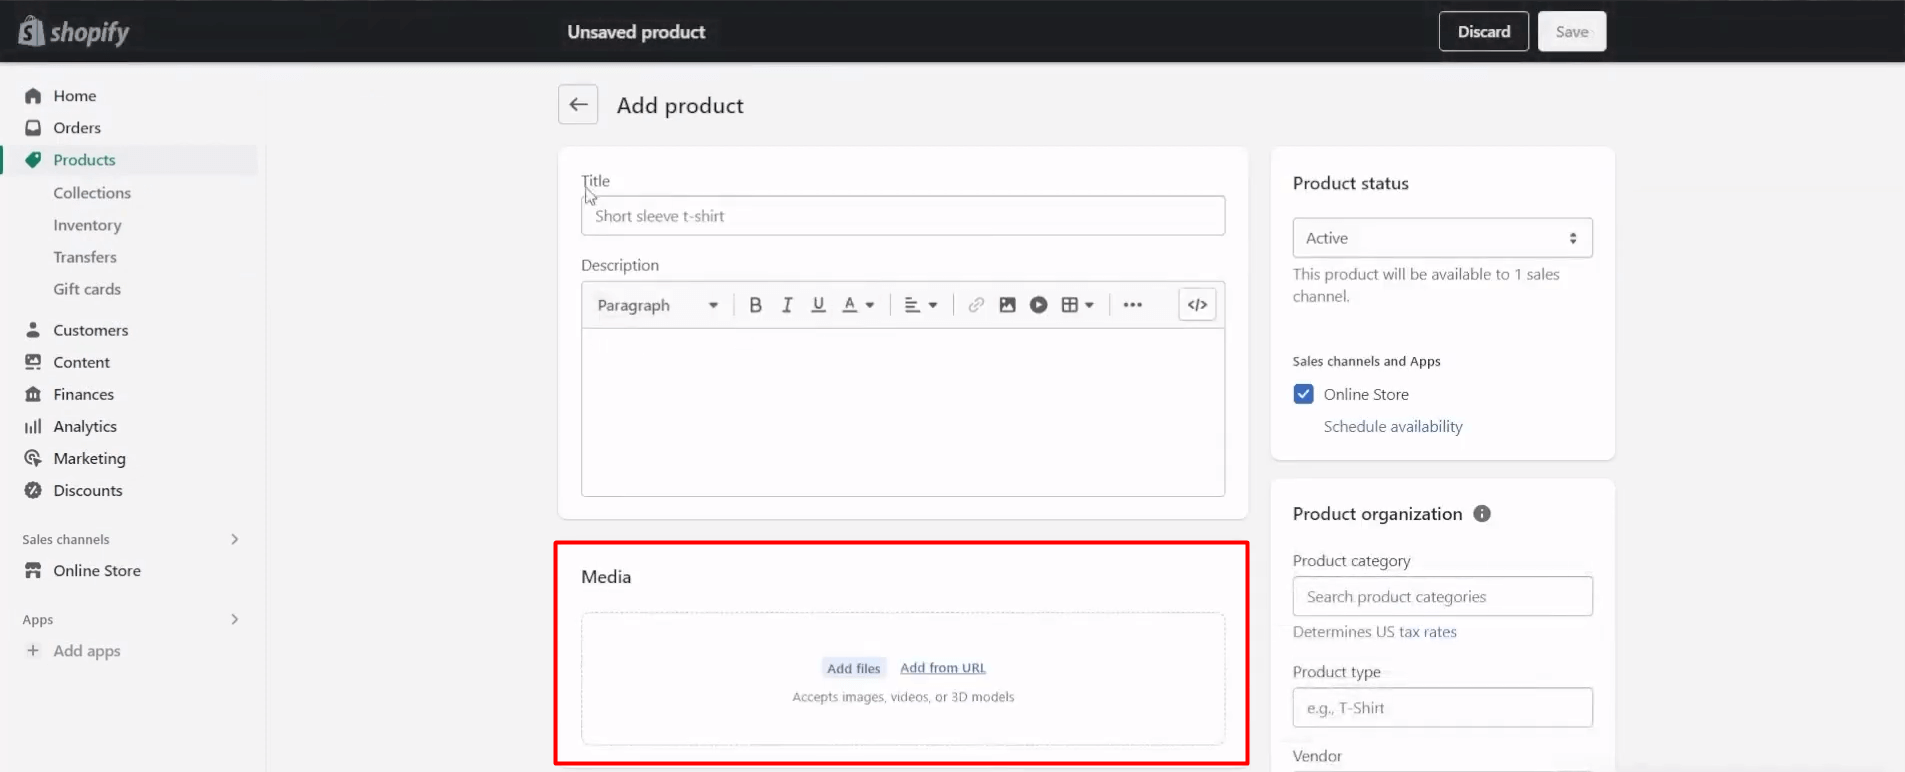
To add product images to your Shopify store, follow these steps:
- Choose Quality Images: Select high-resolution photos that clearly showcase your product. The images should be well-lit, focused, and ideally taken from multiple angles to provide a comprehensive view of the product.
- Upload the Images: Once on the product page, click on the Add images section. You can either drag and drop the selected images or click on the Add images button to select files from your computer. You can upload JPEG or PNG files, but it’s recommended to use JPEG for larger, high-quality images.
- Reorder the Images: Once uploaded, you can reorder the product images by clicking and dragging them to the desired sequence. The first image will be the primary image that customers see when browsing your store.
- Alt Text: Don’t forget to add alt text to your images. Alt text is a short description of the image, which is used by search engines to understand the image content, improving your SEO.
Remember, the quality and presentation of your product images can significantly impact your sales and conversion rates. High-quality, professional-looking images can build trust and encourage more customers to buy from you:
- Product Images: PNG is the most optimal file format for Shopify product images, followed closely by JPEG and GIF. Be aware that product images must be under 20 MB in order to be added to Shopify.
- Videos: Videos intended for your Shopify store should not exceed a length of 10 minutes, and their file size should remain under 1 GB. For optimal results, aim for 4K resolution in your videos.
- 3D Models: 3D models should be formatted in GLB or USDZ. If your 3D model file size exceeds 15 MB, Shopify will automatically optimize the file, maintaining high quality while reducing the size.
Step 4: Inventory, Price, and Extra Information
After the visual and descriptive aspects of your product are taken care of, the next step is to input logistical information regarding the product’s inventory, pricing, and other details. Here’s how you can tackle this.
Pricing
Price reflects the amount that customers will pay during checkout. On the other hand, Compare at price represents the initial price of a product that’s now discounted. To exemplify, if you denote $320 as the Compare at price and maintain Price at $300, the product appears as being offered at a $20 discount. If the product isn’t undergoing a sale, you can disregard this field.
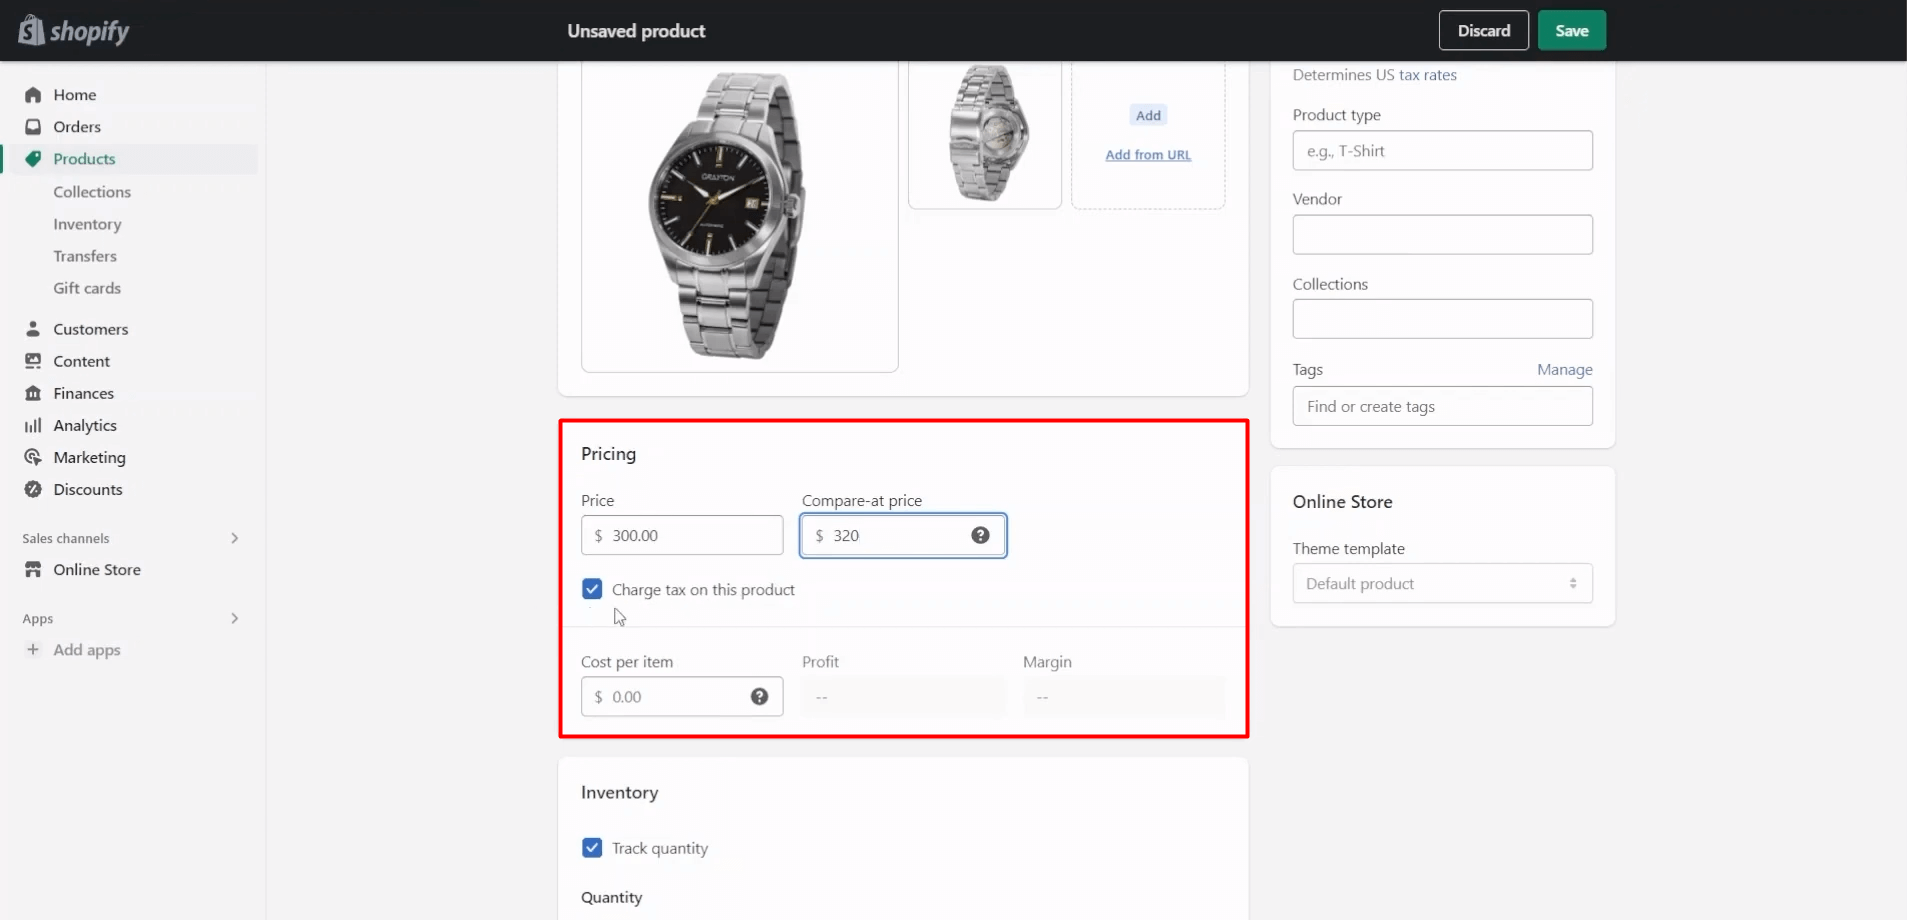
Cost per item is a provision that enables you to monitor the cost of the products you sell. Suppose you are reselling an item, input the price you covered to procure it from the manufacturer, exclusive of taxes, shipping, or other additional charges.
Alternatively, if you manufacture the product yourself, indicate a value founded on your material and labor expenses. Consequently, you can observe your product data and devise reports to scrutinize your profits (this feature is accessible only on the Shopify plan or higher).
If the product is subject to tax, activate the option Charge tax on this product.
Inventory
Inventory management in Shopify is a streamlined process designed to keep you updated on your stock levels, which is vital for smooth operations and fulfilling customer orders accurately and timely. The Inventory section is located as you scroll further down the page, here’s a breakdown:
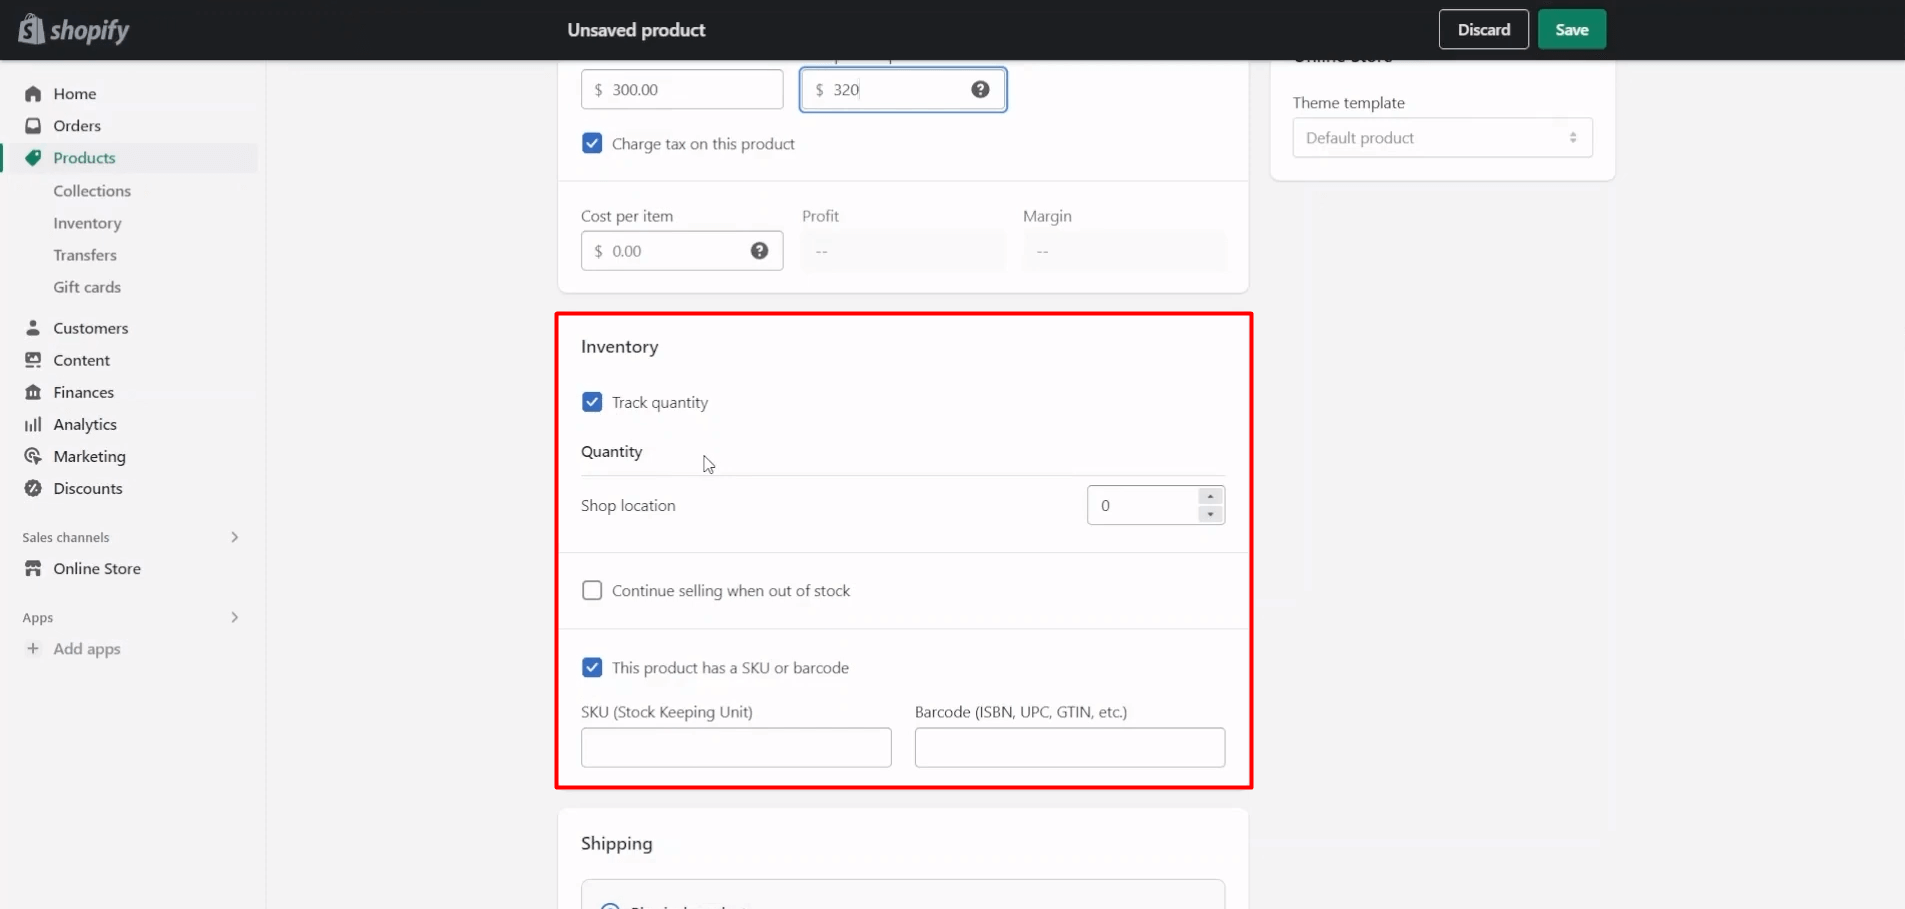
- SKU: The term SKU refers to Stock Keeping Units. These are unique codes that distinctly identify each product within your business. To facilitate efficient inventory tracking, each SKU should be individualized.
- Barcode: This feature is particularly beneficial for resellers. The identifiers ought to be new or existing Global Trade Item Numbers (GTIN). Certain channels mandate a GTIN before a product can be published on the platform. GTINs are unique identifiers recognized worldwide to store and locate product data. UPC, EAN, and ISBNs are variants of the GTINs, their length varies depending on the product type.
- Track Quantity: If you are managing the product’s inventory personally, this option can be activated to avoid overselling and ensure timely restocking when supplies dwindle.
- Continue Selling when Out of Stock: This feature can be enabled if your inventory is managed by a third party. It could be a print-on-demand firm such as Printify or Printful, or a dropshipping company like AliExpress.
- Quantity -> Edit Location: Locations are the physical spaces where your store’s inventory is stored and managed. This could be a retail store, a pop-up location, or a warehouse. The location’s name can be entered and edited as required. If you’ve opted for a third-party fulfillment app, its name will automatically appear as one of the locations. The number of locations you can have depends on the Shopify plan you’ve chosen.
Shipping
Moving onto the Shipping section, if you’re selling a tangible product that requires delivery, you’ll need to check the box marked This is a physical product. If you’re dealing in digital goods or services that don’t require shipping, leave this box unticked.
Next, accurately specify the product’s weight, as it determines the shipping cost your customers are charged. You can choose between different weight units: pounds, ounces, kilograms, or grams, depending on what suits your product best. Note that if you neglect to specify a weight value, Shopify will default to a weight of 0.1 lb.
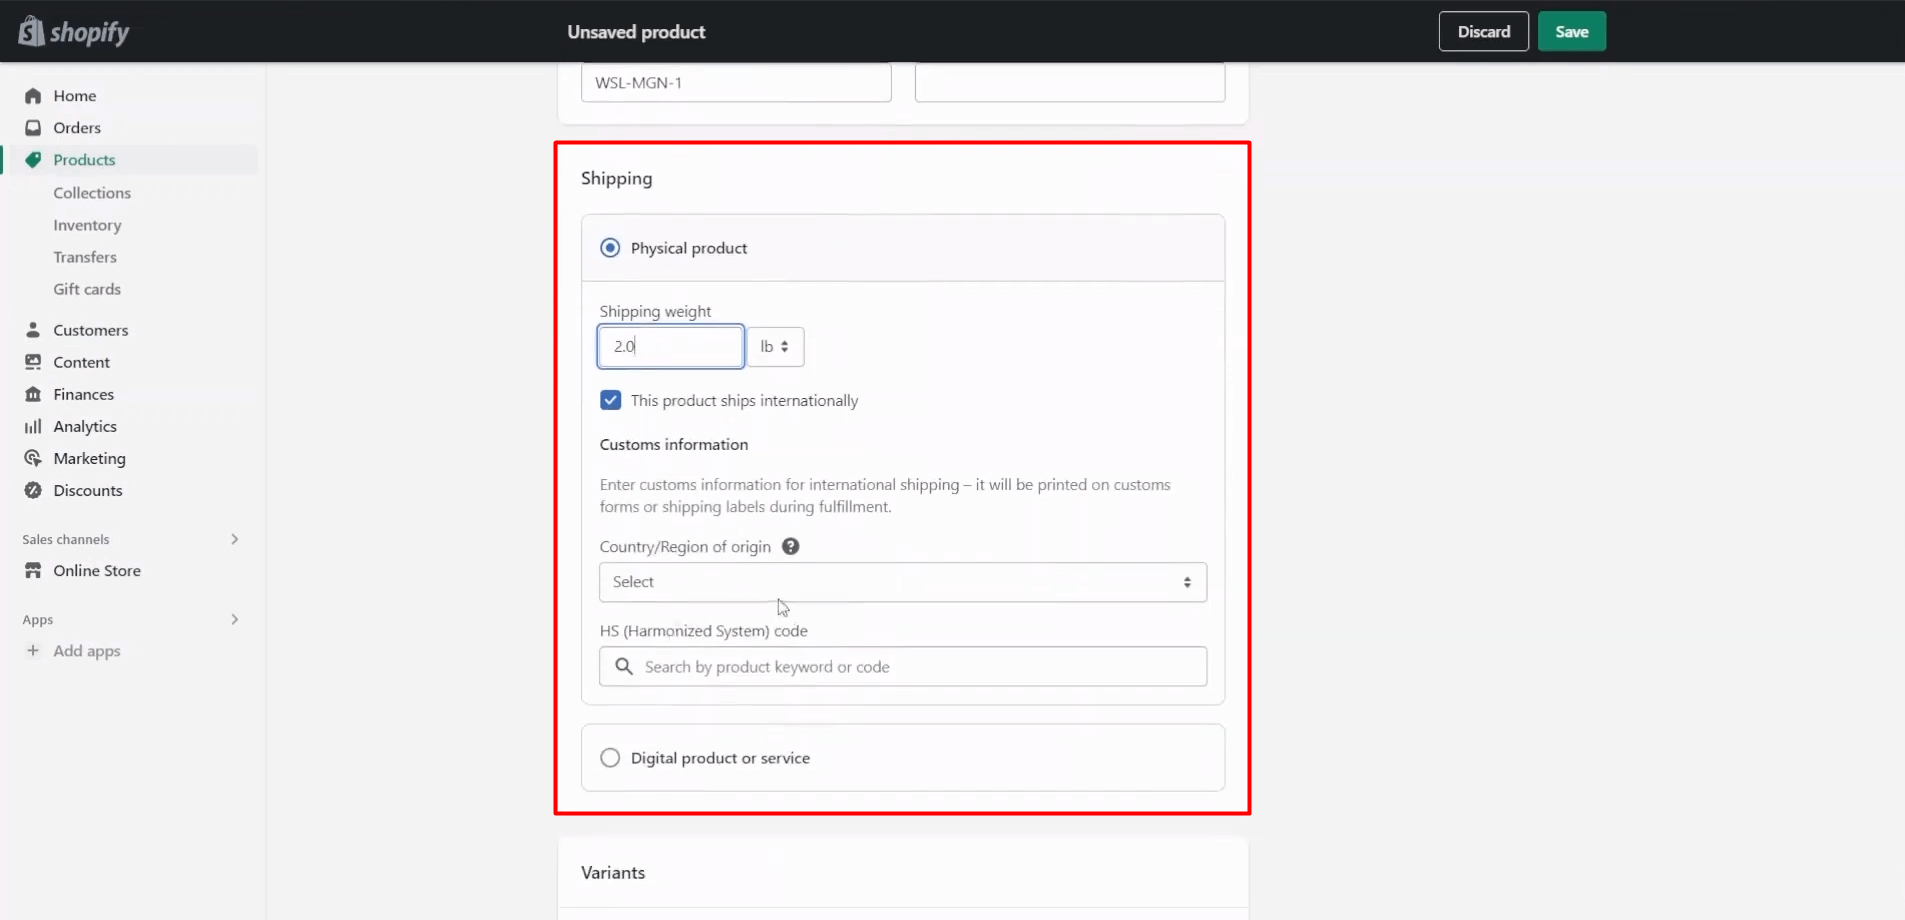
The Customs Information section is specifically for international shipping. If you intend to ship your product globally, you’ll need to input the Country/Region of origin. You’ll also be required to enter the Harmonized System (HS) code. These codes are crucial for customs authorities, helping them identify the correct tariffs applicable to the product. The HS code for your product can be located by performing a keyword search in the HS code field.
When it comes to shipping costs, the decision to either pass these on to your customers or absorb them yourself lies with you. However, bear in mind that about 66% of online shoppers expect free shipping on all their purchases, and nearly 70% abandon their carts due to shipping fees.
Given these statistics, we suggest offering free shipping to your customers. You can do this by incorporating the shipping costs into your product’s total price, instead of adding them as extra fees at checkout.
Step 5: Create a Collection on Shopify
Incorporating collections into your Shopify store provides several benefits. Not only does it assist you in organizing your online shop, but it also enhances the customer experience by helping shoppers locate what they’re looking for more quickly.
It’s important to note that a single product can belong to multiple collections. Some common collection examples might include Men’s T-Shirts, Long Dresses, or Vintage Accessories. Your collection titles should align with your customers’ typical search habits.
There are two types of collections you can create: manual collections and automated collections. Automated collections tend to be the preferred choice among store owners, as Shopify will automatically categorize items into collections based on preset conditions (you can use tags as preset conditions to configure automated collections). Some Shopify themes even allow you to attach an image to the collection. If a collection image is not selected, the image of the first product in the collection will be used by default.
Step 6: Optimize Your Search Engine Listing
Shopify, by default, takes care of generating meta descriptions and page titles to aid your visibility in search engine results. But these auto-generated snippets draw from the information you’ve input on your Product Details page.
For effective SEO, you’ll typically want to customize your Meta Description and Page Title. Make sure both contain relevant keywords pertaining to your product. To start editing, head over to the Product Details page, and navigate to the Search engine listing preview.
Click on Edit website SEO. Here, you can craft a descriptive title peppered with your keywords, which will be displayed in Google’s search engine results. Limit your title to around 55 to 65 characters for optimal viewing.
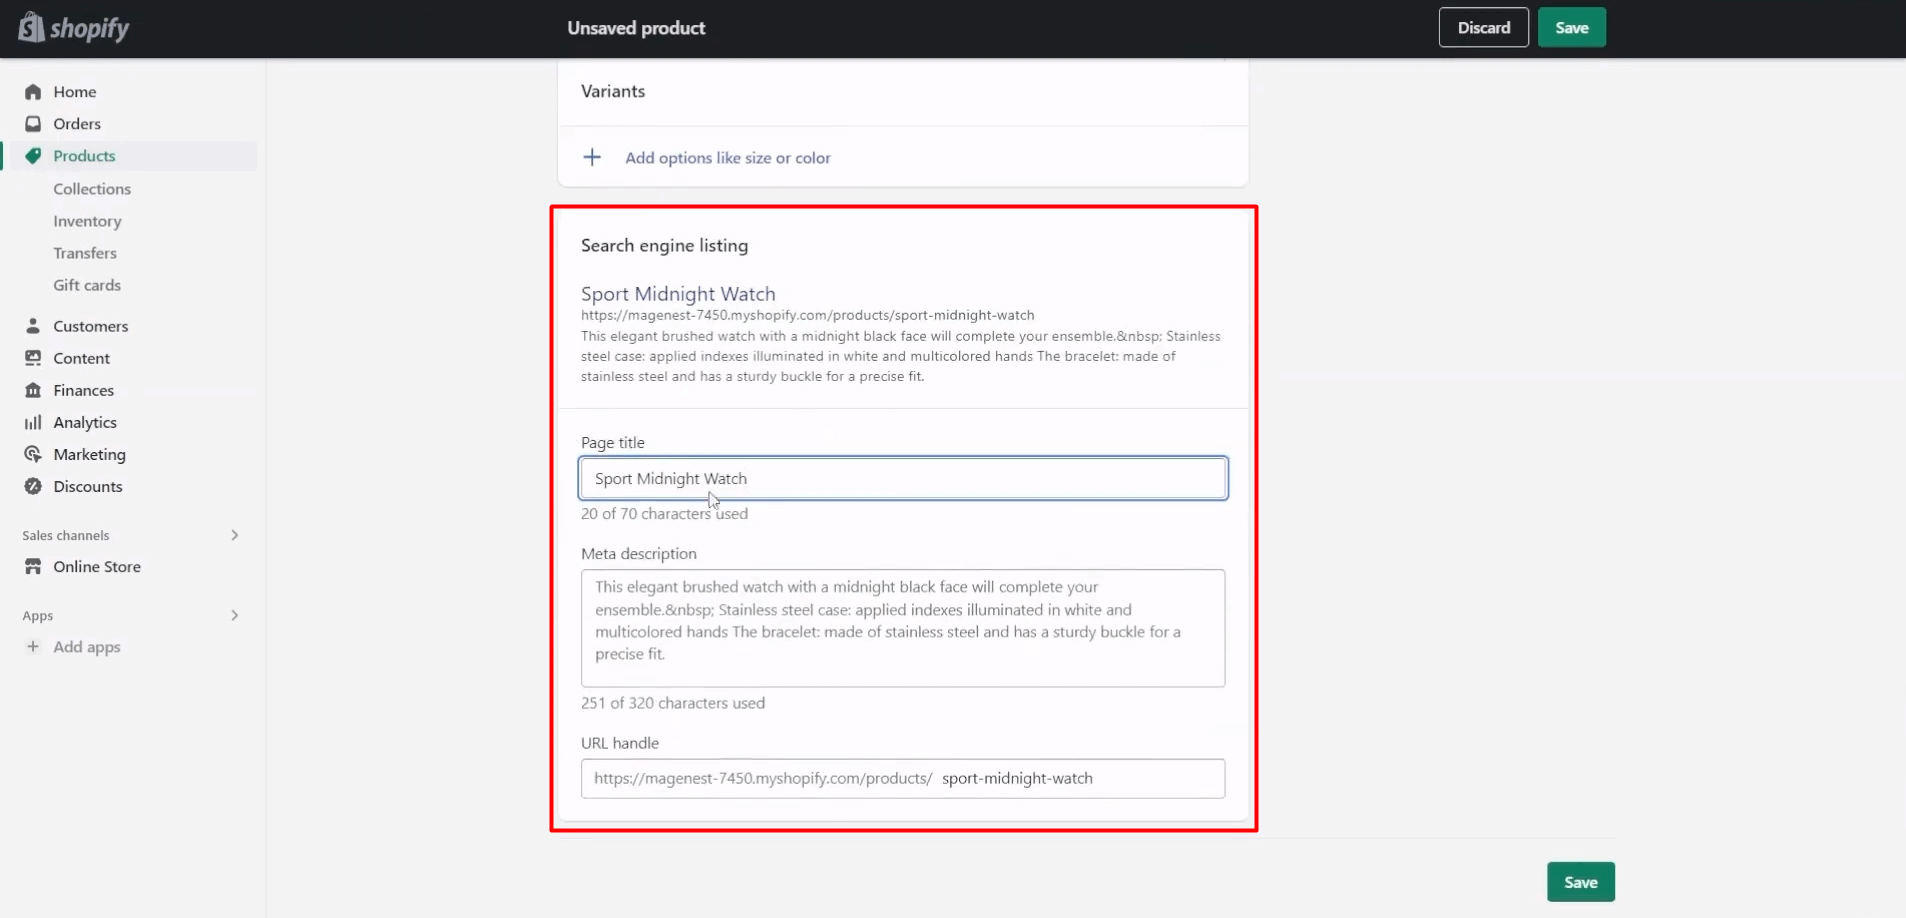
Next, write a detailed description for your search engine listing. Again, make use of relevant keywords to maximize your chances of being discovered by potential customers. The meta description can contain up to 320 characters, but for the most optimization, the length of meta descriptions should be in the range of 150 to 160 characters.
Lastly, in the URL and handle section, modify your website address as needed. It could be beneficial to replace any random numbers in your URL with relevant keywords that align with the product page. Remember, your URL should not contain any spaces. The handle functions with your Shopify theme design.
Once you’ve made all the adjustments, click Save.
Step 7: Publishing Your Product Page
Once everything is set and you’re satisfied with all the details of your product, it’s time to publish. Just before you do that, it’s good to have one final look at your product page. Click on the Save product button at the bottom right of your screen. After saving, you can scroll up to see how your product page appears.
You can further preview it on your website by clicking on the link saying, View on your website. This will give you a customer’s perspective and ensure everything appears as expected.
If anything is not as desired, don’t worry, you can still make changes. Simply go back to your individual product page in the Shopify admin section and edit as needed. Keep in mind that although product details can be changed at any time, such alterations may impact how products are grouped in your reports. Therefore, exercise caution when modifying tags and collections.
To make edits, navigate to your Shopify admin page, click on Products, then select the product you wish to modify. Once you’ve made your changes, remember to hit Save.
To help you have a detailed view of how to add products to your Shopify store, the holistic guide video below is a wonderful resource that you can take on your own. This step-by-step guide simplifies the process, providing easy-to-follow instructions and practical tips to add your products effectively.
Adding Multiple Products to Your Shopify Store
If you have a range of different products that you want to add to your Shopify store, doing them one at a time can be time-consuming. But don’t worry, Shopify has an efficient solution for this.
You can add multiple products to your Shopify store at once by using the bulk upload feature. You’ll need to create a CSV file that contains all the product details like title, description, price, SKU, inventory, etc., and then import that file into Shopify.
Here’s a brief step-by-step guide:
- Go to your Shopify admin dashboard, and navigate to Products.
- Click Import.
- Upload your prepared CSV file.
- Click Import Products.
Adding products to Shopify store using CSV files can be an efficient method, especially when dealing with a large number of products. However, there are some important considerations to keep in mind:
- Format: Ensure your CSV files are correctly formatted in accordance with Shopify’s guidelines. Incorrectly formatted CSV files may lead to errors during the upload process.
- File Size: Shopify restricts the size of CSV files that you can upload, the maximum file size is 15MB. If your CSV file is larger, you may need to split it into smaller files.
- Image URLs: If your CSV file contains image URLs, make sure they are publicly accessible on the web. Shopify cannot fetch images from a restricted access location.
- Product Variants: If you are adding products with variants, ensure that each variant is on a separate line in the CSV file with its unique SKU.
- Overwriting Data: Be aware that uploading a CSV file can overwrite any existing data for products with the same handle. It’s a good practice to back up your data before proceeding.
- Error Messages: If you encounter an error message during the upload, check Shopify’s list of common product CSV issues to troubleshoot.
- Encoding: Your CSV file should be encoded as UTF-8 to prevent any compatibility issues.
Always preview your changes in Shopify before going live to ensure your product data appears correctly. While this is a cost-effective method, keep in mind that it can be time-consuming if you have hundreds or thousands of products. In such cases, you may want to explore alternative methods.
Duplicate a Product
In the context of a multi-channel sales strategy or when incorporating similar products from a dropshipping supplier, duplicating existing items can significantly streamline your operations. Duplicating a product allows you to replicate and edit various details such as images, SKUs, stock quantities, and barcodes.
If your goal is simply to offer variations of an existing product, you might consider adding a variant instead. Keep in mind that by default, the duplicated product is hidden on all your channels and apps. It won’t be published until you modify its availability. If needed, you can adjust the settings so that the duplicate is visible on the same channels as the original product.
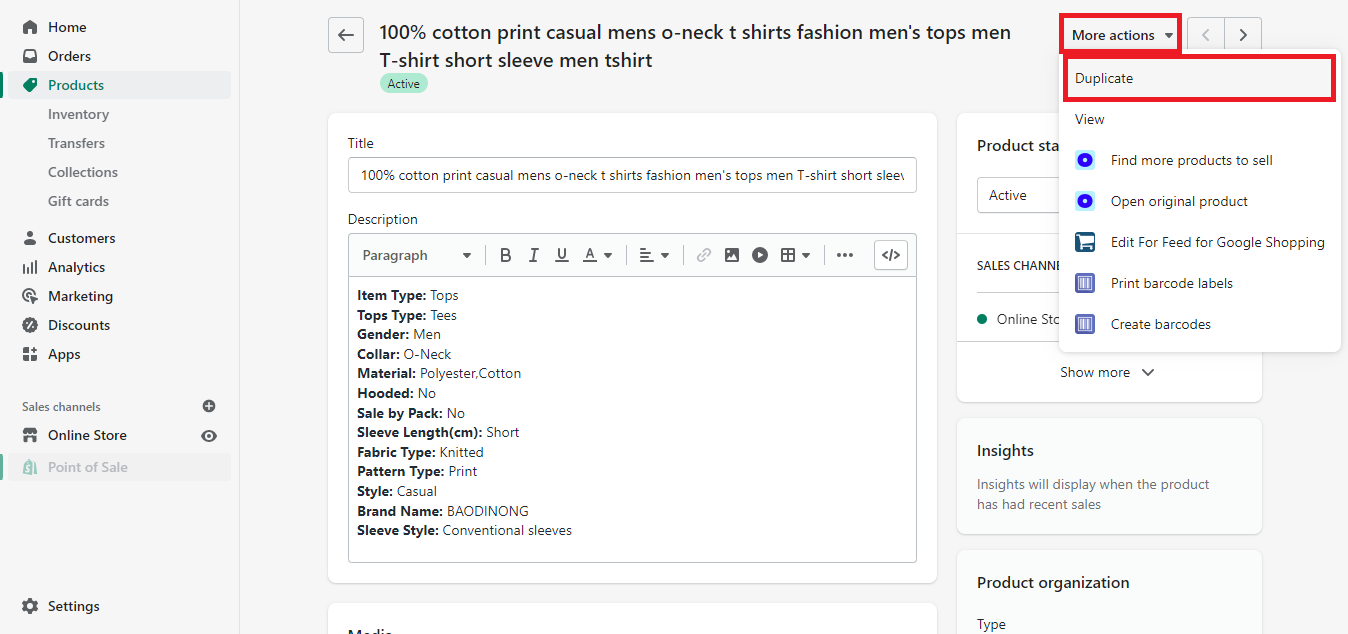
Here’s how to create a duplicate:
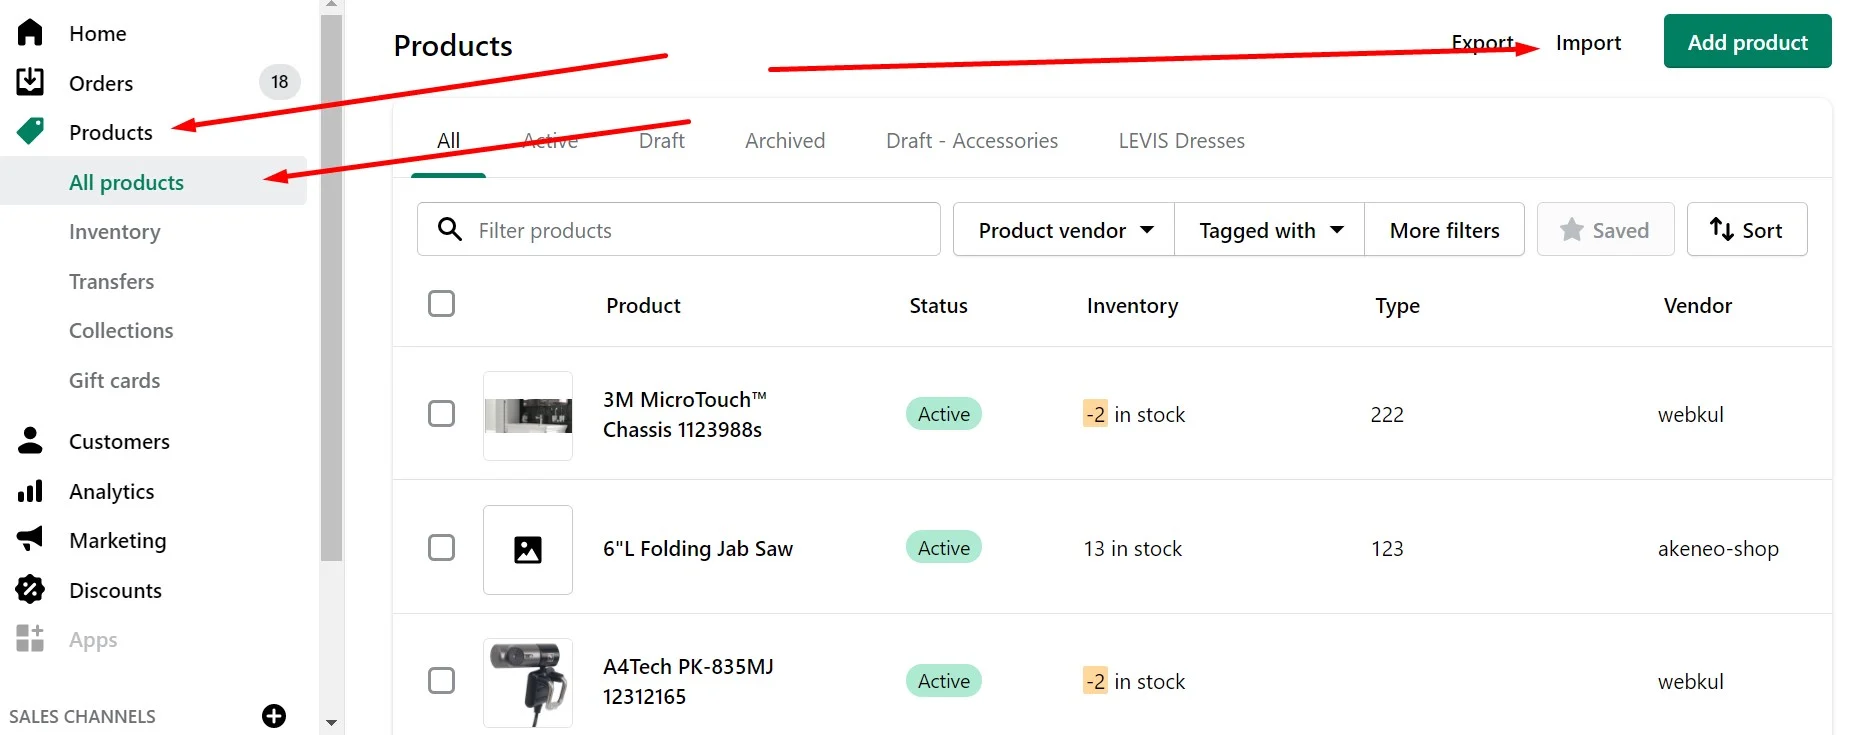
- From your Shopify admin dashboard, go to Products > All Products.
- Click on the name of the product you wish to duplicate.
- Check the Duplicate box.
- Enter a unique name for the duplicate product.
- Click on Duplicate again.
- Modify the product details as necessary.
Finally, don’t forget to update the product’s availability to ensure it can be accessed via the same channels as the original. Note that duplicate products are not the same as product variants.
Add New Products with Shopify POS
Adding new products directly from the Shopify Point of Sale (POS) interface is a convenient feature. Products created here won’t automatically appear on other sales channels, but you can adjust this by altering their settings in Shopify. Note that an internet connection is required to create Shopify POS products.
To add a product, click the + button on the Products screen and select Add product. In the pop-up window, you can enter details about the product, such as its title, price, and inventory status. If you want to add an image to the product, click on the image button and either select a file from your device or capture a new photo using your device’s camera.

When you’re ready to make the product available for purchase, click on Save product. The product will then be displayed on the checkout screen on the POS and on the Products page on your Shopify website.
If you need to edit or delete a product, this can be done from the Products page as an administrator on Shopify. Please note that products cannot be directly edited or deleted within Shopify POS.
Showcase Products on Sales Channels
You might be selling products across various platforms such as Amazon, eBay, and your own Shopify shopping cart, especially if you’re dropshipping from sources like AliExpress. You have the control to decide on which active sales channels your products will be visible. If you choose to hide a product from a specific sales channel, it will not appear in your product catalog for that particular platform.
Products may be hidden for various reasons; they could be seasonal items only available at certain times of the year, or maybe they’re currently out of stock. Sometimes, you might want to provide an online exclusive offering to your premium customers.
However, to reach a broader audience and drive more sales, it’s a good idea to perform your products available across various sales channels. Shopify allows you to do this seamlessly.
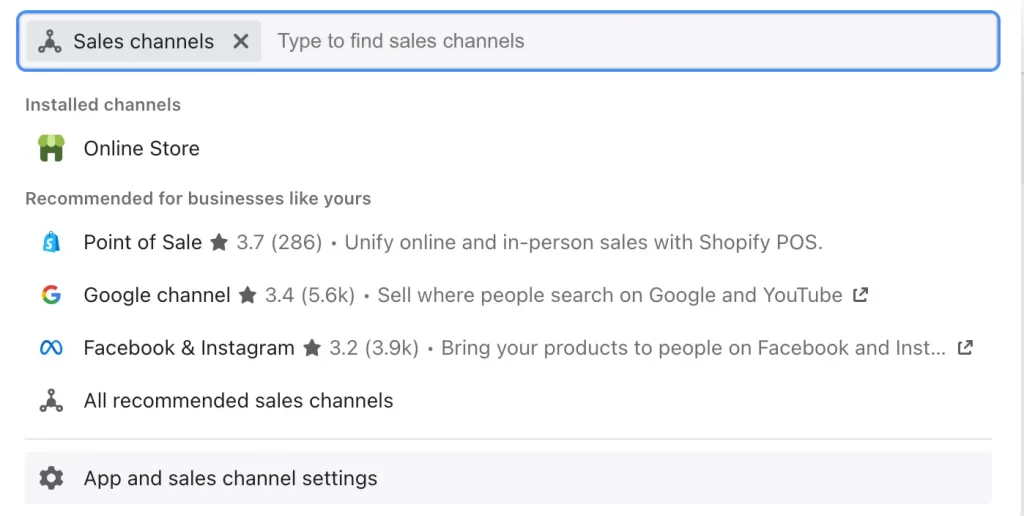
To manage the availability of your products across different channels, navigate to Products > All products on your Shopify admin panel. Click on the product name you wish to manage. In the Product Availability section, you’ll see the channels where the product is currently available. Click on Manage to edit these settings. Here, you can select or deselect the channels as per your preferences. Once you’ve made the changes, click Done and then Save to apply them.
Remember, each sales channel you select will have its own unique considerations, like fulfillment methods and shipping rules. So, be sure to familiarize yourself with these before making your products available. By having your products available on multiple sales channels, you increase the opportunities for customers to find your products and make a purchase.
Scan Products with Camera
With Shopify’s advanced technology, you can make use of your device’s camera to scan products. This unique feature can streamline the process of product management, inventory tracking, and even checkout in a physical store setting.
- Open the Shopify app, navigate to Products, and then All Products.
- At this point, you can either create a new product or select an existing one.
- Tap on Inventory and within the Barcode section, click on the barcode icon. This action opens your device’s camera.
- A rectangular frame will appear on the camera screen, indicating where to place your device so the product’s barcode fits within the frame.
- Hold still while Shopify recognizes and scans the barcode. Once scanned, the app will return you to the inventory screen.
Remember, this feature can only be used with products that already have their barcodes added to your Shopify inventory. It’s a powerful tool that can save time and improve efficiency in your store operations.
Further Actions to Manage Shopify Products
How to Delete Products on Shopify
There might come a time when you want to remove certain products from your Shopify store. Whether it’s due to discontinuation, seasonal unavailability, or any other reason.
Shopify permits you to remove items that are no longer available for delivery or manual collection. You can either delete items individually or employ a bulk action. Bear in mind, deleting an item from Shopify permanently eliminates the stock. Once a product is deleted, it can’t be restored. If you simply want to temporarily stop displaying a product for any reason, then you can opt to hide the product and make it visible again at a later time.
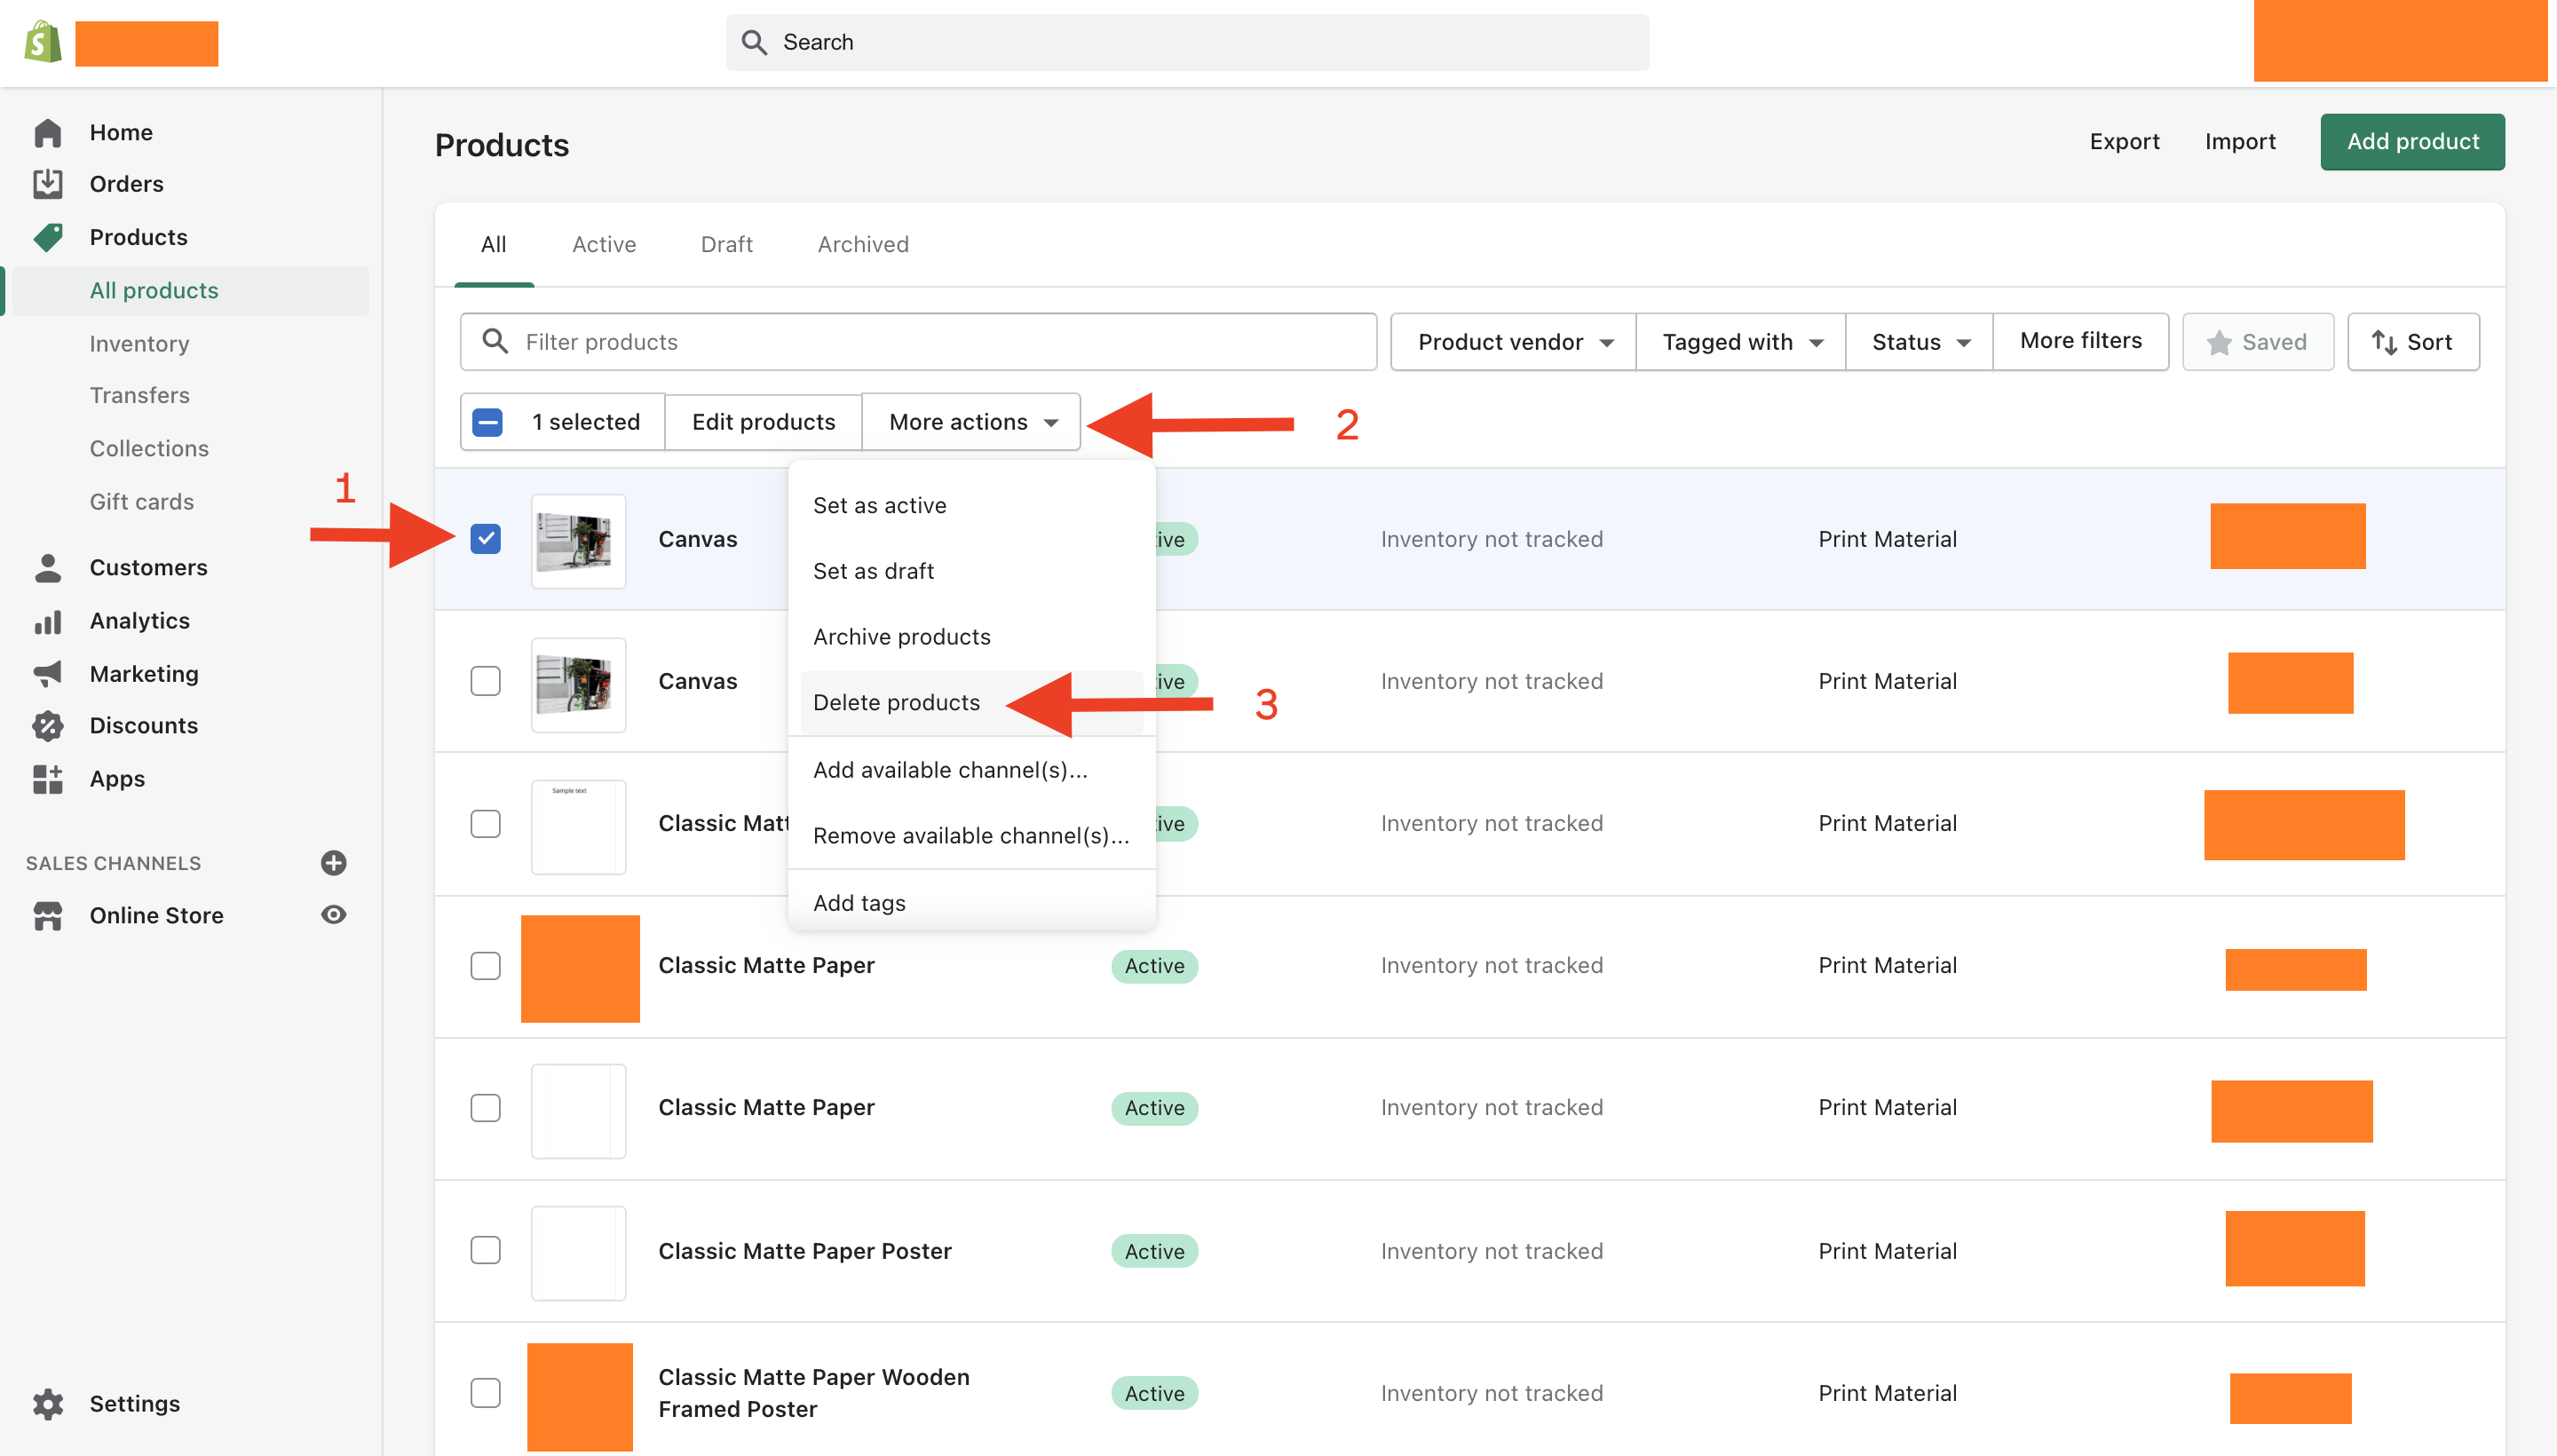
To delete a product, follow these steps:
- From your Shopify admin dashboard, navigate to Products and then All Products.
- You’ll see a list of all your products. Select the product or products you want to delete.
- After selecting the products, click on Actions located at the top of the page.
- In the dropdown menu, click on Delete selected products.
- A pop-up will appear to confirm your decision, as this action is irreversible. If you’re sure, click on Delete.
Keep in mind, once a product is deleted, it’s permanently removed from your Shopify store, along with any associated information.
Archive Products on Shopify
Archiving products on Shopify is a useful feature when you want to remove certain items from your sales channels without deleting them permanently. By archiving, you keep the product information intact for future reference or use, and it doesn’t show up in your active product list, making your inventory management easier.

You can archive either a single product or a group of products simultaneously through bulk action. When you archive a product, it will be moved to the Archived tab on the Products page. To archive a product, follow these steps:
- In your Shopify admin panel, go to Products.
- Choose the product you want to archive.
- On the product details page, click on Archive product.
If you need to locate an archived product within your Shopify admin, simply navigate to Products, and then click on the Archived tab. To unarchive a product, visit the Archived tab, select the product you want to restore, and click on Unarchive product.
In Conclusion,
Adding products to Shopify store is an essential step in building and managing your online retail business. Always remember, it’s crucial to review and update your product listings regularly to ensure they remain accurate, appealing, and optimized for both customers and search engines.
If you encounter roadblocks, fear not! We have an array of Shopify services ready to help you build a superior Shopify store. As seasoned Shopify specialists, we have an intimate understanding of what goes into creating an outstanding online shopping space.