When it comes to building an online store on Shopify, organizing your products into categories can help improve the customer experience and make it easier for them to find what they’re looking for. But if you’re new to the platform, you might wonder how to add categories in Shopify. In this blog post, we’ll guide you through the steps you need to take to create categories and subcategories for your Shopify store.
Table of Contents
What Are Categories in Shopify
There are 2 types of categories. One for customers to easily navigate the products in your store, and one for Shopify to automatically calculate. Here, we will reference the first type of category as website categories and the second type as product categories. So let’s go over the difference between the 2 types of categories in Shopify.
The main difference between website categories and product categories in Shopify is their purpose and how they are used on the platform.
Website Categories
Website categories, also known as Collections, are used to organize products in a way that makes sense for customers browsing your store. They help customers easily find what they’re looking for by grouping similar products together based on common characteristics, such as product type, brand, or price range. Website categories are created and managed by you, the store owner, and are displayed on your store’s navigation menu. You can customize this to match your brand and the different types of products that your store carries.

For example, you can check out the website category from ASH’s Shopify store, which belonged to Emers Group. It’s a Vietnamese clothing brand that Magenest helped to redesign & customized to have a faster loading time, intuitive navigation, and a structured website layout to ensure customer satisfaction.
Product Categories
On the other hand, product categories are used by the platform to automatically group products together based on certain criteria, such as product type, vendor, or tags. These categories are not visible to customers on the front end of your store but are used by Shopify to help organize and track your store’s inventory and sales data.
Assigning a product to a category in Shopify can also help with tax collection, as the correct tax rate will be applied based on the assigned category. Additionally, using standardized product categories can help when selling products on other channels that require a standardized product type, like Facebook. Shopify provides a predefined product taxonomy that includes a hierarchical structure of categories and subcategories, such as Apparel & Accessories, Home & Garden, Electronics, and Health & Beauty to name a few examples. Within each category, there are further subcategories that help to narrow down the product type.
For example, Shoes is a subcategory of Apparel & Accessories and can be present as number 352, or as Apparel & Accessories > Shoes.
There are over +5500 product categories and subcategories, but don’t be scared. You can check out the list of Shopify Product Taxonomy here.
How to Add Website Categories in The Shopify Store
There are 2 ways to add website categories to your Shopify store: via the navigation menu, and by creating a collection page.
But before adding website categories, we recommend you create a category tree, also known as a collection tree, to better visualize your website navigation. It will look a bit like this.
- Home
- About Us
- Men
- Pants
- Cargo
- Jeans
- Shirts
- T-shirts
- Polo
- Pants
- Women
- Kids
This is the easiest way to add website categories to your Shopify store,
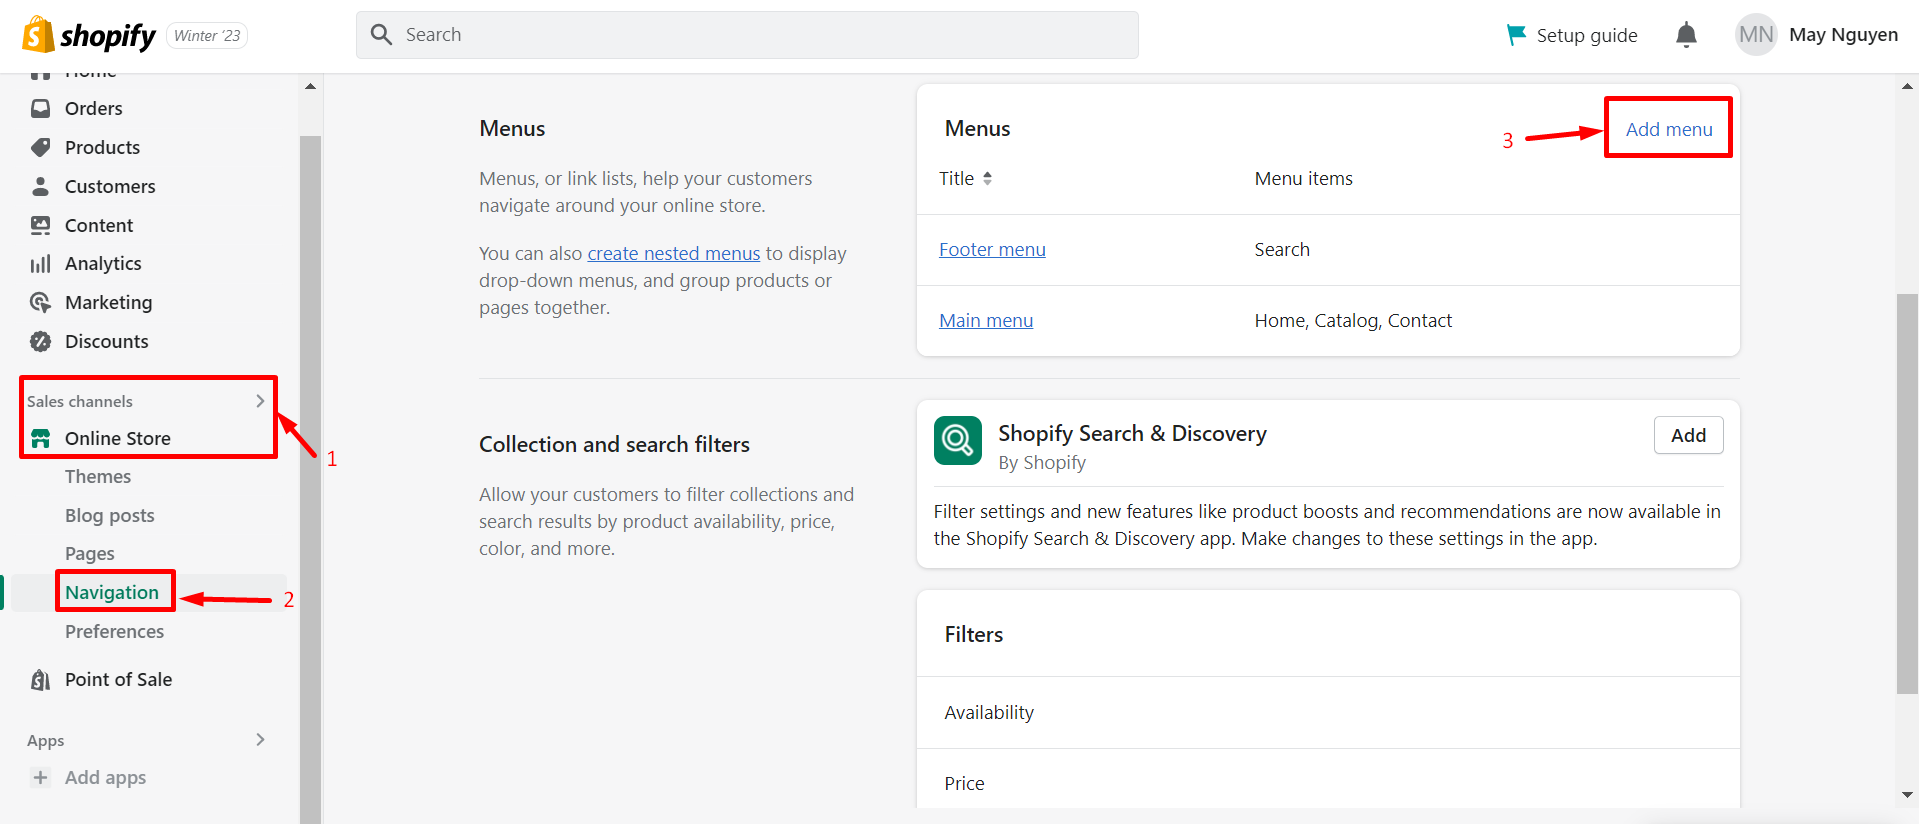
Step 1: Log in to your Shopify store and click on Online Store under the Sales Channels section.
Step 2: Click on Navigation to open the Navigation menu
Step 3: Choose Add menu
Step 4: Choose Add menu item to add a new category like you want and fill out the required information, which includes Name and Link. You can choose this link to be any page inside your Shopify store domain, as long as it makes sense for customers to navigate throughout your store.

Step 5: Click Add to finish adding a category.
Step 6: Arrange your Menu items.
– Here you can use the drag-and-drop action, by using the icon ⋮⋮, to change the order of the Menu
– You can also add subcategories into parent categories. When adding a menu item as a subcategory, it will be indented from the parent category.
– On Shopify, you can only create level 2 subcategories, also known as sub-subcategories.
For example, in the image above, I added Pants and Shirts as level 1 subcategories of the Men category. They both got indented compared to the Men category.
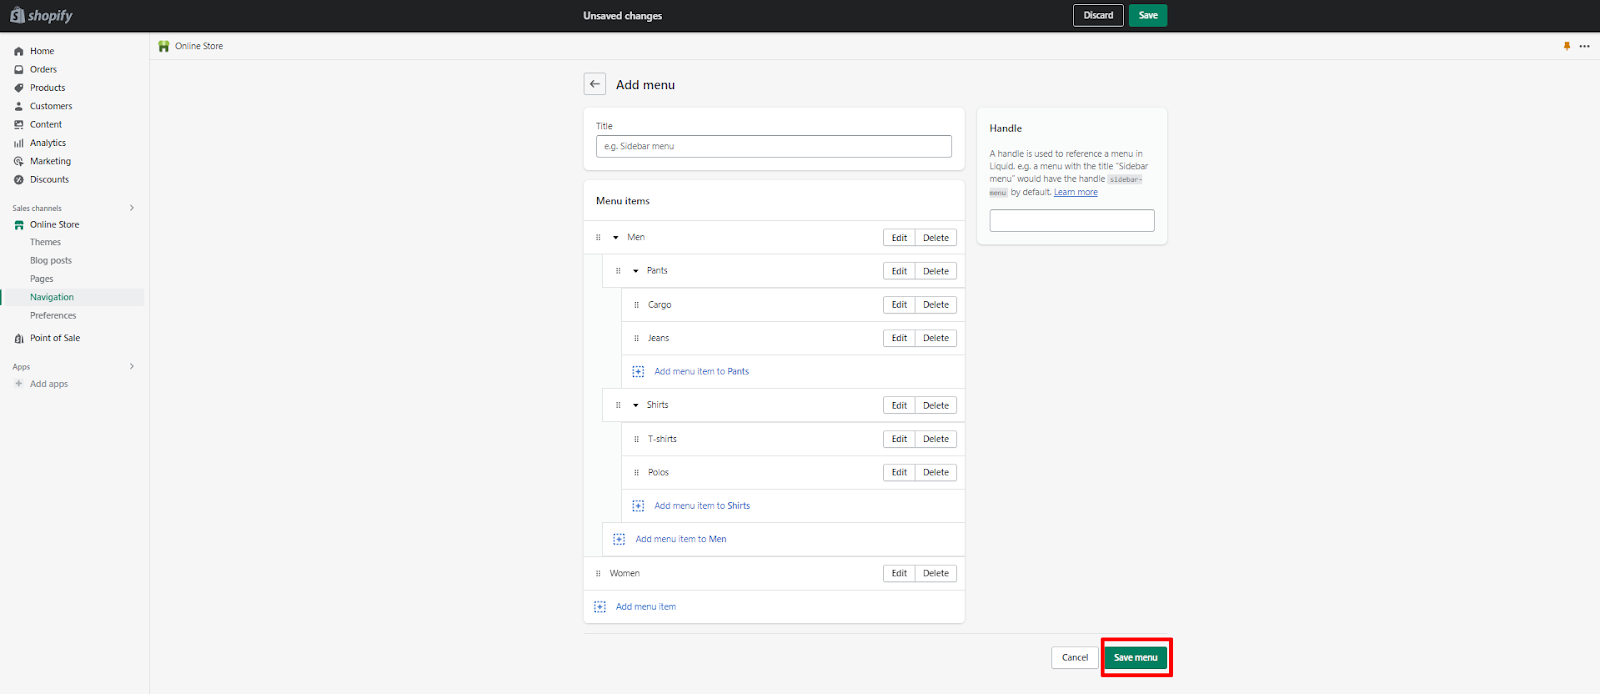
And Cargo and Jeans as sub-subcategories of the Pants subcategories.
Step 7: Don’t forget to hit the Save menu button in the bottom right.
Here is our full guide on how to add website categories by creating and configuring the Navigation menu.
Adding Website Categories by Creating A Collection Page
This method involves creating a new page template and linking it to the parent collection through a menu. This method allows for more customization of the sub-collection page but requires some knowledge of HTML.
Here are the steps
Step 1: Create a new page in Shopify admin with only the handle of the menu.
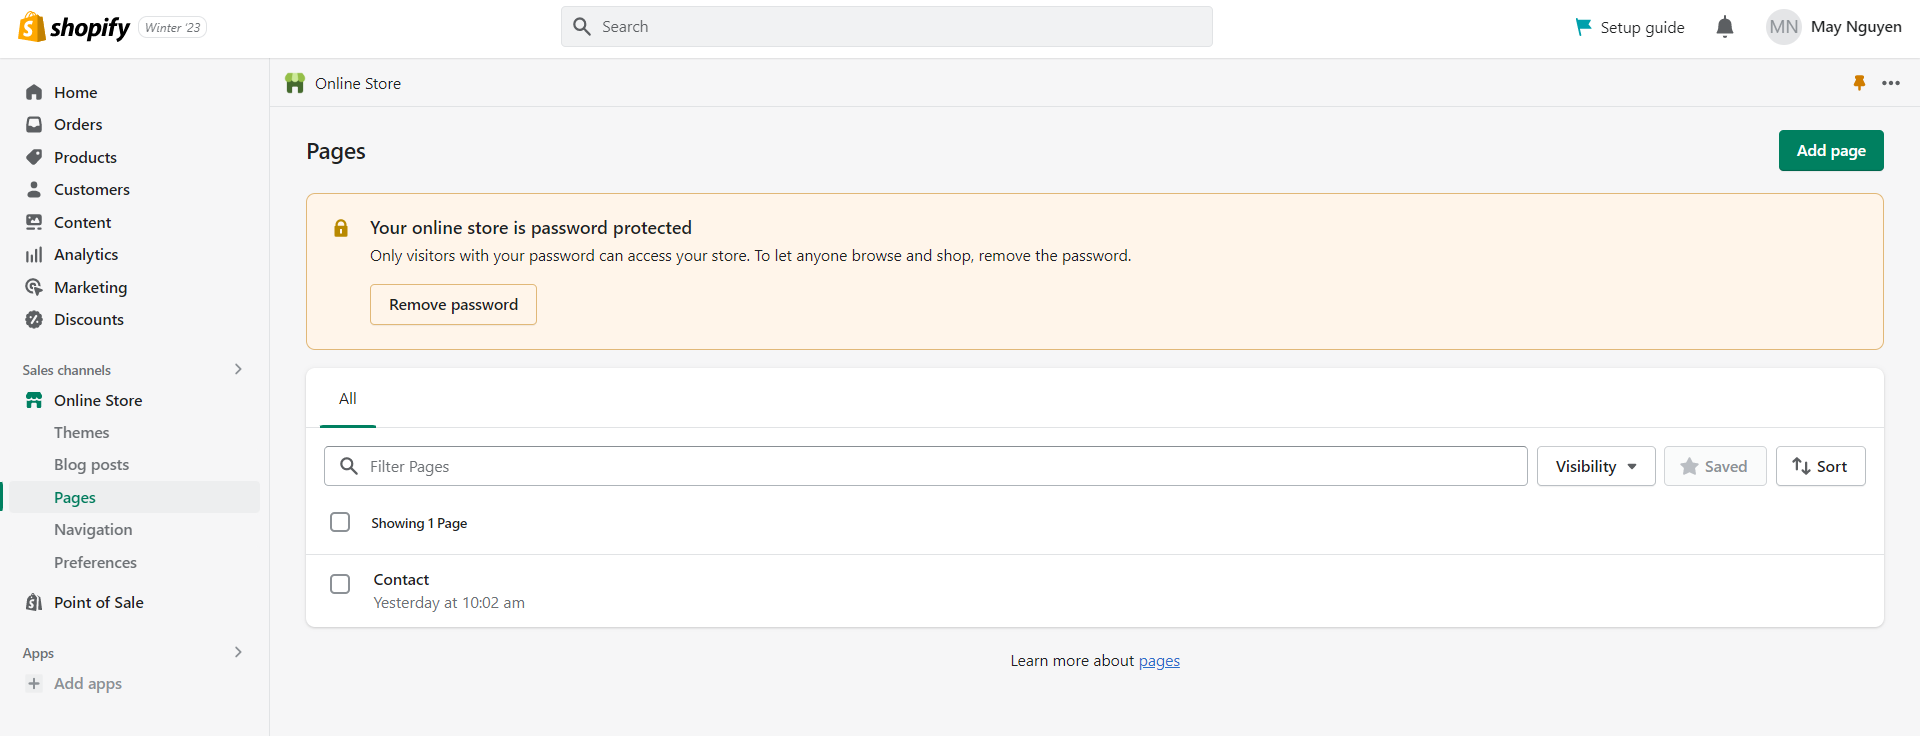
- Log in to your Shopify store and click on Online Store under the Sales Channels section.
- Click on Pages to open the Pages menu.
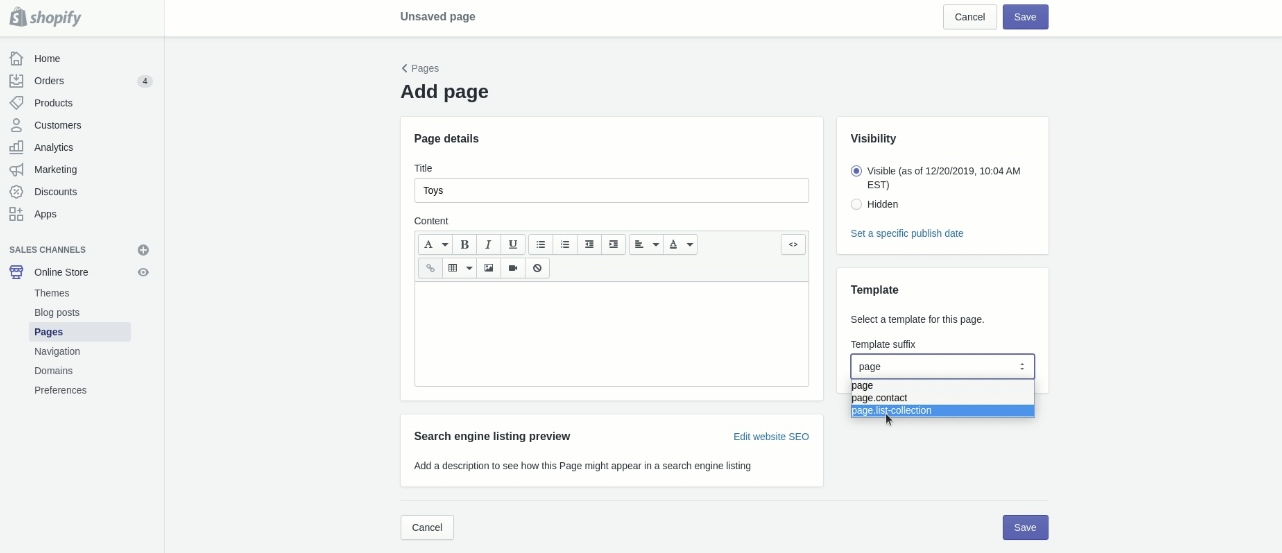
- Choose Add page in the top right corner to add a new page.
Step 2: Add page details and choose the page.list-collection template in the Templates section in the below right corner of the page, then click Save.
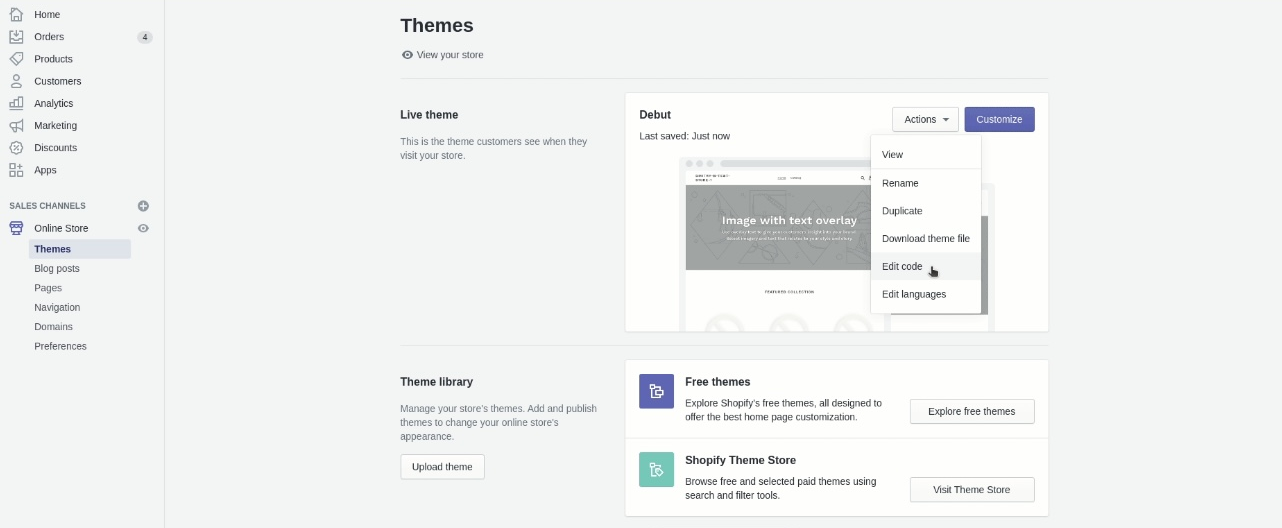
Step 3: Click on Themes under the Online Stores to open the Themes menu. Then select Actions and choose Edit code.
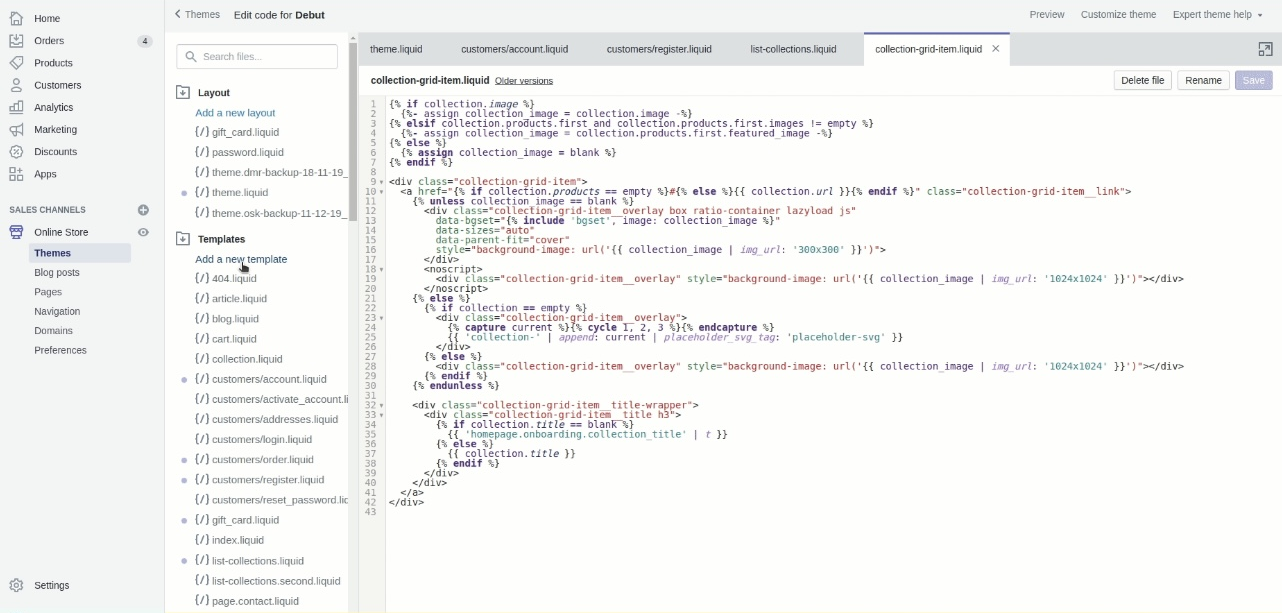
Step 4: Add a new template called list-collection for Page in the Edit Code section of the theme.
Create a menu in Navigation and link the sub-collection to the parent collection.
Step 5: Save and customize the page.
How to Add Product Categories in Shopify
There are also 2 ways to add product categories in Shopify: Selecting them manually one by one when you’re adding new products, or importing them directly from a CSV file. The second method is recommended for those who have lots of products because it imports many products all at once, but you will need basic knowledge of Excel and HTML to properly fill out all the product information.
Adding Product Categories in Shopify When Adding New Products
This is the easiest way to add product categories in Shopify. When adding new products to your Shopify store, you may notice a suggestion for a product category based on the information you’ve provided. While this suggestion can help identify the most appropriate category for your product, it’s important to keep in mind that it’s only a suggestion and should not be considered tax advice. To ensure the accuracy of your product category, it’s recommended that you verify and confirm the suggested category before accepting it. In this section, we’ll discuss how to add product categories to your Shopify store and how to ensure that they’re accurate and appropriate for your products.
Here are the steps to adding product categories in Shopify when adding new products
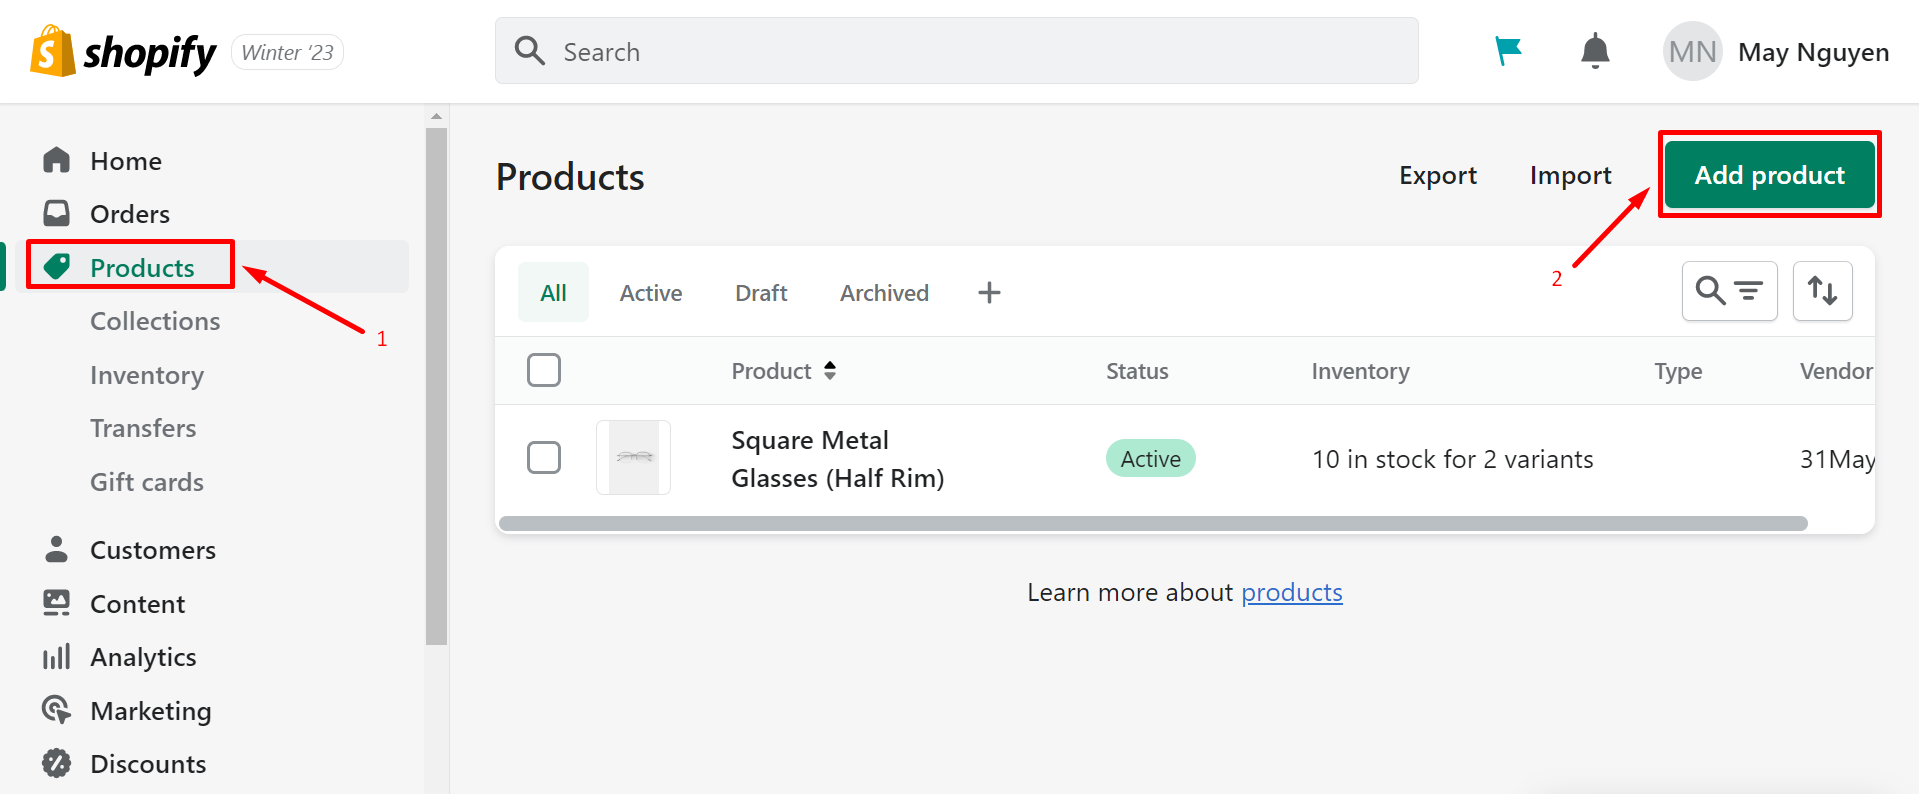
Step 1: Log in to your Shopify store and select Products in the Menu section.
Step 2: Click on Add product button on the top left to open the Add product page.
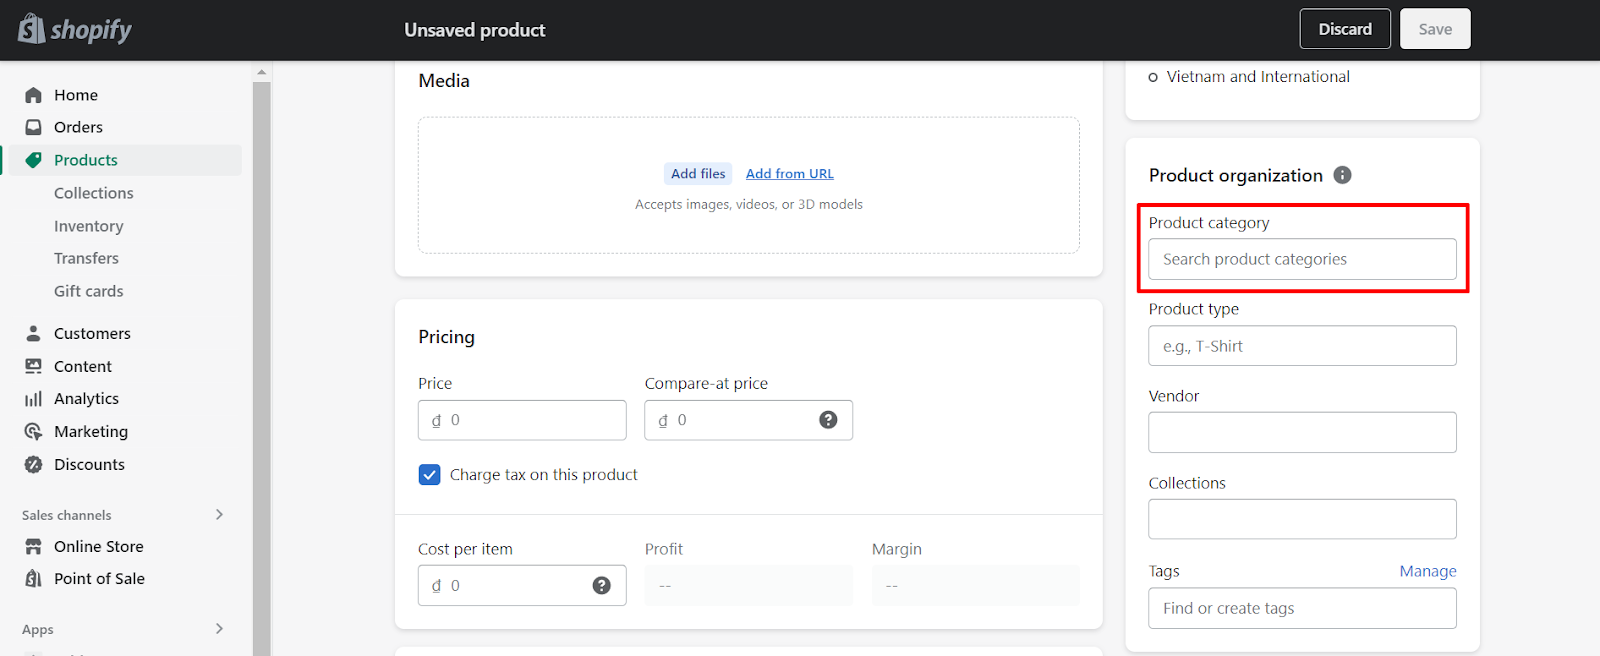
Step 3: Fill in all your product’s information, including Title, Description, Media, Pricing, etc.
Here, you also click on the Product category in the Product organization section to the right to start seeing all the Shopify suggestions. Your job here is to pick the right category that fits your product.
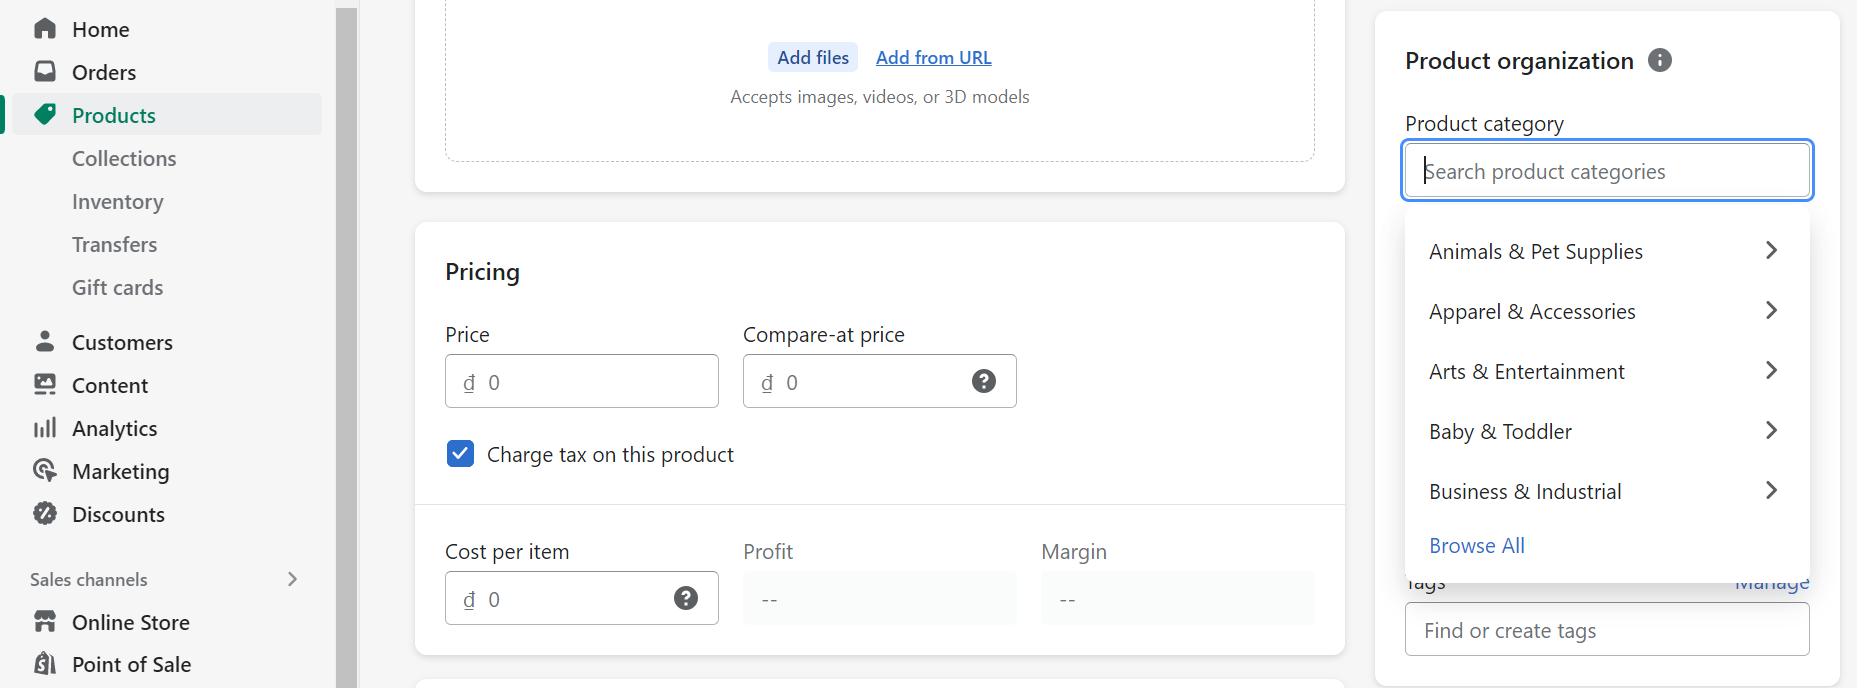
This product category will affect how Shopify manages your product and how it’s going to be taxed, so do it carefully.
Step 4: After finishing filling out all the information needed, remember to click Save in the top right.
Adding Product Categories in Shopify via A CVS File
It is recommended by Shopify experts to create a CSV file when adding product categories in Shopify when you have a long list of products that need mass adding.
Here are the steps to create a CSV file
Step 1: Create a CSV file with your product information, including a column for Product Category.
Step 2: In the Product Category column, enter the ID number or the path of the product category. Both the ID and the path are available in the Shopify Product Taxonomy.
Step 3: Save the CSV file.
With a CSV file, you can even import categories to your products in Shopify, but you need to follow a few rules. The first rule is, your CSV file must be able to be read by Shopify. That means, if you use a category ID number, it must be a valid one from the Shopify Product Taxonomy. If you use a category path, it must match the path exactly as it appears in the Shopify Product Taxonomy. If you enter a category that does not exist, the product will not be assigned to a category.
For example, for a pair of shoes, you must fill 352 or Apparel & Accessories > Shoes under the Product Category.
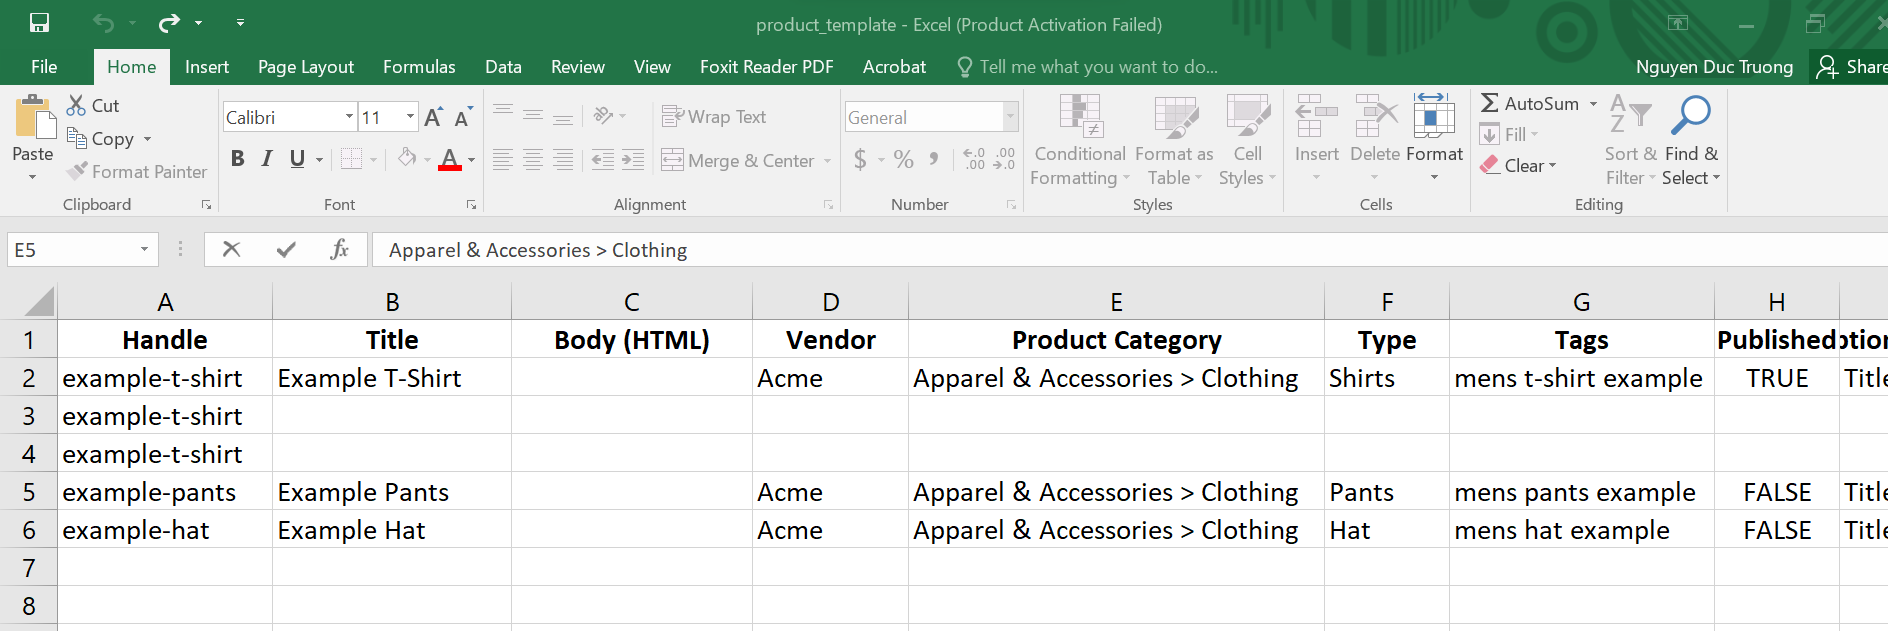
The second rule is that you will need to follow Shopify guidelines, which contain more than 38 columns of information that need to be filled out. These columns include Handle, Title, Body, Vendor, Product category, Custom product type, etc. You can download the CSV file product template here to easily keep track of all the information.
Lastly, make sure to use only the predefined categories provided by Shopify in the Shopify Product Taxonomy. Creating your own categories can lead to errors in tax collection, search results, and other issues.
Here are the steps to import categories to your products via a CSV file in Shopify
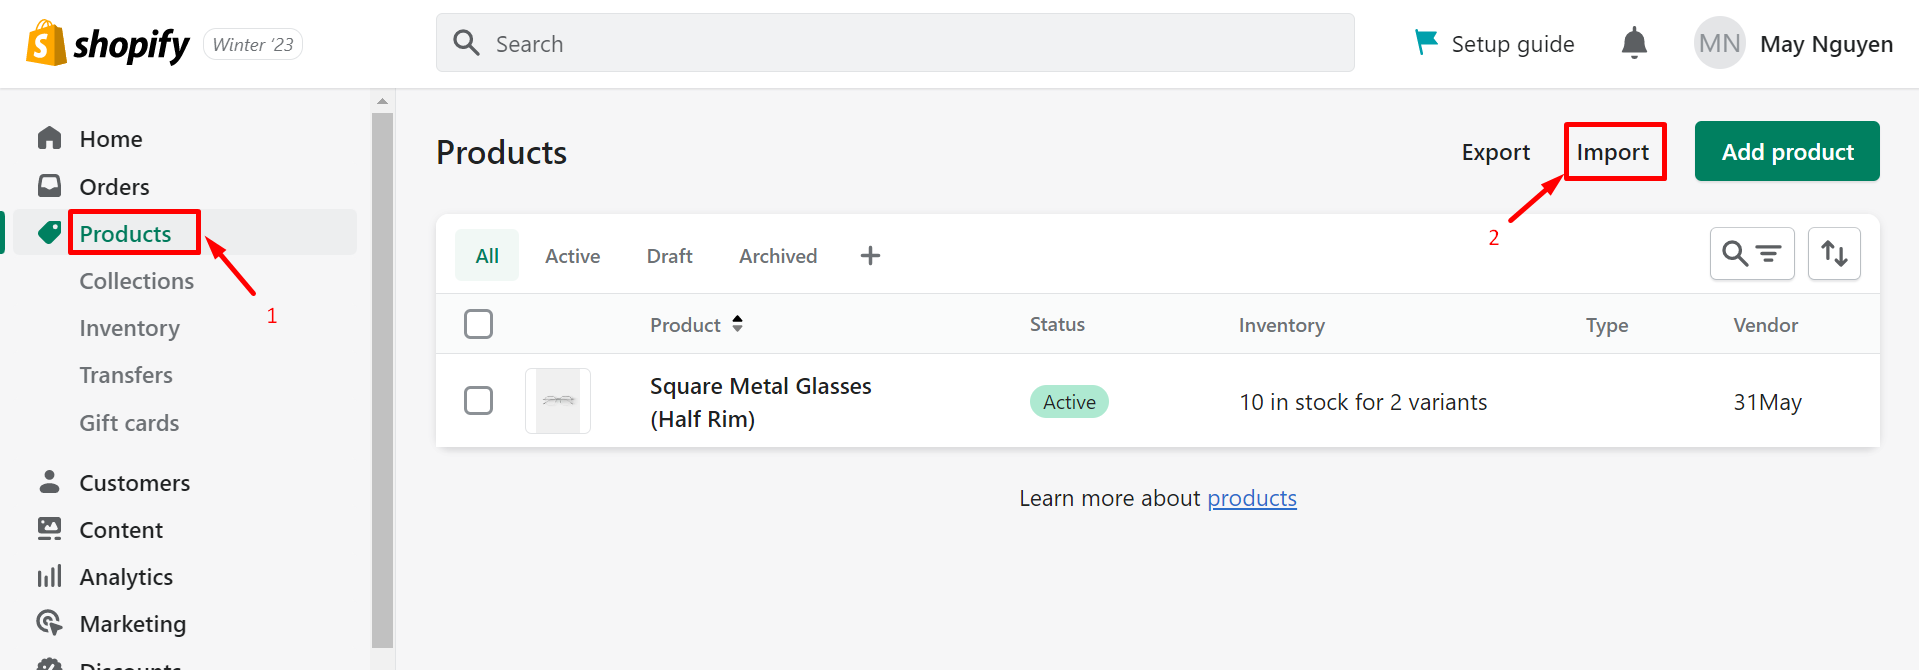
Step 1: From your Shopify admin, click on Products.
Step 2: Click on Import.
Step 3: Select the CSV file you want to import.
Step 4: On the Import Products page, Shopify will ask you to map your CSV file columns to the appropriate product fields in Shopify. Make sure to map the Product Category column to the appropriate field in Shopify (follow the 38 columns rule) like the template above. You can even download a Shopify sample CSV template to check if you have filled it correctly.
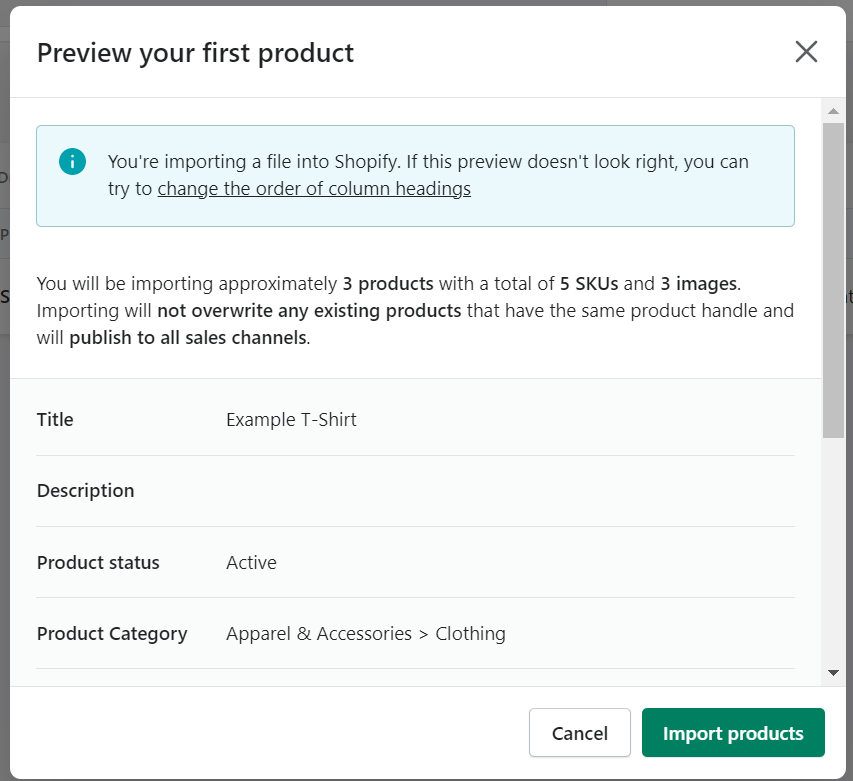
Step 5: Review and confirm the import settings, and click on Import products to import the products and their categories.
Common Misunderstandings When Adding Categories in Shopify
You can make several mistakes due to not clearly understanding when dealing with both website and product categories in Shopify. Let’s clear up the top 6 common misunderstandings that you may occur
Confusing website categories with product types
The first and typical one is not distinctly identified between the 2 types of categories.
Website categories are used for navigation and organization purposes on your storefront, while product types are used to group similar products together for reporting purposes. Confusing these two concepts can lead to mismanagement of your product listings.
Creating too many website categories
While it may seem helpful to have a lot of categories to organize your products, too many categories can actually make it harder for customers to find what they are looking for. It’s important to strike a balance between having enough categories to organize your products effectively and not overwhelming your customers with too many options.
Failing to use subcategories
Subcategories can help customers navigate your store more easily by allowing them to refine their search within a specific category. Failing to use subcategories means adding too much, or too little, and creating unnecessary or irrelevant subcategories, which can make it harder for customers to find what they are looking for.
Neglecting the importance of product descriptions
While categories can help customers find what they are looking for, it’s important to have clear and descriptive product descriptions to help customers make informed purchasing decisions. Neglecting the importance of product descriptions can lead to high return rates and dissatisfied customers.
Assigning incorrect tax rates to product categories
It’s important to assign the correct tax rates to your product categories to ensure that your tax calculations are accurate. Assigning the wrong tax rate can result in overcharging or undercharging customers.
Not regularly reviewing and updating categories
As your business evolves, your product offerings may change, and it’s important to regularly review and update your categories to reflect these changes. Failing to do so can lead to confusion & frustration for your customers, and also make it harder for you to manage your products.
Tips for Utilizing Categories in Shopify
Tips for Utilizing Website Categories in Shopify
- Use descriptive names: Make sure to use clear and descriptive names for website categories to help customers easily navigate and find what they are looking for.
- Use website categories to create a clear and intuitive navigation structure on your storefront. Group related products together under relevant categories, and use subcategories to further refine the product listings.
- Consider using website categories to highlight product collections or promotions. Create categories specifically for seasonal or sale items, and feature them prominently on the storefront.
- Use analytics to refine your categories: Use Shopify’s built-in analytics to track which website categories are the most popular and adjust your categories accordingly. This will help ensure that your categories are relevant and useful to your customers.
Tips for Utilizing Product Categories in Shopify
- Use product categories to ensure accurate tax and shipping calculations. Assign each product to the appropriate category based on its physical properties, regularly review, and update the categories as needed.
- Regularly review and update your product categories to ensure they are up-to-date and accurate. As the list of Shopify Product Taxonomy changes or your business evolves, your product categories may need to be adjusted to reflect these changes.
Conclusion
By adding both categories to your Shopify store, you not only make it easier for customers to navigate and find the products they want. But also make it easier for you and Shopify to manage all the product-related information like tax or shipping fees. With the steps outlined in this blog post, we have answered your question about how to add categories in Shopify. And following carefully, you can create categories and subcategories that suit your store’s needs and help improve the shopping experience for your customers. With a well-organized store, you’ll be one step closer to building a successful online business. So why wait? Start adding categories to your Shopify store today.
If the many steps are too tricky and time-consuming, you can reach out to Magenest’s team of Shopify experts, who are willing to assist you with any questions, or directly refer to our Shopify development services to know more detailed information and get more insight about our ability through implemented projects.