Within the Shopify platform, several essential pages are fundamental to every online store, such as the Home Page, Product Page, Contact Us, and About Us Page, among others. Each of these pages plays a vital role in mapping out your unique sales journey. However, this standard set of pages may not fully cater to your specific needs. Each store has its distinct sales journey, often requiring specialized pages that Shopify’s default selection doesn’t encompass. Consequently, you find yourself faced with the task of creating these unique pages from scratch, a process that can be both time-consuming and resource-intensive. Recognizing this challenge, this blog post aims to provide you with a practical and cost-effective solution to add pages to Shopify store swiftly.
Table of Contents
What Are Shopify Pages?
Definition
Shopify pages are the foundation of your online store’s content and navigation. They include essential pages like Homepage, Product pages, Contact page, and more, providing a complete website framework. These pages serve various purposes and play a crucial role in creating a well-organized and informative eCommerce website. You can customize them using Shopify’s theme editor, and they adapt to your chosen theme, though customization has some limits.
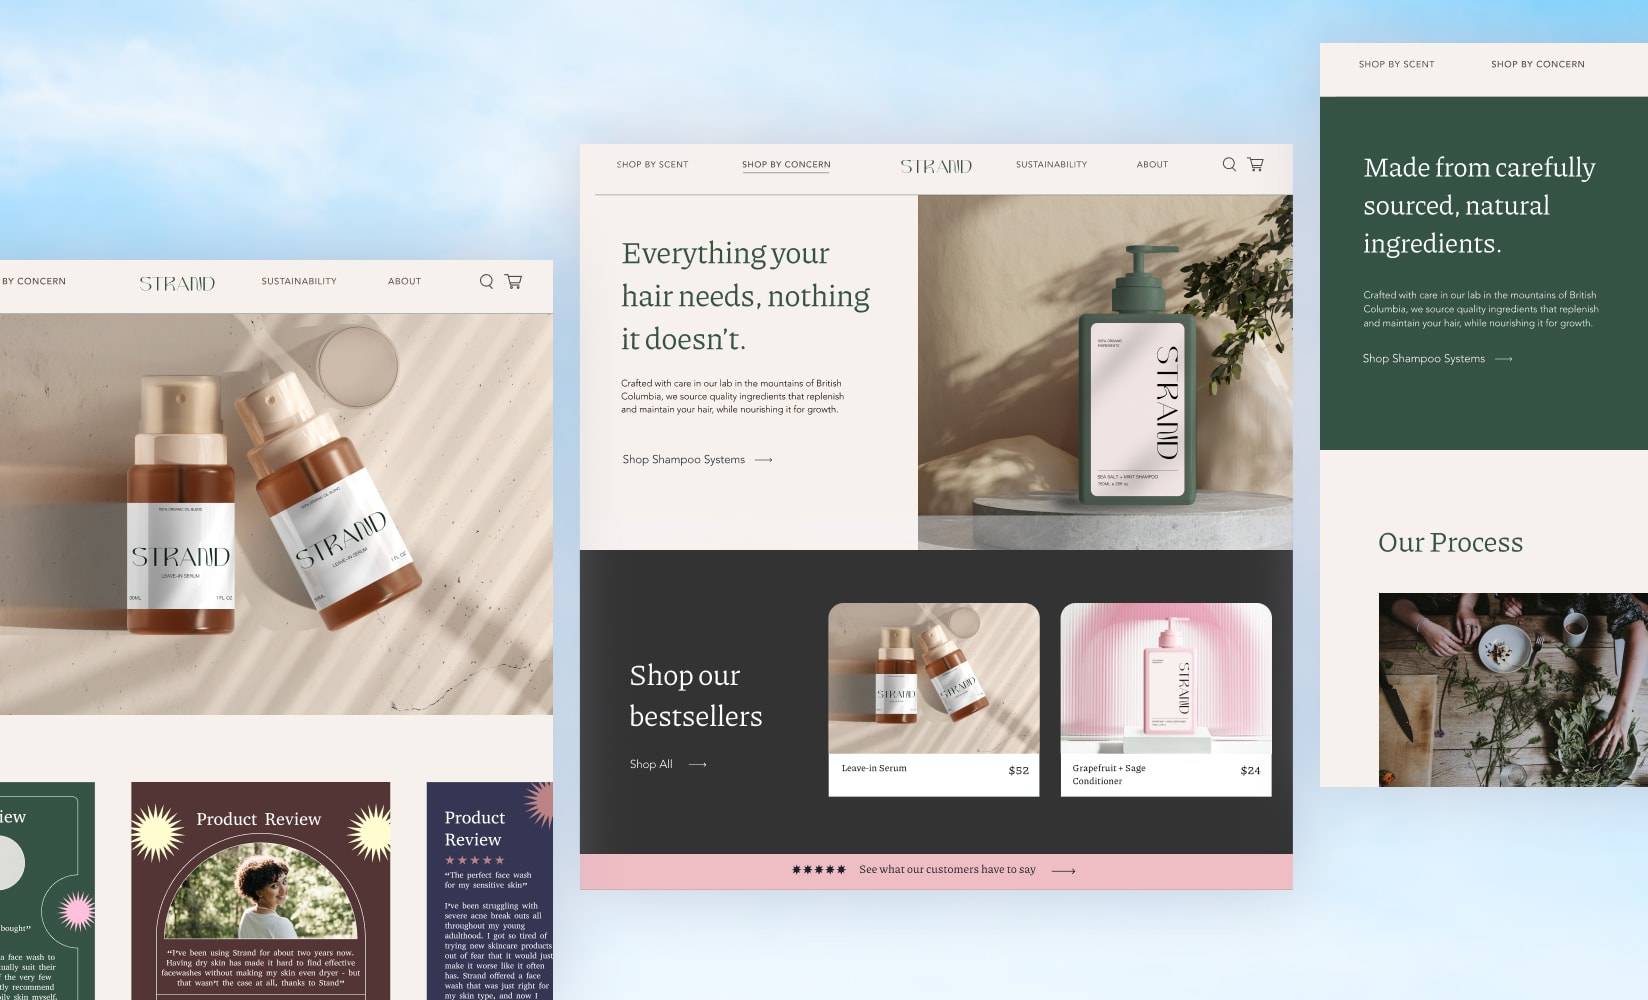
Many themes are free, allowing easy experimentation with page appearance. Shopify pages are responsive, ensuring they look great on all devices. These features aim to simplify platform use, store design, and quick online business launch. Now, let’s delve deeper into each page’s unique functions and effectiveness.
Types of Shopify Pages for Your Store
In Shopify, there are several types of pages you can create for your online store to effectively convey information and engage with your customers. Here are the main types of Shopify pages.
Homepage
The Shopify homepage is pivotal. If it’s not appealing and functional, potential customers may leave your site quickly. Fortunately, Shopify provides extensive customization options for the homepage through the theme editor. While all Shopify pages offer customization to some degree, the homepage receives the most attention in terms of flexibility and personalization. Make it your first focus, as it’s the gateway to future sales.
Use the Shopify theme editor. Customize options on the left reflect in the live preview on the right, but remember to save changes before publishing. Customization options vary by theme, so choose one that aligns with your brand and invest time in perfecting your Shopify homepage to ensure it’s visually appealing and effectively conveys your message.
Collection Pages
Shopify collection pages serve as the hub for organizing your product categories. Categories may include items like sweaters, women’s apparel, gifts for dad, seasonal sale items, and more. While they might initially seem perplexing for new merchants, the process is straightforward. You need to input your actual products into the Shopify admin and then add them to your collections. Don’t worry, we have a concise guide in the next section on creating collections and ensuring they appear correctly on your Shopify Collection page.
Product Pages
Shopify product pages provide a canvas to showcase your products with stunning images, customizable variants, clear pricing, shipping details, and comprehensive descriptions. Keep in mind that the product page is often the last stop for customers before making a purchasing decision. If it falls short at this critical juncture, it can be detrimental to your business. Some themes offer further customization options through the theme editor, allowing you to refine this pivotal page.
About Us Page
Some merchants mistakenly view the About Us page as a mere formality for websites, assuming it doesn’t significantly impact conversion rates or brand loyalty. However, this perspective is entirely wrong. In today’s era, consumers seek a connection with the brands they support and often align their values with them. Consequently, the Shopify About Us page stands as the most effective and suitable means to build trust and communicate precisely who you are and the driving force behind your business to your valuable customers.
Contact Us Page
Customer support is a crucial element of modern eCommerce. However, the question arises: How can you assist your customers if they cannot reach you? The Shopify Contact Us page is the answer. Like other Shopify pages, this page should go beyond basic contact information and location details. In fact, it can serve as an excellent platform to strengthen your brand narrative, provide frequently asked questions (FAQs), or gather email subscriptions.
FAQ Page
The Shopify FAQ Page plays a critical role in retaining and guiding online shoppers. Recognizing that unanswered questions can lead potential customers to seek alternatives, this page is designed to gather the most common queries and provide comprehensive answers. Addressing customer concerns thoroughly ensures a seamless shopping experience and encourages visitors to continue exploring your offerings.
Blog Pages
Content marketing serves as a foundational strategy for boosting organic website traffic. The most effective approach involves consistently crafting relevant blog posts that offer value to your audience and address their specific pain points.
Shopify’s blog page serves as an excellent platform to streamline this marketing endeavor. It allows for easy organization of blog posts in chronological order and offers various display options on the page. Additionally, creating and publishing blog content on Shopify is simplified with a range of tools and features that facilitate SEO optimization and enhance the overall presentation of your articles.
Policy Page
Policy pages are a crucial component of any eCommerce website. They serve as a means to provide customers with a comprehensive understanding of your terms and conditions, playing a pivotal role in reducing customer support inquiries. By clearly outlining policies related to refunds, returns, exchanges, and shipping, you empower your customers with the necessary information to make informed decisions and navigate their shopping experience confidently.
How to Add Content Pages on Shopify
To kickstart the construction of your online store, you require a variety of pages, ranging from the fundamental to the more specialized ones. Let’s commence with the foundational pages before delving into product and collection pages. Here’s a straightforward guide on adding pages to Shopify store, whether it’s your FAQ page, Contact Us page, or policy pages, all in a few easy steps.
Step 1: Log in to Your Shopify Admin
First and foremost, let’s get started by accessing the Shopify dashboard. If it’s not already bookmarked, simply visit shopify.com and click on Log in.

In case you do not currently have a Shopify store, you must sign up for Shopify and create a basic Shopify store.
Step 2: Go to Online Store > Pages
Once you’re in the Shopify admin dashboard, navigate to the left sidebar and click on Online Store.
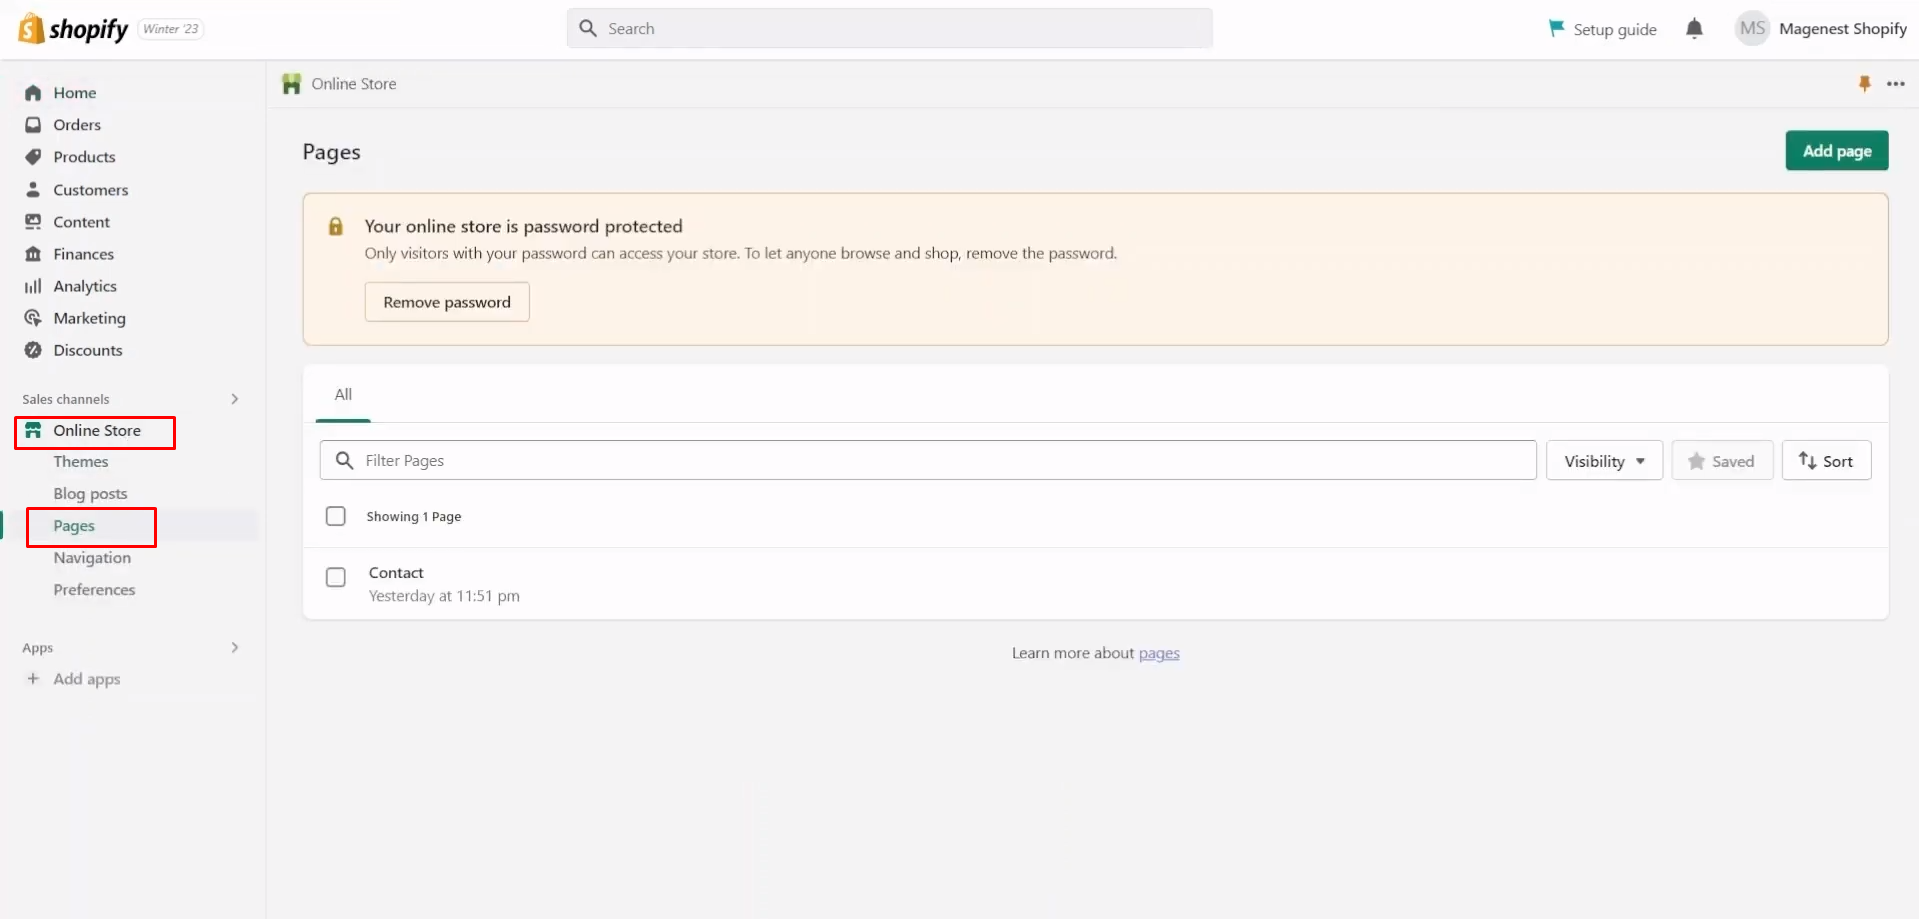
From the dropdown menu under Online Store, select Pages. This will take you to the Pages section where you can manage your existing pages and create new ones.
In the top right corner of the page, you’ll spot a convenient button inviting you to Add page.
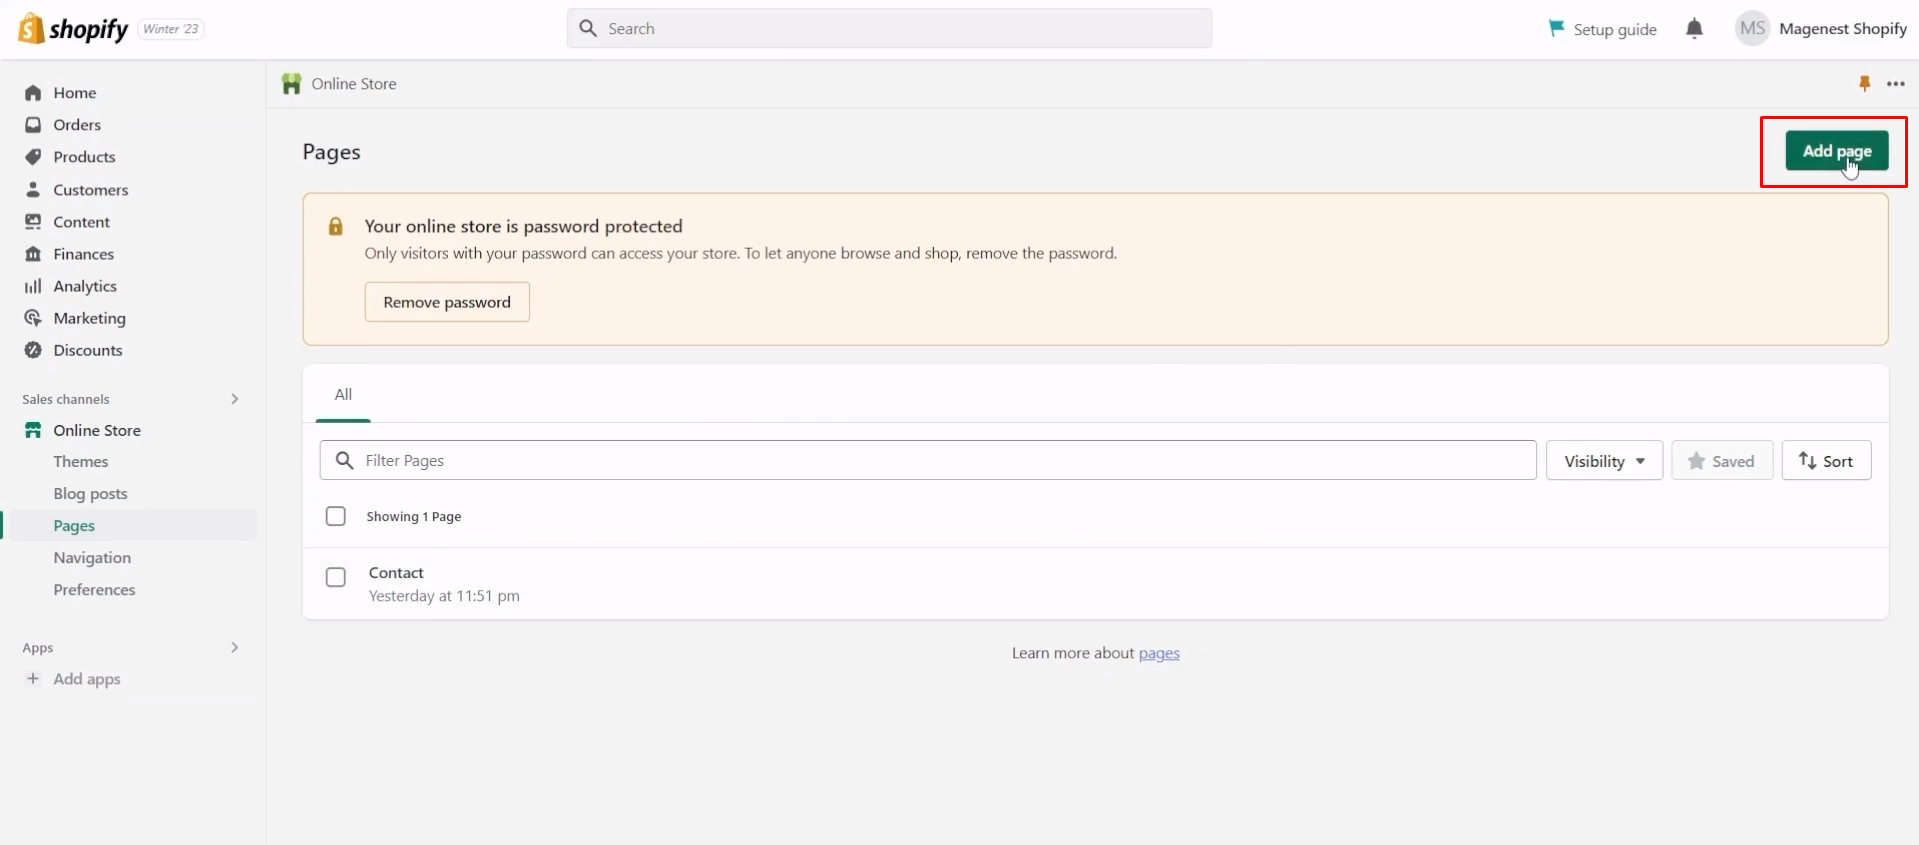
Click on that button, and you’ll be directed to the page creation screen.
Step 4: Set Up Your New Page
Now, you can initiate the creation to add page to Shopify store. Begin by entering the title and proceed to input the page content in the provided fields below.
By this stage, you should have a clear idea of the type of page you’re creating, but Shopify offers helpful suggestions in the empty title field (Contact us, Sizing chart, FAQs).
You also have the option to select a theme template that aligns with your current Shopify theme and any associated apps that generate templates.
In the page editor, provide a title for your new page. This title should be relevant and descriptive. Below the title, you can add the content for your page. Use the content editor to add text, images, videos, and any other elements you want to include on the page.
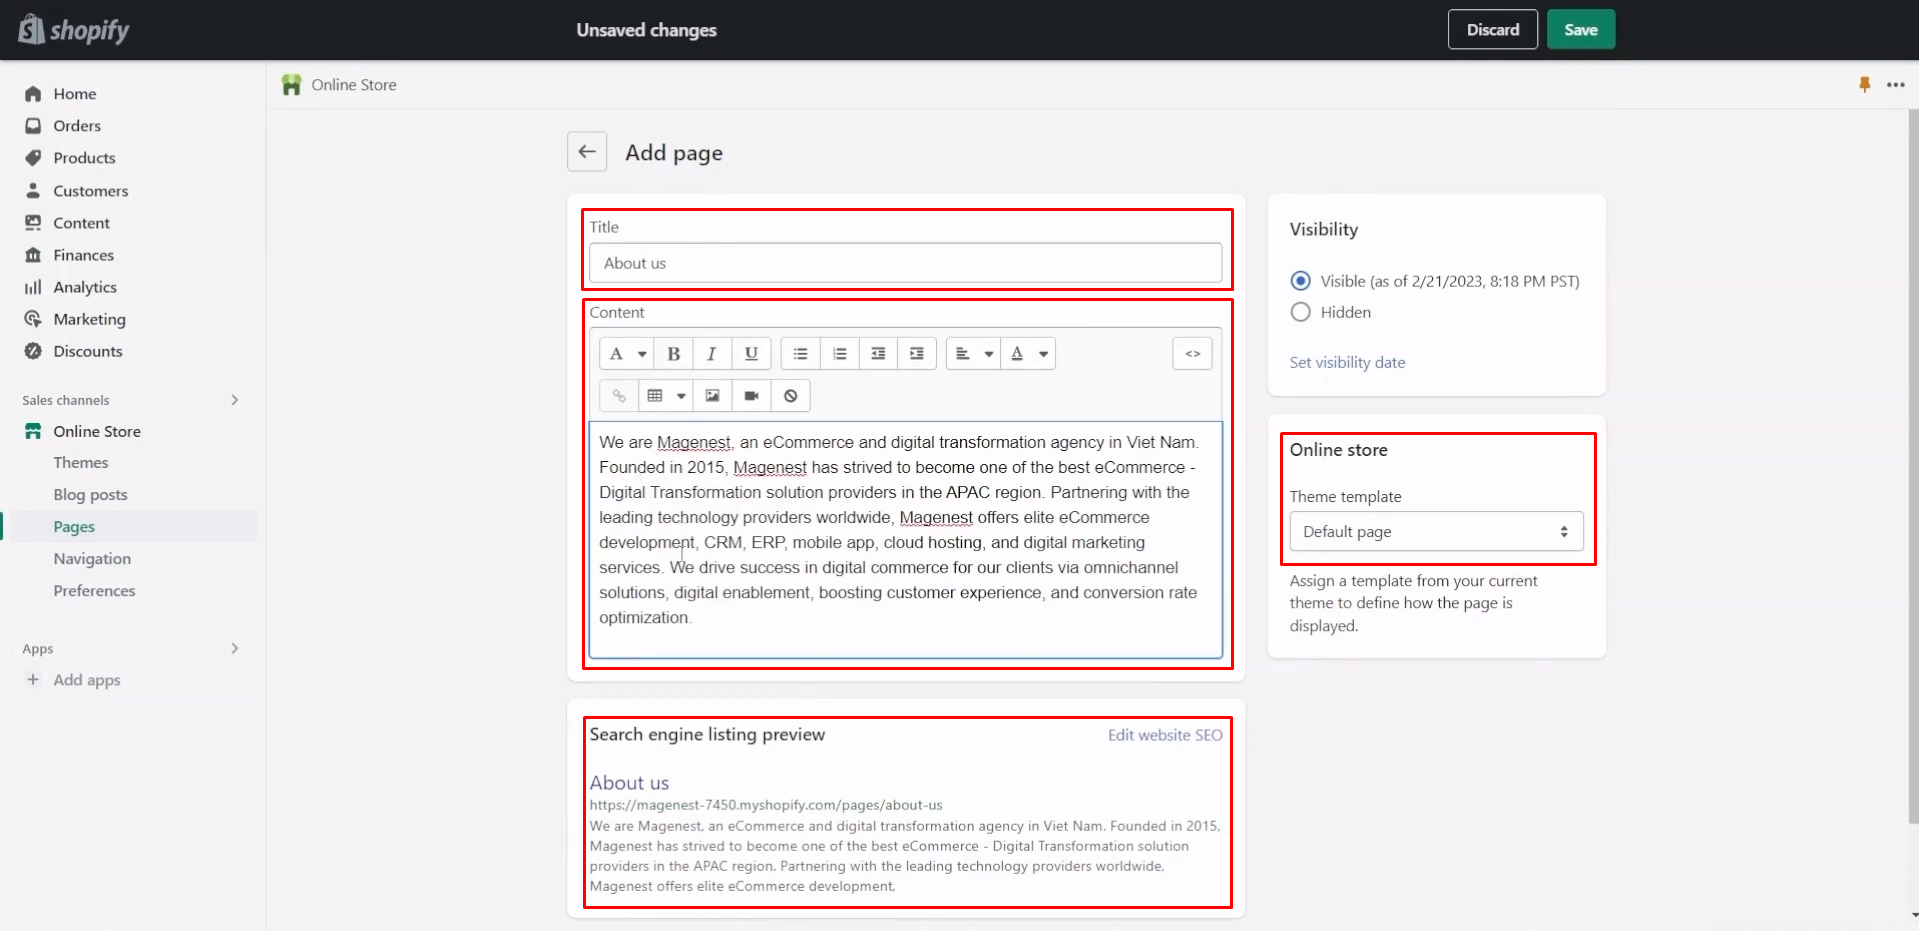
After entering these details, you can further customize how your page appears on search engines like Google. While it will automatically include your title and page content, this feature provides greater control over your SEO efforts by enabling you to edit the title, meta description, and URL handle. It’s recommended to make these edits for enhanced optimization.
Shopify will automatically generate a URL based on your page title. You should edit this URL to make it concise and keyword-rich. The handle is the end part of the URL, and you can edit it as well.
The meta title and meta description should contain relevant keywords and provide a concise summary of your page’s content. According to Google guidelines, your meta title should be limited between 55 to 65 characters while meta descriptions should not exceed 160 characters.
Step 5: Set Page Visibility and Publish
Last but not least, you have the option to determine whether your page is Hidden or Visible on your store.
By default, it will become visible immediately upon saving your page. However, you can also schedule it to become visible at a later date by selecting Hidden and specifying the date you want it to be published.
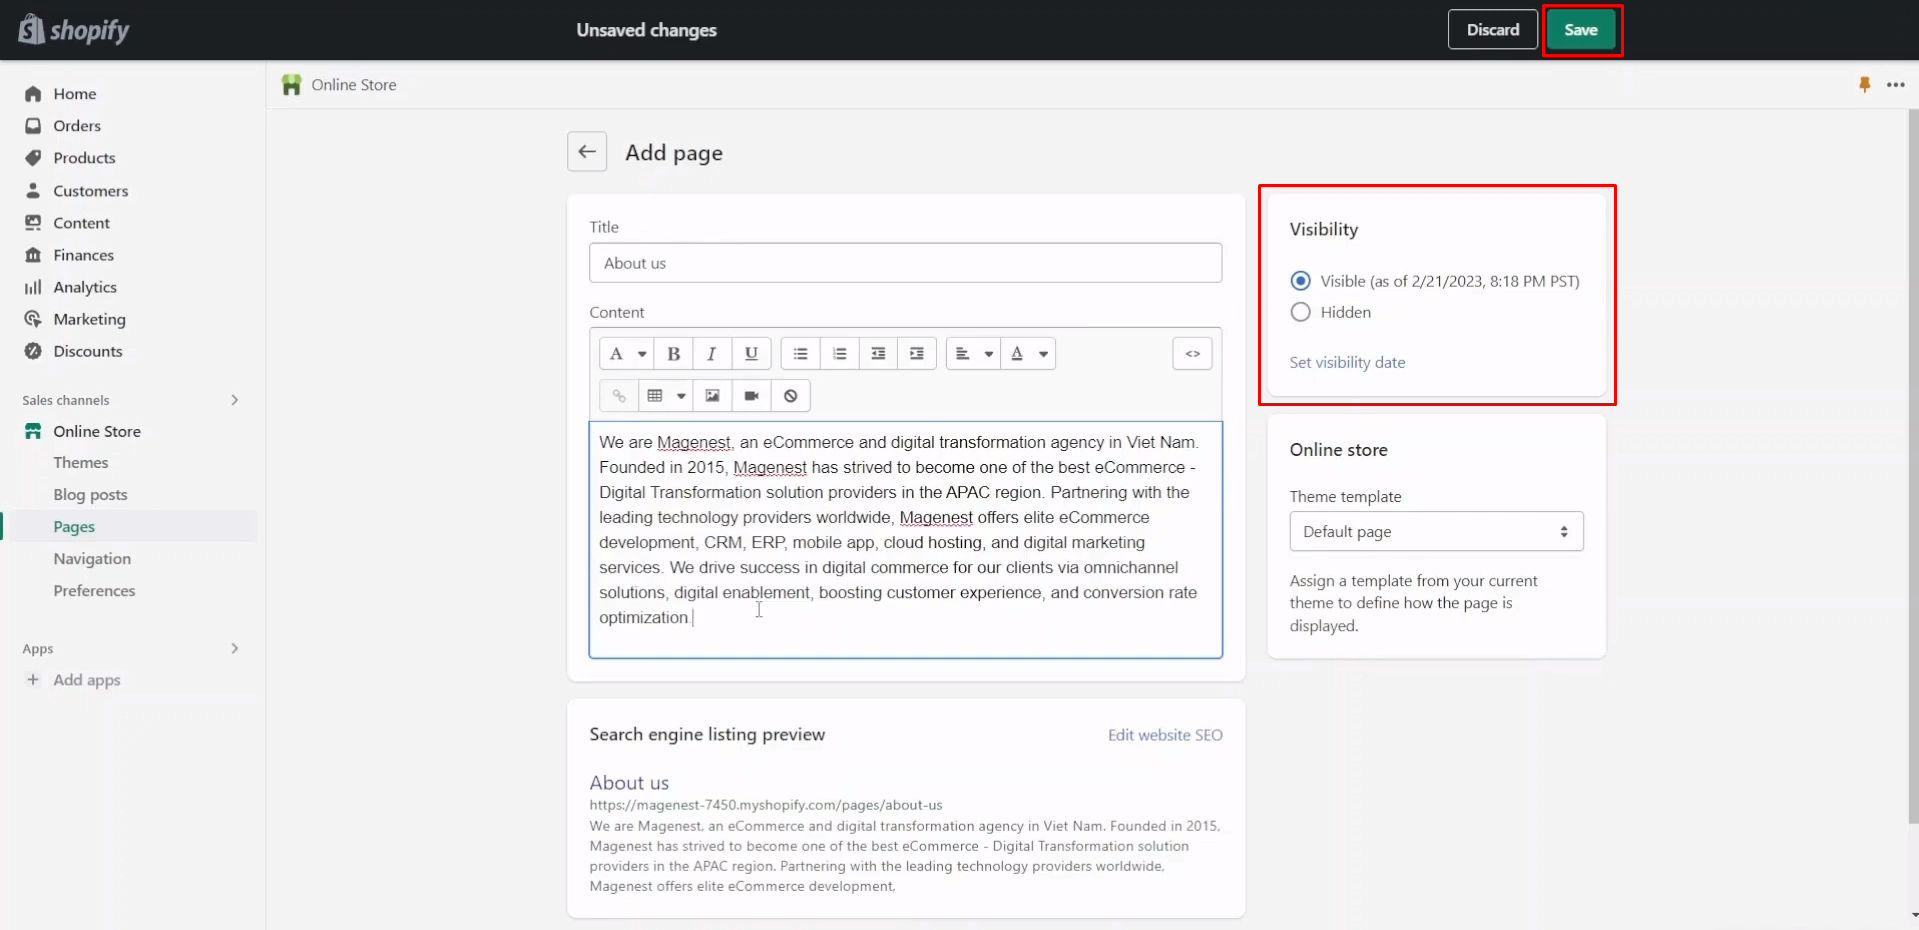
Once you complete all the necessary fields and are satisfied with the content, click the Save or Save and View button to save your new page. Your page is now part of your Shopify website.
After getting through the process of how to add a page to your Shopify store, you can further customize its appearance using Shopify themes and promote it through your website’s navigation menus, homepage, or marketing campaigns.
How to Add a Product Page on Shopify
A Shopify Product Page serves as a comprehensive product display platform, offering detailed information to showcase a company’s product’s unique features and competitive advantages to customers.
These pages offer numerous advantages to businesses, including increased conversion rates, improved search result optimization, enhanced brand reputation, and more. Consequently, they hold a pivotal position among Shopify’s most crucial pages. Here’s a step-by-step guide on how to add a page to Shopify store.
Step 1: Go to Products on the Lefthand Dashboard Menu
Access your Shopify dashboard, and in the left-hand menu, select Products.
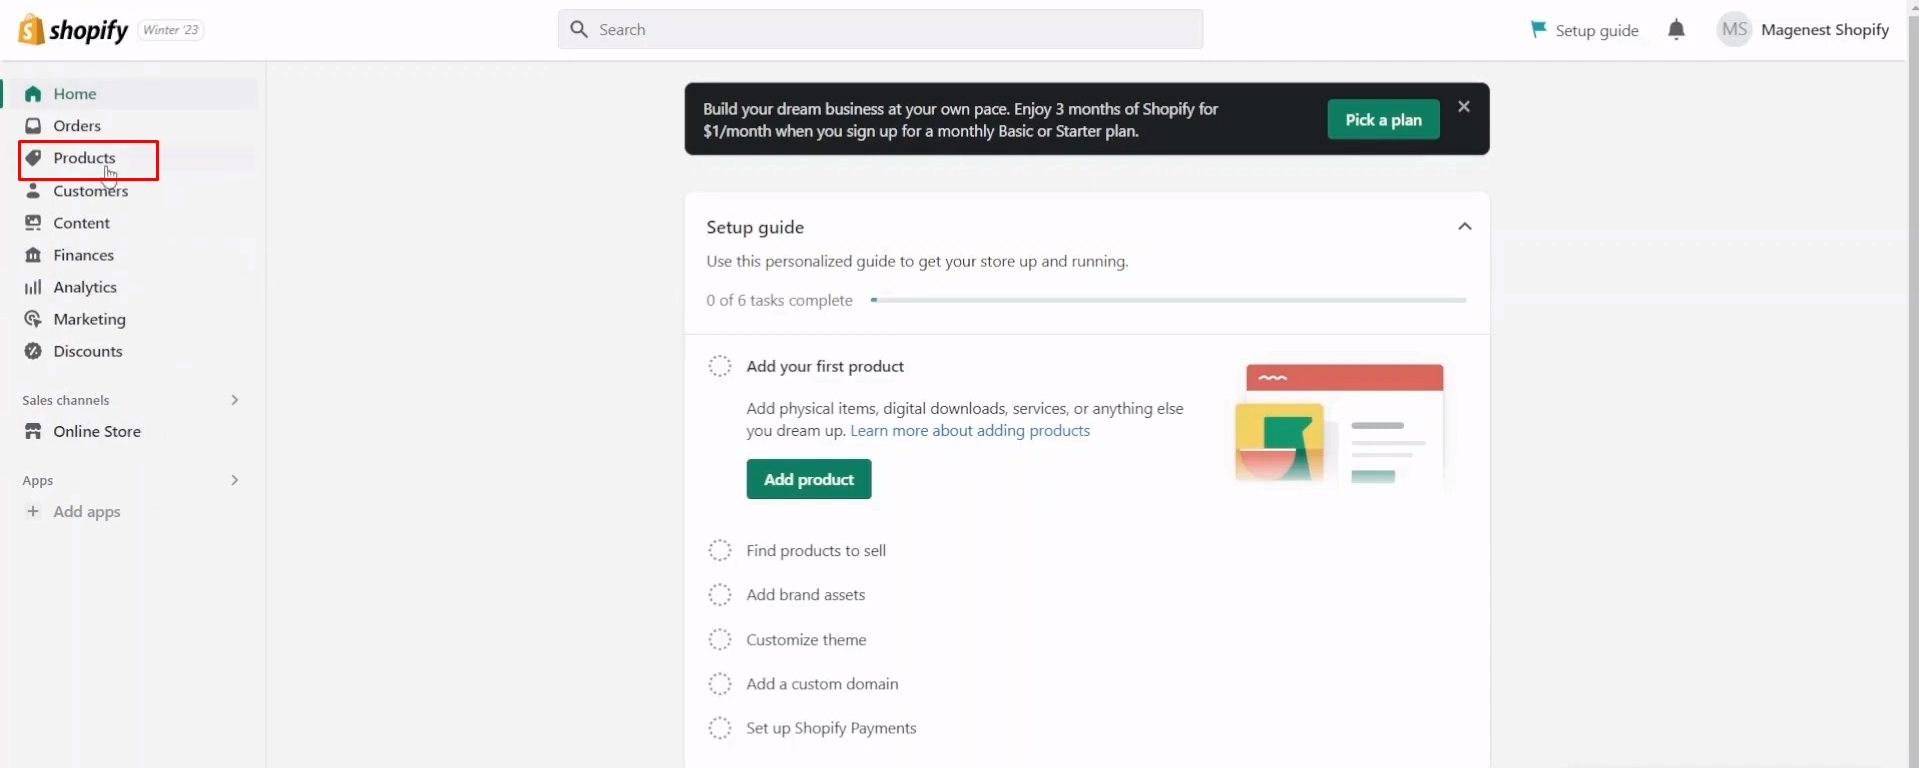
This section is where you manage all your product data, including inventory tracking. For now, we’ll focus on adding a product and completing its details.
Step 2: Click the Add Product Button
In the Products section, you’ll see an option to Add product. Click on this button to begin creating a new product page.
Step 3: Add Product Title, Description, and Images
Once you reach the product detail page, you’ll encounter the Title, Description, and Media sections.
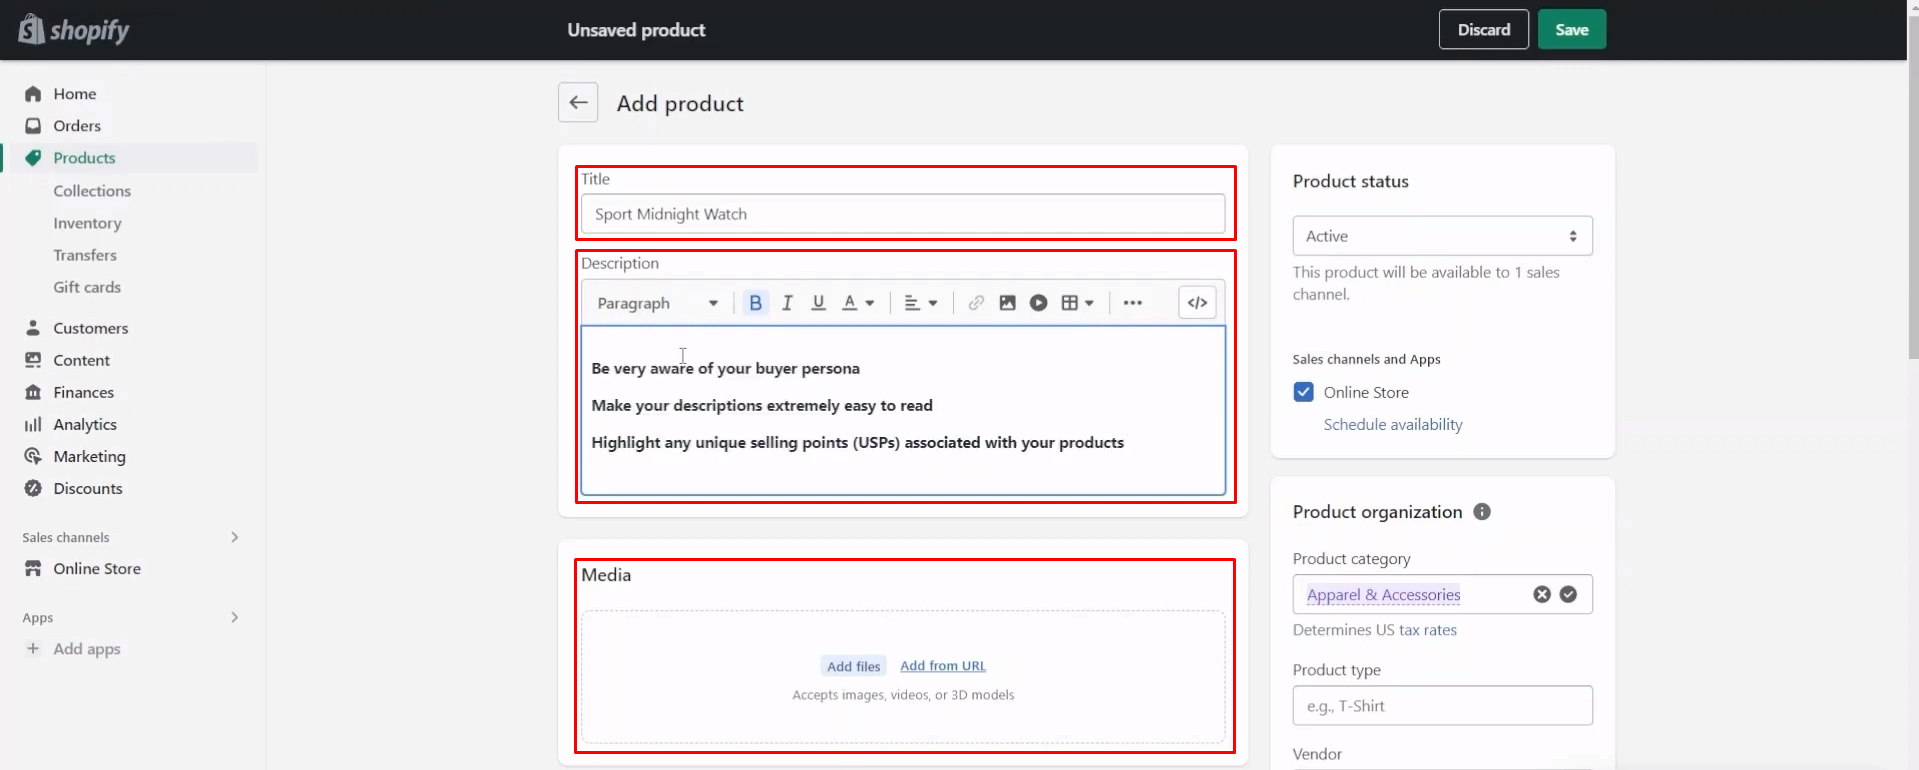
Begin by entering your product’s name as the title, craft a compelling product description, and include captivating product photos and other media that entice customers to click the buy button.
- Title: Provide a descriptive and catchy title for your product.
- Description: Write a detailed product description that highlights its features, benefits, and any important information.
- Images and Videos: Upload high-quality images and videos of your product to showcase it effectively.
If you’re utilizing multiple sales channels like Facebook, Instagram, Walmart, Amazon, or the Buy Button, you can also specify where this new product will appear.
With the primary product page information in place, it’s time to attend to the finer details of your product.
Step 4: Enter All Your Product Details
Selling your products necessitates meticulous attention to detail. These particulars assist in product organization, inventory management, shipping cost calculation, and various other essential aspects of your online business.
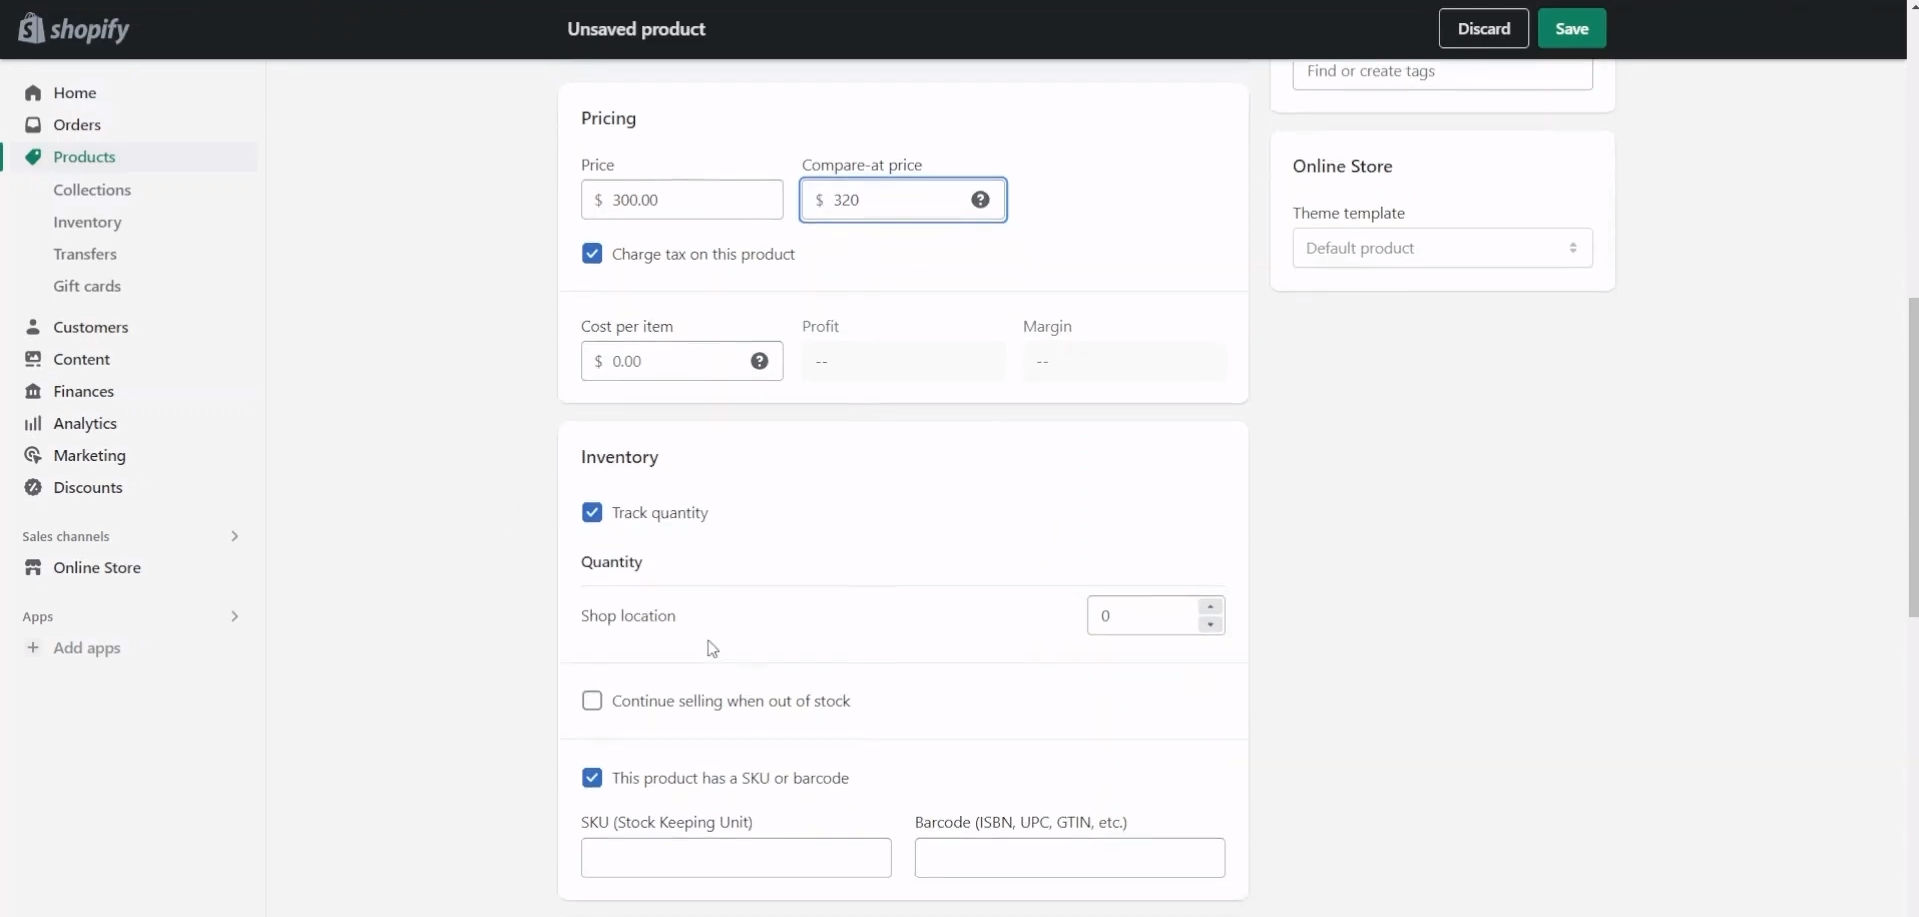
Here’s a comprehensive list of the information you can incorporate into your product data to facilitate your selling process:
- Pricing: Set the price of your product, including any variations or options.
- Inventory: Track your product’s inventory by specifying the quantity available.
- Shipping: Configure shipping options, including weight and dimensions if applicable.
- Variants: If your product comes in different variations (e.g., sizes, colors), create variants with their own prices and inventory levels.
- Tags: Add relevant tags to categorize your product for easy searching.
- SEO: Optimize your product page for search engines by adding a meta title, meta description, and URL handle.
- Collections: Assign the product to relevant collections or categories for better organization.
Step 5: Configure Page Visibility and Publishing
Choose whether the product is Active or Draft. An active product is visible to customers, while a draft is not. Set a publication date if you want to schedule the product to go live at a specific time.
Once you’ve filled in all the necessary product details, click the Save or Save and View button to save your new product page. The product is now part of your Shopify store.
How to Add a Collection Page on Shopify
Similar to product pages, collection pages are generated by creating a new product collection. Collections are clusters of products organized according to your specific criteria, whether it’s products tagged as knits, items under specific prices suitable for gifting, or a recently launched product line, your choice. You can assemble collections by manually adding individual products or automating the process based on defined rules.
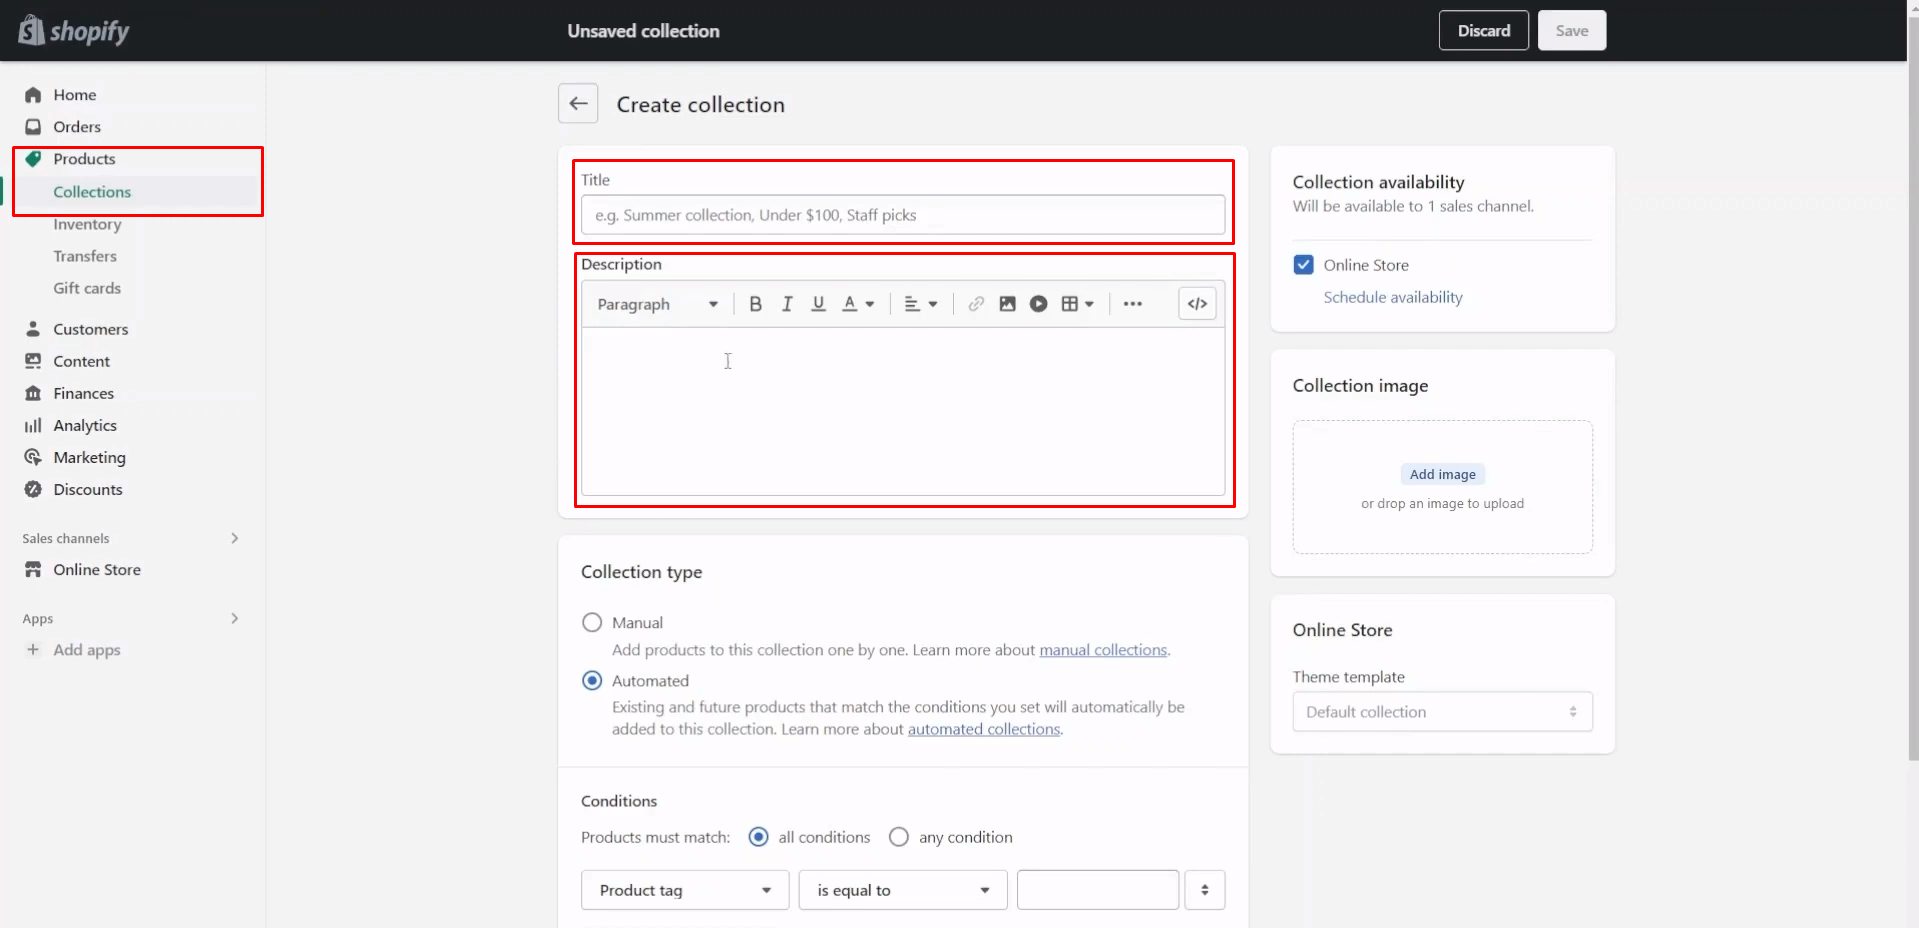
Shopify collection pages serve as the platform to showcase these curated product groups. They encompass a title, description, and an optional image that acts as the header background. Rather than sifting through individual product pages, shoppers can browse collection pages to streamline their search for the desired items. Follow these steps to add a collection page:
- From your Shopify admin dashboard, navigate to the left sidebar and click on Products.
- In the Products section, click on Collections to manage your collections and create new ones.
- To add a new collection, click the Create collection button.
- Give your collection a clear and descriptive name. This name will help customers understand what products are included in the collection.
- To populate your collection, you can add products manually or set up automatic conditions based on product attributes like tags, vendor, price, or type.
- Customize the appearance of your collection page by selecting a theme template that aligns with your store’s design. You can also add a featured image for the collection, which will be displayed at the top of the page.
- You can choose how products within the collection are sorted, whether it’s by best-selling, price, or other criteria. This helps customers easily find what they’re looking for.
- Optimize your collection page for search engines by editing the meta title, meta description, and URL handle. This ensures better visibility in search results.
- Once you’ve configured all the necessary settings and added products, click the Save or Save and View button to create the collection.
For intuitive guidance, our step-by-step guide on adding pages in Shopify is here to empower you. Whether you’re a seasoned Shopify user or just starting, this step-by-step tutorial provides valuable insights to help you manage and customize your store pages seamlessly.
How to Customize Shopify Pages
You might have come across information suggesting that customizing Shopify pages can be somewhat limited. Historically, this was done to ensure optimal performance and streamline the store-building process. However, it’s important to note that significant progress has been made over the years in terms of enhancing the control and design flexibility of your store.
Thanks to the introduction of third-party integrations, the possibilities for creating fully customized storefronts have expanded dramatically. Let’s explore the two primary options for customizing Shopify pages.
Utilizing the Shopify Theme
We’ve previously touched on the theme editor and its role in customizing Shopify Pages, but it’s equally crucial to know how to discover and install new themes for your store. Access the Shopify theme store to explore this.
Essentially, these are templates accessible to Shopify merchants, available in both paid and free options. They are applied to a Shopify store to alter its appearance and functionality. These themes are designed to be responsive across all devices and offer diverse customer experiences. You’ll have various filter and search options at your disposal. We recommend starting by sorting themes by free and experimenting with some that seem suitable for your store.
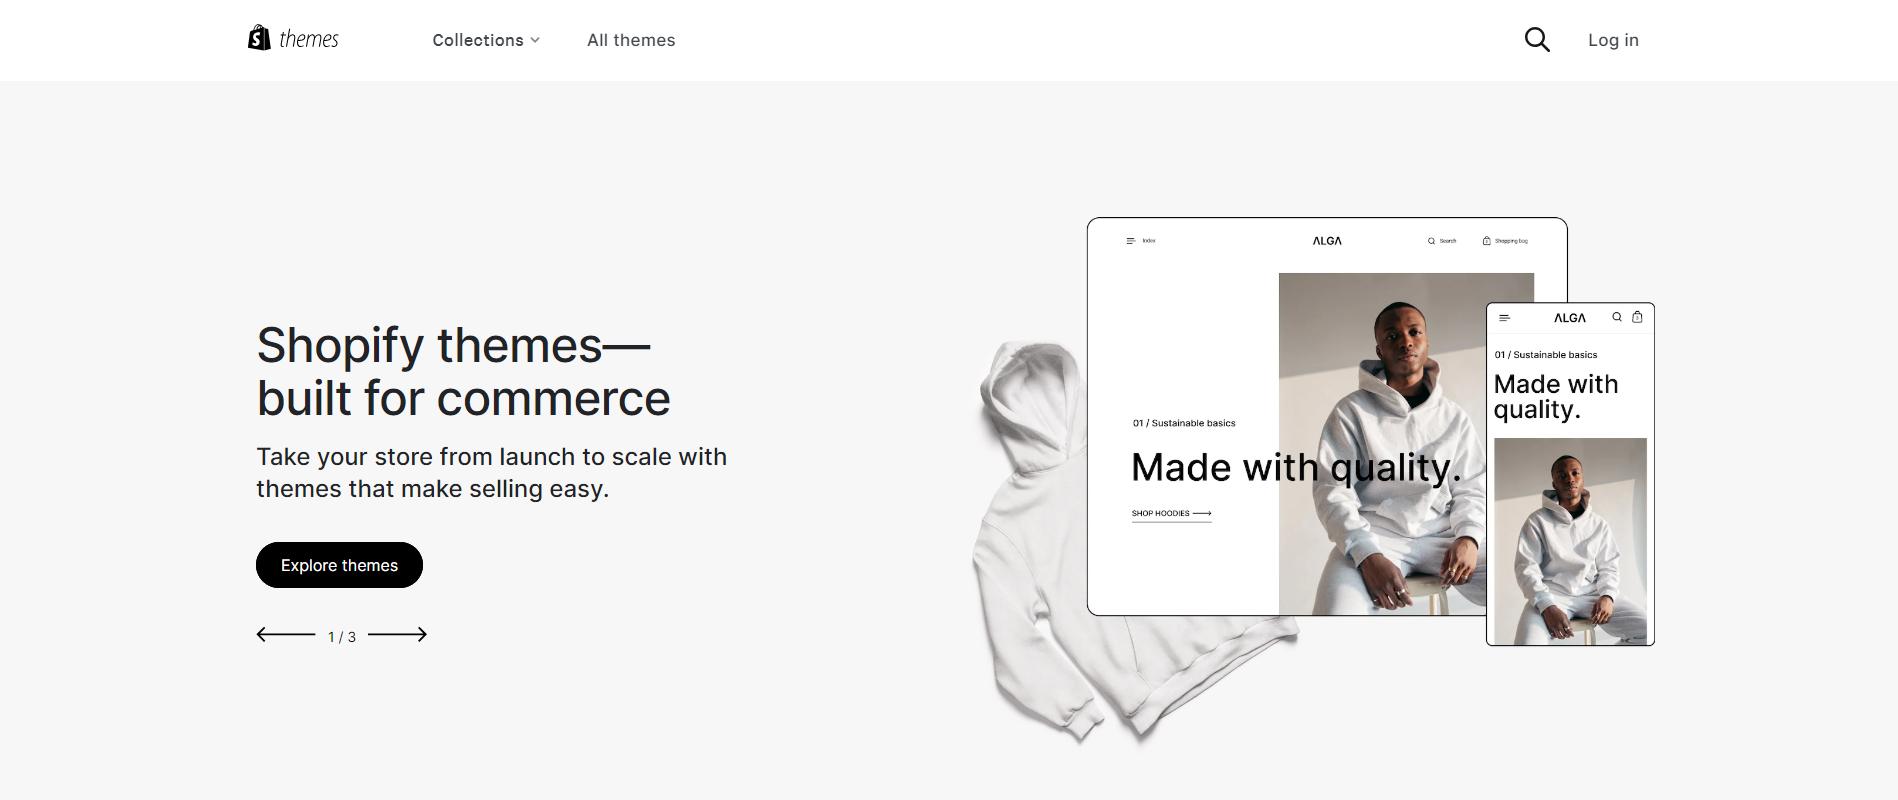
To proceed, simply click on the theme you prefer, take it for a test run if you’d like, and then select Start with this theme. Follow the subsequent steps and complete the fields to add the theme to your store.
Now, as depicted above, access your Shopify admin, navigate to online store > themes > choose the theme from the options on the right.
It’s beneficial to experiment with free themes to understand how they’ll impact your store and determine which one is the best fit. For paid themes, they typically offer a more extensive range of options and can cater to specific industries and goals.
Using the Shopify App
Customizing your Shopify store pages using Shopify apps can significantly enhance their functionality and appearance. Here’s a guide on how to utilize Shopify apps for customization:
- Shopify App Store: Visit the Shopify App Store and search for apps that offer customization features for your store page. Some popular options include PageFly Shopify Page Builder, Shogun, and GemPages.
- Install the App: Select the app that best suits your needs and click on it. Then, click the Install or View demo button to initiate the installation process or check the app before integrating it into your live store.
- App Configuration: Follow the app’s setup instructions to integrate it with your Shopify store. This typically involves granting necessary permissions and connecting the app to your Shopify account.
- Access the App: Once the app is installed and configured, access it through your Shopify admin dashboard or the Apps section.
Best Practices to Add Pages to Shopify Store Effectively
Best practices on how to add pages to your Shopify store efficiency are essential to ensure your online store operates efficiently and provides a user-friendly experience. Here are some key tips to follow:
- Clear Organization: Start by organizing your content with a clear and logical structure. Group related pages under appropriate menus or collections. This helps visitors navigate your store effortlessly, improving their overall experience.
- Descriptive Titles: When assigning pages, use descriptive and keyword-rich titles. This not only helps visitors understand the page’s content but also enhances your store’s SEO. Keywords in page titles can improve search engine rankings and attract more organic traffic.
- Regular Review: Continuously review and update your page settings. Ensure they align with your store’s goals and meet user expectations. As your business evolves, so should your page assignments to reflect any changes in product offerings, promotions, or messaging.
- Responsive Design: Test and optimize your assigned pages for different devices and screen sizes. Your store must be responsive, providing a seamless browsing experience whether visitors are on desktop computers, tablets, or smartphones. Responsive design is crucial for retaining and converting mobile users.
- Performance Monitoring: Utilize performance metrics and analytics tools to measure the effectiveness of your assigned pages. Track important KPIs like bounce rate, conversion rate, and user engagement. Analyzing this data will help you identify areas for improvement and make informed decisions about page assignments.
By adhering to these best practices, you can ensure that your Shopify store’s page assignments are well-structured, SEO-friendly, and optimized for user satisfaction. This, in turn, will contribute to the success of your online business and enhance the overall shopping experience for your customers.
In Conclusion,
Adding and editing pages on Shopify is a fundamental aspect of creating a user-friendly and informative online store. By adhering to the step-by-step instructions and incorporating the recommended best practices mentioned earlier, you will have the knowledge and tools necessary to proficiently add pages to Shopify store. It’s essential to recognize that page assignment is not a single event but an ongoing endeavor. Regular upkeep and optimization are crucial to sustain the long-term success and performance of your online store.
If you want to customize more your Shopify store pages and take them to another higher level, it requires all of your technical knowledge and experience with your customers. In this case, enlisting our Shopify website development services is a recommended option. At Magenest, we have multiple Shopify-certified and experienced experts. They excel in implementing custom code to introduce functionalities that might not be accessible through the standard Shopify system.